
Supplies Needed
- 3 zippers, 9" or longer
- fabric for pouch body, accent pieces, and linings (fat-quarters are plenty for the pouch body and linings; accents can be made from scraps)
- fusible fleece
- coordinating thread (which may be more than one, depending on your choice of accent fabrics)
All seams are 1/4”
* Note: The piece indicated is one already partially stitched onto the pouch. Now you will be stitching on the other end; will be a lining piece that you are working with, except for the last instance, where it will be the main body fabric.
Cutting Instructions* Note: The piece indicated is one already partially stitched onto the pouch. Now you will be stitching on the other end; will be a lining piece that you are working with, except for the last instance, where it will be the main body fabric.
1 – main body fabric, 8” x 9 ½”
1 – fusible fleece, 8" x 9 ½” (not shown)
2 – front accent pieces (can be the same or contrasting), 8" x 1 ¼”
2 – pieces fusible fleece, 8" x 1 ¼” (not shown)
6 – zipper ends (all matching or matching pairs), 2 ½" x 3”
1 – main zip lining fabric, 8" x 12 ½”
1 – center zip lining fabric, 8" x 9 ½”
1 – bottom zip lining fabric, 7" x 8”


Preparing Fabric
Adhere fusible fleece to matching fabric piece. (not shown)
Preparing Zippers
Fold and press 1/4" fold in each of the 2 1/2" x 3" fabric pieces, along a 3" edge. Fold each piece in half again so each measures 1 1/2" x 2 1/4".
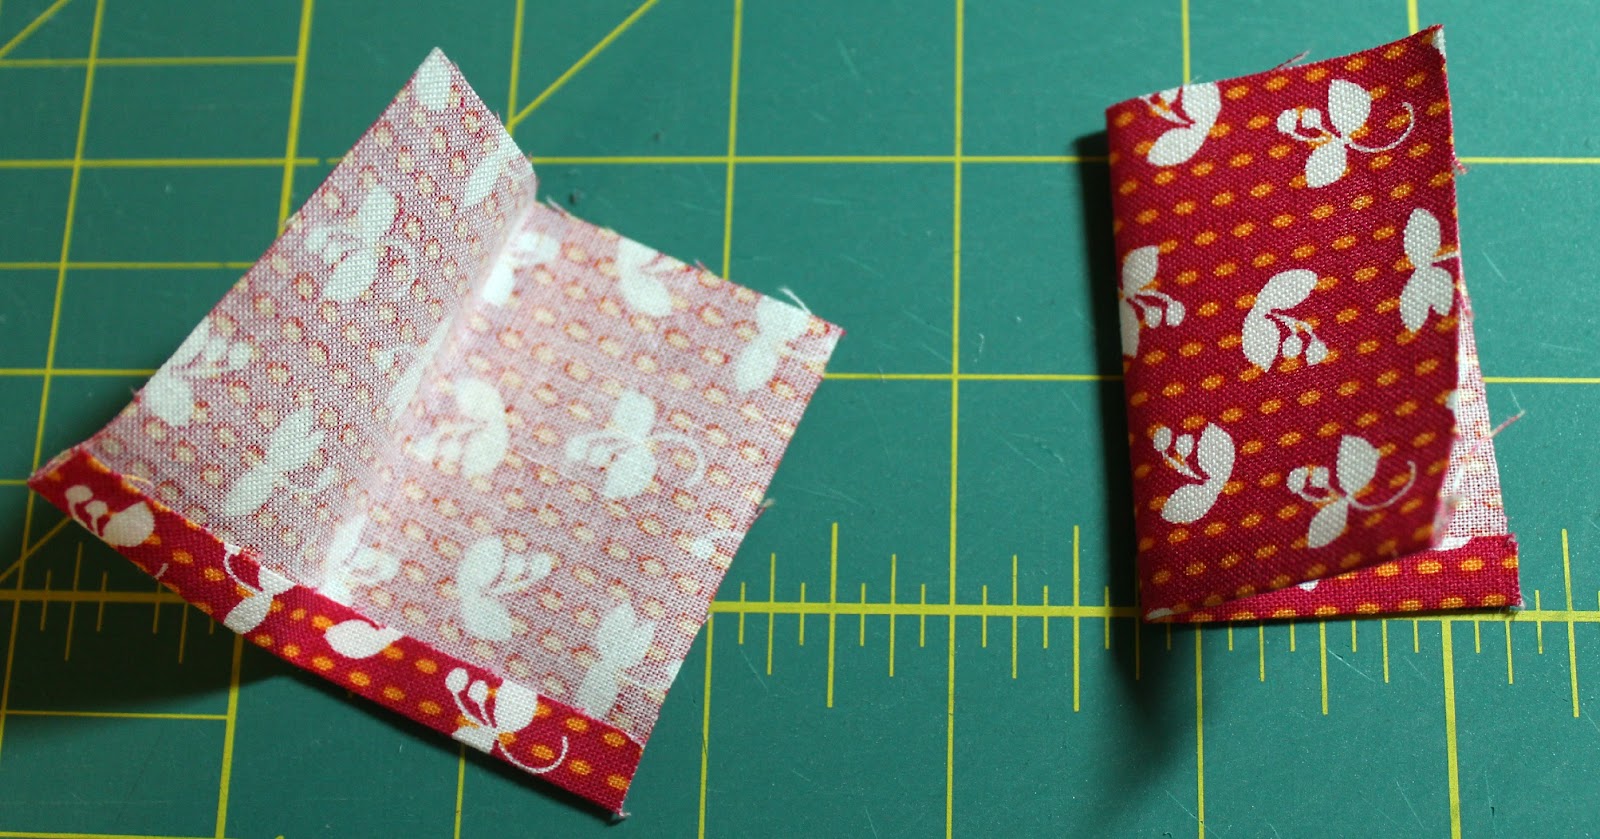
Pin the folded 'tabs' over the zippers so they extend approximately 3/4" in from the edges of the main body fabric. Stitch across each folded edge.


From here forward, zippers will be referred to as #1 (bottom zipper from front view), #2 (center zipper from front view), & #3 (main/top zipper from front view). Bottom edge of each zipper will be referred to as “B”; top edge of each zipper will be referred to as “T”. We’ll be installing the zippers from the bottom up.

Zipper Installation
- For zipper #1B, lay on your work surface, in order given:
Zipper #1 face DOWN, zipper pull to the left
Bottom (smallest) lining face DOWN
Pin well, between layers if needed.


Using a zipper foot, stitch 1/4” seam along length of zipper, removing pins as you go.
(Confession: sometimes I need to sew along until I reach the zipper pull, remove from machine & rearrange the pull out of the way, then continue stitching.)

- For zipper #1T, lay on your work surface, in order given:
Zipper #1 face UP, zipper pull to the left
Accent piece #1 face DOWN
Pin well, between layers if needed.


- For zipper #2B, lay on your work surface, in order given:
Zipper #2 face DOWN, zipper pull to the left
Center (medium-sized) lining face DOWN
Pin well, between layers if needed.

Using a zipper foot, stitch 1/4” seam along length of zipper, removing pins as you go. Once stitched, remove from machine and arrange fabric so zipper is fully visible, pressing pocket lining down & accent piece with zipper up. Top-stitch close to zipper.

- For zipper #2T, lay on your work surface, in order given:
Zipper #2 face UP, zipper pull to the left
Accent piece #2 face DOWN
Pin well, between layers if needed.

Using a zipper foot, stitch 1/4” seam along length of zipper, removing pins as you go. Once stitched, remove from machine and arrange fabric so zipper is fully visible, pressing pocket lining down & accent piece up. Top-stitch close to zipper.
- For zipper #3B, lay on your work surface, in order given:
Accent piece #2 face UP
Zipper #3 face DOWN, zipper pull to the left
Main (largest) lining face DOWN
Pin well, between layers if needed. Using a zipper foot, stitch 1/4” seam along length of zipper, removing pins as you go. Once stitched, remove from machine and arrange fabric so zipper is fully visible, pressing pocket lining down. Top-stitch close to zipper.

- For zipper #3T, lay on your work surface, in order given:
Zipper #3 face UP, zipper pull to the left
Main body fabric face DOWN*
Pin well, between layers if needed. Using a zipper foot, stitch 1/4” seam along length of zipper, removing pins as you go.
 Once you sew this step, your project will be inside out, and somewhat odd looking. No worries! You're still on the right track!


To Finish
This is where it got really difficult to take meaningful pictures, so read carefully and just go step by step.
- Reach in through the main lining fabric fold and turn inside out, so all you see is the main lining, right side out. Reach in and unzip the main zipper.
- Work from here on one side edge of pouch at a time. Line up edge, pushing main lining out of the way as best you can. Pin edges together, and starting from bottom, stitch up the side of the pouch, removing pins as you go and going up as far as you can.
- Now bring the lining back where you can work on it, pushing the seam you just sewed into the pouch, out of the way. Press edges of lining in 1/4", pin sides together, and starting from bottom, stitch up the side of the pouch, removing pins as you go and going up as far as you can.
- Repeat for other side.
- Turn pouch inside out through open main zipper, pushing out corners to shape. Press edges with your iron for a clean finished look!

The story behind this pouch can be found here. If you make a Triple-Zip Pouch or are inspired by this tutorial, please feel free to post a photo in my flickr group ~ Quilting with A Quilter's Table. Thanks!
Awesome!
ReplyDeleteFantastic tutorial - thanks :)
ReplyDeleteGreat tutorial! My daughter is going to love all those zippers!
ReplyDeleteOh, hurray! I've been waiting for this! Thank you so much! Unfortunately I can't make one right away, because I'm in the midst of testing a rather complicated bag pattern for someone, but this pouch will be next on my list. I'll show you when I've made one. I think this pouch is so cool, and I can't wait to make it!
ReplyDeleteI love the colors of this one! Surprised? I have a quick question. In the preparing zippers step, how much zipper is exposed between the tabs? If I count the blocks on your mat correctly, it looks like about 6.5".
ReplyDeleteGreat tutorial! I love it in the Madrona Road fabrics.
ReplyDeleteThis is such a cute pouch! And your tutorial is really well done, thanks!!
ReplyDeleteI am going to round some zippers and give this a try, your tutorial looks clear and easy to follow. Also, I have been trying not to order Madrona Road all week, you might have made that even harder.
ReplyDeleteAmazing tutorial, Debbie! And I love that Madrona Road!
ReplyDeletei pinned the crap out of this debbie! excellent tutorial~! i will be trying it out sooooooon!
ReplyDeleteIt looks fab, love that fabric line you chose for it :o)
ReplyDeleteFabulous! Bookmarked :)
ReplyDeleteNice tutorial Debbie. I'm still scared to try it ; )
ReplyDeleteSo cute Debbie! Thanks for the tutorial.
ReplyDeleteAmanda
Such a great idea, Debbie! Thanks for the tutorial.
ReplyDeleteAwesome pouch!! Thanks for the great tutorial =D
ReplyDeletethanks for writing up a tutorial! I love your 3-zip pouch & hope to try making one for myself :)
ReplyDeleteYou did a wonderful job, Debbie on this tutorial. I will Pin It, so that I am going to make it one of these days.
ReplyDeleteThis is awesome! I'm not sure I'm brave enough for THREE zippers but you make it look so easy :-)
ReplyDeleteGreat tutorial.I sure try one.Thanks for sharing!!
ReplyDeleteNicke cracks me up. Also, this is so fun! Thanks for sharing your tutorial, Debbie!
ReplyDeleteThis is great. I will definitely be making one sometime soon!
ReplyDeleteThank you for making a tutorial! I am going to give this a try for sure!
ReplyDeleteGreat tutorial, I can't wait to make one! Lovely fabrics too!
ReplyDeleteA great tutorial- thanks!
ReplyDeleteHi, I'm your newest follower. Thanks for the tutorial. I've never seen a pouch like this.
ReplyDeleteI have shared your tutorial on Freebies for Crafters...thanks for sharing your tutorial.
ReplyDeleteHugs Khris
I just discovered your blog and love it. This triple zip pouch is beautiful, your tutorial is well explained, thanks for sharing with us. This is a blog that I will visit often. You have a new follower with me, just love your blog!
ReplyDeleteI think I got it, but am just a little confused and want to make sure I am going to do it right. On the first step after applying the first zipper (this step)
ReplyDeleteFor zipper #1T, lay on your work surface, in order given:
Bottom (smallest) lining face UP*
Zipper #1 face UP, zipper pull to the left
Accent piece #1 face DOWN
Do you mean "lining face up", to fold the lining up so right sides are together? I keep looking at the pictures and think that is what I see. If I am wrong, Help Please!
For DonnaRae...Hi! Sorry you're facing some confusion, but yes, I think you are exactly right. The lining that you just pressed away from the zipper, now take its other end - you are basically making the first 'pocket!' So yes, the two ends of the lining are now right sides together. This IS the trickiest - and once you have this one down, you'll see 'ah ha!' . . . Hope this helps!
ReplyDeleteque bonito realmente genial!!!!!!
ReplyDeleteFelicidades!!!! y gracias!!!
This is Debbie, just adding translation for Rosy's comment above: "really great beautiful!
ReplyDeleteCongratulations! and thank you!"
Hi Debbie, Thanks for the answer. I got it. I tired replying to your message at my blog. I am just learning how to blog. I thought that you were able to get the email addy if I used Google profile. I guess not? Anyway, I tried to set up a Google email account to use with my blog and Google now wants a cell phone number to confirm the account. I don't want to give my cell phone number out So I can't email you without going through an email account. My PC is new so I have not set every thing up yet, like having my mail go through my charter account. Anyway, your answer did the trick. Now to get my email addys all set up. I just don't like to post it in an open forum. I get too much spam as it is. LOL... Thanks for the tute and your time helping me!
ReplyDeleteWow! Just ran across your awesome tutorial on Pinterest and was pleasantly surprised to see Madrona Road! Cool!!!
ReplyDeleteI'm working on zipper T1, did you fold up the lining? It's unlear in the directions but in the photo, it looks like you flipped it up? I took the next smallest lining piece and sewed it in, I now wonder if I have to unpick it?
ReplyDeleteThanks, love this bag!!
Great tuto! Thanks!!
ReplyDeleteOh man, Deb! This is amazing - going to the top of my to-do list so I can bring it to the Sewing Summit...thanks!!
ReplyDeletehola, recien te conozco excelente tutorial, desde ahora te seguire, e intentare hacer esta cartuchera.
ReplyDeleteabrazos
Deb,
ReplyDeleteI received one made from your tutorial (at least I'm thinking it was) and I LOVE it!!! Thank you so much for this tutorial as I wanted to make one, too.
thanks!!!!
cute CUTE! Awesome tute, can't wait to try it out!
ReplyDeleteJust read a post on How About Orange which referred to your tutorial. This I gotta try!
ReplyDeleteLooks like a great bag and a great tutorial. I just bought 10 zippers yesterday so I am all set!
ReplyDeleteThanks for this tutorial.
ReplyDeleteMoltes gràcies!
Bet from Catalonia!
You did a great job, this is really a perfect tutorial, thanks for sharing!
ReplyDeleteThis is excellent! I will be linking to this in a blog I've scheduled for this week - I'm going to make it with my students at school too if you dont mind! Cheers, Tracy
ReplyDeletehttp://yellowfibro.blogspot.com.au
Hi! I love this... may I feature it on www.sewcanshe.com? Please drop me a line at caroline@sewcanshe.com to let me know.
ReplyDeleteThanks!
Caroline
This looks fantastic!!! Must try it. Thanks for the tute.
ReplyDeletevery cute: I featured it here:
ReplyDeletehttp://sewprettysewfree.blogspot.com/2012/10/triple-zip-pouch-sewing-tutorial.html
Thanks,
Anshu
http://sewprettysewfree.blogspot.com
Thank you for an excellent Tutorial! I really enjoyed making this. I was wondering if you made the largest lining in two pieces with a seam that would wind up at the bottom of the the lining. Then you could leave an opening and be able to sew the side seams a little easier and turn the whole ting through this opening. I will try this and let you know if it works.
ReplyDeleteWonderful just wonderful tutorial thank you so much.
ReplyDeleteThis is such a great project.
ReplyDeleteMyself and two friends spent a day making triple zipper pouches only we made jumbo sized pouches.
I just put a picture of mine on my blog with a link to the tutorial.
Thank you!
Margaret
Wow what a great tutorial. Just finished my first one. Did it from start to finish (picking fabric to admiring it open and closed) in 2 hours and 10 minutes. Will make another tomorrow and post them both on my blog with a shout out to you. The only change I would make to this pattern is that I will probably add a strap for convenience. I thank you and the receivers of these gifts will also thank you. I'm off to see if I can be your newest follower.
ReplyDeleteYou got my vote (o:
ReplyDeleteI pinned this a while ago and am just now getting around to looking at it. Love it!!! Any suggestions for converting this to a purse? I want to make my 3 yr old a purse with lots of pockets, buttons and zippers. She's a bit obsessed. =)
ReplyDeleteIn response to Unknown (above), I know of more than one person who has just increased the size with good results. A purse tutorial has crossed my mind though - maybe in the new year...
ReplyDeleteLove it! I've been trying to think of how to put a multizip pouch together...and now my brain can just rest and use yours! :)
ReplyDeleteGreat Tutorial! How would I make this bag with 2 zippers on both sides instead of just the 1?
ReplyDeleteSewKoolBeenz@gmail.com
@pril
Fabulous - thanks so much!!!!
ReplyDeletethis looks like a great tutorial. and what a fun sew along project! i'm excited to do this :)
ReplyDeleteI LOVE this pouch!!! I made one tonight, and now I'm addicted. I did get confused a few times about various things, mostly because it was late at night and I probably should have been in bed sleeping, instead of up and sewing. When I got to the last part, sewing up the sides, my brain refused to go any further. I understood the concept of sewing up the sides (sort of), but I just couldn't make it work. Colleen's post saved me - I simply sliced the main lining piece in half at the bottom, sewed the sides up easily, turned the bag right side out through the opening I left in the bottom of the lining, and then machine stitched the opening closed. Problem solved, my OCD is satisfied, and I can go to sleep. Thank you so much for your generosity in sharing this with us. I'm going to be making more of these :)
ReplyDeleteThat's exactly what I did! Otherwise, I couldn't figure out how to turn it right side out.
DeleteThanks for this tutorial. I've got it pinned for later. Think I'm going to make two of these for my nieces' birthdays.
ReplyDeleteYOU are a genius.
ReplyDeleteI've been wanting to make a zippered bag for a while now, but didn't really know where to start. Your tutorial is amazing and so clear, thank you so much! (Love your bright colored fabric too!)
ReplyDeleteHi!
ReplyDeleteFirst of all, thank you for the great tutorial! I made it and can't stop the sewing...
Edit
Better late than never! I made one too. First of many, I'm sure:
ReplyDeletehttp://cabinfibers.blogspot.com/2013/02/i-asked-her-for-adidas-and-she-bought.html
Thanks for the wonderful tutorial. Am I the only one
ReplyDeletewho had trouble getting the ends of the top zipper to look
good? I finally put it up to work on another day. Otherwise,
I think it is such a cute bag.
It makes a difference if you lay the zipper up or down before sewing the zipper in. Here are a couple of sites that should you how to do it so the zipper ends look much better. I also put tabs on the ends of my zippers which makes a world of difference. I don't think either of these sites mention it but there are lots of sites out there. Just Google instructions for zipper tabs in pouches or something like that. Here are the two sites I mentions. (http://www.curbly.com/users/ModHomeEcTeacher/posts/4101-How-to-Insert-a-Zipper#jump) and (http://www.sewdelicious.com.au/2012/09/simple-zip-pouch-tutorial-for-beginners.html)
ReplyDeleteI cannot wait to try my hand at this one. Thanks for sharing :-)
ReplyDeleteHi Debbie, I am wondering if it's OK to put the two pouches I made in my Etsy shop if I link back to your blog? Can you please email me back and let me know what the rules are? ;)
ReplyDeleteThank you!
Kerry
kerryATpenny-dog.co.uk
Hi, great tutorial, Thank you so much from Italy, Emanuela
ReplyDeleteAwesome tutorial! Thanks for sharing!
ReplyDeleteThank you SO much for this tutorial. I absolutely love my little triple zip pouch. Your directions were great too!
ReplyDeleteLove the tutorial thanks for sharing the post.... now i can use this one...!
ReplyDeleteembroidered patches
wallets and purses
Magnetic Labels
lighters uk
This is amazing! Thanks for a great tutorial! Somebody has a very keen mind to figure out how this would go together so easily. Thanks!! I will be making this one again!
ReplyDeleteFantastic pattern! Well done :-)
ReplyDeleteGreat tutorial and the cutest little bag!
ReplyDeleteGreat tutorial, thank you! - I have posted a picture in my blog: http://quiltar-och-silver.blogspot.se/
ReplyDeleteBeautiful little bag. Thank you for the detailed tutorial.
ReplyDeleteI can see so many uses for this! Thank you for sharing. I have linked to you on my blog. http://alittlebirdmademe.wordpress.com/2013/06/21/a-list-of-30-free-tutorials-and-patterns-for-wallets-and-pouches/
ReplyDeleteHi Debbie - I'm in the home stretch of this adorable little bag and I'm TOTALLY stuck. How do I top stitch the final side of zipper #3? I have reread the tutorial and i don't think it mentions it - please help!!
ReplyDeletemerci pour ce tutoriel, je me coucherai moins bête ce soir !
ReplyDeleteje vais bien vite tester en faisant une trousse.
bonne journée
What great fun this pouch is going to be!! I can't wait to make...THANK YOU for posting such an easy to follow tutorial...I really appreciate it :)
ReplyDeleteKatye
Can hardly wait to give this little bag a shot. Thanks for the well written tutorial.
ReplyDeleteToday this bag will be made by several members of Quiltesiden on Facebook. We are sewing together.
ReplyDeleteThank you for sharing the pattern :-)
Debbie, you are welcome to join us in my group on Facebook. Then you can see all the pictures. Just look up the Norwegian group Quiltesiden.
ReplyDeleteI love this but as another person said….a little confused about the last part. I will figure it out once I get going I am sure….but…..a video tutorial would be AWESOME and you would get LOTS of viewers I am sure. Please………...
ReplyDeleteI’m trampled for the blogs writings and also blogs.
ReplyDeleteenglish help online
I love this! I saw a zip pouch in Country Living this month but its just one pouch with decorative zippers...I was working out a pattern in my head to do a pouch like this while trying to fall asleep last night! - Bailey Marie & Me
ReplyDeleteCan anyone tell me the final size of the outside of the bag please? I'm trying to change the size and convert to cm's and want to be sure im on the right track. I want a finished bag of 38cm wide by 27cm high (15x10.5 in) will still work right? Sorry im a newbie being very brave trying something complicated
ReplyDeleteAshleigh, the finished pouch is 6" tall and 7 1/2" wide....good luck!
ReplyDeleteThank you for sharing this great tutorial. I just finished a bag and wrote a post about it. You can find it on my blog at http://beccascrazyprojects.blogspot.com/2014/06/triple-zip-pouch-fun-with-thing-1-thing.html.
ReplyDeleteI love this! thanks for the tutorial!
ReplyDelete(julie gier)
Perfect tutorial for a multiple zipper pouch! Thank you!
ReplyDeleteThanks Debbie, awesome pouch, have made 3 so far and will probably make a few more
ReplyDeleteThank you so much for the nice Bag tutorial but could you please post some pictures of how to sew the lining in the end, I had to handsew the last seam.
ReplyDeleteI made a couple of these last year and I love them so much I am going to make a few more. They are so handy.
ReplyDeleteThank you, I made my own version to my little son!
ReplyDeletehttp://www.irinkaitseteossa.blogspot.fi/2015/07/triple-zip-pouch-vai-olisko-sittenkin.html
Do you think there is a way to attach a long handle to this. I have not made one yet, but thinking I would like to use it as a purse while at a quilt show or on vacation etc.
ReplyDeleteI make them with small wrist handles on the outside. Just add a tab and add whatever you want to the tab. I also instead of the handle put key holder and/or clip for my bag. So many options. I suppose you could make a cross bag strap
DeleteThis comment has been removed by the author.
DeleteBut the strap would have to be thin or widen gradually from the ends to the middle for more options.
DeleteI was just thinking this could be made about an inch or so bigger and put a strap on it to use as a purse.
ReplyDeleteMy 11-year-old granddaughter was carrying a 3-zipper shoulder bag this summer while visiting us. It was a great place for her cellphone. Her 4-year-old cousin asked me to make her one for pre-K. Thank you for the tutorial. All I have to do is put a shoulder strap on the pouch.
ReplyDeleteI was more than a little confused by the Finishing instructions so I followed my instinct and sewed all the linings to the main fabric (right side out) in a cylinder fashion. Then I turned the pouch wrong side out, unzipped the main zipper (top zipper) and sewed each side together. I don't know if my finished product is according to instructions. I'd like to see a picture of the inside of the finished pouch.
Vicki, got to page 8 of the PDF format and it will show you what the pouch should look like before I out sew up the sides. Pouches made like this with a strap is great to carry your money in when yard selling or going to flea markets. No bulky purse to carry.
ReplyDeleteWhat are the dimensions of the pockets on the pouch? I want to make something like the Flight 001 Seat Pack and this would be perfect if it would hold my Kindle and iPhone.
ReplyDeleteAwesome! Absolutely amazing. Thanks very much for sharing this incredible pouch! The fabics you have used are lovely!
ReplyDeleteI guess I am just lame because I have made zippered pouches, but at the step "1T" I understand the layers, but the pic shows the lining "looped" for lack of a better word. Is this the same lining that was sewn to the zipper 1B?
ReplyDeleteJust what I needed for my Easter sewing project
ReplyDeleteMany thanks.
FAntastic tutorial. Thanks
ReplyDeleteHi Debbie, Can you tell me what the finished size of the pouch is. Thank you
ReplyDeleteGinka, Your email doesn't show, so I'm sorry I can't reply back. The size is 6" tall by 7 1/2" wide.
DeleteThank you for this tutorial, I have been following it and it was clear and easy to follow! Except, unfortunately, I'm at the end (the part starting with "Work from here on one side edge of pouch...") and I have NO idea what to do. When it says "Pin edges together, and starting from bottom, stitch up the side of the pouch", are we supposed to be sewing through ALL the layers (medium lining, small lining, large outer piece) at once except the large lining? Or am I supposed to be sewing up just the side of the small lining, then sewing up just the side of the medium lining, then sewing up just the side of the large outer piece?
ReplyDeleteStephanie, you have no email commented to your profile, so I'm sorry I can't email you back, and I'm hoping you check back here... It's been years since I've made one of these, but yes, I think you sew thru all layers except the main lining that you have pushed out of the way.
DeleteThanks! Yes, I was coming back here to check for a reply. Here goes!
DeleteAll these years later and sewers across the world love the pattern and directions. And I still do!
ReplyDeleteThat's awesome. Thank you!
Delete