Pages

Saturday, August 31, 2013

Fresh Sewing Day

Considering I was out of town for about a third of August, I'm pretty pleased with what I got done. Of course there was the normal assortment of City Sampler and bee blocks. And though they were all fun and interesting in their own way, I think my favorites are the "Space Dust" block in the mosaic center (CS #39) and that last one - the Patchwork, Please envelope block.
1. Block 40, 2. Block 41, 3. Block 42, 4. Modern Maple block, 5. Block 39, 6. Block 38, 7. Block 37, 8. x and + blocks, 9. Palace Steps block, 10. improv arrow blocks, 11. block #1

Four of my other project finishes were with the Patchwork, Please sew along. I especially enjoyed the envelope wall hanging, and am enjoying having it hang next to my sewing machine where I can make use of it every day. 

My Tinker Tote has been fun to use, and it was one of the most satisfying finishes of the month. Though I am pretty happy to have my Modern Maples quilt done too, in plenty of time for fall. All in all, it's been another good month to sew.

Friday, August 30, 2013

Patchwork, Please! :: Piece-of-Cake Shopping Bag

I'm one of those people that, when walking into the grocery store for just a few items, doesn't take a cart or even one of those wobbly-handled baskets. I only need a handful of things, right? But invariably, by the time I get to the check-out counter, my arms are full, and I may even have dropped something along the way, just because I picked up stuff I'd remembered we needed or decided we couldn't live with out.
So when I heard comments of 'too big' regarding this week's Patchwork, Please shopping bag, I certainly hoped those claims were right. And yes, this bag IS big, but a perfect size for my kind of shopping.

That said, this was one of those "good news/bad news" projects. This was taken when things were still feeling quite under control . . .

Here's the good, bad, and the ugly:
Good: The fabric I used is lovely and I like it alot: Essex Linen in Flax with Lush Uptown by Erin Michael for the pocket, lining, and drawstring cover.
Bad: There's not much structure to the bag, so it is very floppy, especially unfilled. Filling it up helps!


Good: I tried a new product! Erin from Pellon had told me about their 100R Vinyl Fuse, and I was anxious to try it to make the interior of my bag water-resistant. I'll continue with the good news to say that it worked just as advertised and was a cinch to adhere.
Bad: I was so used to adhering iron-on products to the wrong side of fabrics that I instinctively did the same here! Which makes my bag overall water resistant, but not in the way I'd intended. Totally user-error!

Good: I followed Krista's advice about decreasing the height of the bag lining and that worked like a charm.
Bad: I think there's a typo on page 106, step 14 - I'm pretty sure at this step the rectangles mentioned should be right-side together.

Good: Surprisingly, even with my normal quilting needle, the webbing went on really easily and nicely.  (Hint: I did use a fabric glue-stick to 'place' the straps prior to sewing.) I stitched an 'X' where each strap met the bag exterior.
Bad: Unfortunately my thread matched too well and you can hardly see my extra detailing. Also, the top edge of the bag was super floppy once the bag was finished, so . . .
Good: I stitched another 'X' closer to the bag top for a stronger finish.
Bad: You can barely see that either. But it definitely improved the overall look, which was totally worth it.

Honestly, I'm anxious to put this bag to real-life use and see how it holds up. Even though it looks saggy and baggy when unfilled, it's sturdy and feels like it's going to work just fine for those spontaneous market visits. And yeah, it's kinda weird with its ill-placed vinyl, but I learned a lesson I won't soon forget. Let's go shopping!

Linking up with Fabric Tuesday.

Thursday, August 29, 2013

More to Show

Last month I shared several really special quilts - quilts that had been made by bees I am in. Even when I play just a small part by making a block or two, it's still very gratifying to show off the finished quilts. And this month there's a few more!

Anita/RhubarbPatch of FAITH Circle had us each do eight simple 6 1/2" blocks, but what a sweet quilt they made! I think the loopy quilting Anita did just made it!
April Do.Good.Stitches

Next is "Birds of a Feather" by Susan/PatchworknPlay from the Mid-Century Modern Bee. When I saw our assignment that month - to make an Anna Maria Horner feather block I was scared silly! But it turned out to be quite fun - and just look at the finished quilt! Each block is so unique and pretty, and yet again, Susan's layout and quilting just pulled them all together in the lovliest way!

Again, when I saw the month's assignment for That Stash Bee from Valerie/Between Quilts, I didn't know what I was going to do! A scrappy rainbow was the general theme, with the specifics being either scrappy stars or words of encouragement, as the family this quilt was going to had been through a very difficult time. I opted for stars, but admit to being just so impressed at the creativity of my bee mates. I'm pretty sure I gasped when I saw this completed quilt for the first time! Do click through and take a quick look - both at the front and the back - such a unique and lovely quilt. (If I hear back with an affirmative from Valerie, I'll add the photos here - meanwhile see them on flickr!)

And lastly, "Common Affection," a quilt I made back in April with the help of the Mid-Century Modern Bee is in the limelight - at least at my house! It will be displayed in the 2013 American Quilter's Society QuiltWeek in Des Moines, Iowa this October. Over 100 quilts will be shown, and then a selection of them will be chosen by the judges to travel with this exhibit through September 5, 2014. Either way, I'm pleased, and grateful to my bee girls for helping me step out into new territory with this quilt.
"Common Affection" completed!

That's it for now . . . hope you enjoyed the show!

Tuesday, August 27, 2013

Tuesday at the Table

You know that t-shirt, "My parents went to Hawaii and all I got was this t-shirt?" Well I went to my kitchen and all I made were blueberry muffins. But in this case, they were even-better-than-usual and they were made with blueberries from our own bushes. I have made numerous blueberry muffin recipes over the years, but always seem to try a new one. This time it came from Ina Garten. I for one absolutely adore streusel on just about anything, and it was a very welcome addition to an otherwise pretty basic muffin.

Blueberry Streusel Muffins
from Barefoot Contessa Back to Basics: Fabulous Flavor from Simple Ingredients

For the muffins:
3 1/2 cups all- purpose flour
1 1/2 cups granulated sugar
4 1/2 teaspoons baking powder
1 teaspoon baking soda
1 teaspoon kosher salt
2 cups buttermilk, shaken
1/4 pound (1 stick) unsalted butter, melted and cooled
1 1/2 teaspoons grated lemon zest
2 extra-large eggs
2 cups fresh blueberries (2 half-pints)

For the streusel topping:
3/4 cup all-purpose flour
1/2 cup light brown sugar, lightly packed
1 teaspoon ground cinnamon
1/4 teaspoon kosher salt
4 tablespoons (1/2 stick) cold unsalted butter

Preheat the oven to 375 degrees. Line muffin tins with paper liners.

Sift the flour, sugar, baking powder, baking soda, and salt into a large bowl and blend with your hands. In a separate bowl, whisk together the buttermilk, butter, lemon zest, and eggs. Stir the buttermilk mixture into the flour mixture with a fork, mixing just until blended. Fold the blueberries into the batter. Don’t overmix. With a standard ice-cream scoop or large spoon, scoop the batter into the prepared cups, filling them almost full.

For the topping, place all the ingredients in the bowl of a food processor fitted with the steel blade and pulse until the butter is in very small pieces. Pour into a bowl and rub with your fingers until crumbly. Spoon about 1 tablespoon of the streusel on top of each muffin. Bake the muffins for 20 to 25 minutes, until golden brown. Makes 20 large muffins.

Just so you know, it's not just me. Mom deemed them "delicious", and when grandgirl saw them, she exclaimed, "I love those. I need them!" I think you do too.

Monday, August 26, 2013

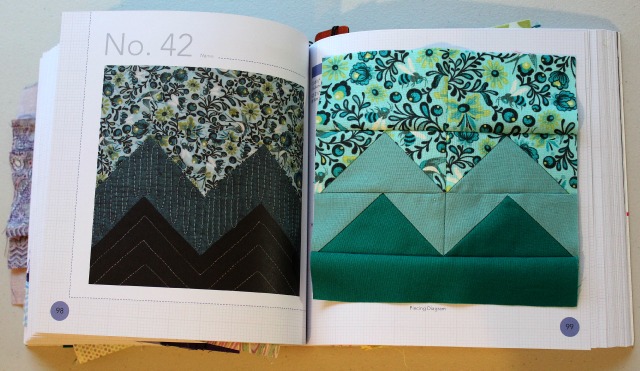
City Sampler Quilt Along :: Blocks 40, 41, & 42

Crazy, but this week's blocks weren't half as quick as normal, especially #40 there. 24 pieces in one 6 1/2" block! But the end result was definitely worth it.
The next two weren't quite so tricky.


By the way, are you following along with the City Sampler posts at Sew Sweetness? Today there were some handy tips - for block storage, for stitching diagonals - good stuff.
As is my block-filled book. Awesome, huh?

Linking up with Sew Sweetness.

Zakka Along 2.0 :: Week 13

Congrats to last week's linky winner Laurie/bluedogsews!

The trivet project last week was verrrry popular! Here's just a sampling of the dozens of trivets made! And that first blue and red one just happens to be Laurie's!
This week, visit Spotted Stones to see her fun and oh-so-practical Piece-of-Cake Shopping Bag. Check out that lining fabric! And Krista has several helpful suggestions so be sure and read her post before starting on your project!

The giveaways for linking up this week's project are a 1/2 yard bundle of Essex and Essex yarn dyed linen from Robert Kaufman + $20 gift certificate to Pink Chalk Fabrics. (wow, huh?!)


To link up your project, click on the frog below and follow the instructions. One entry per person, please.

Sunday, August 25, 2013

Learning Another Language

It's Greek to me. Photography that is. I have a decent advanced beginner's dslr, a Canon EOS Rebel T3i that hubby bought me for my birthday about 18 months ago. In that time, I've learned some very basics about my camera and photography in general:

  • how to shoot in Program mode rather than Automatic, so I at least have more control over the flash
  • how to switch to Macro mode to shoot up close
  • how to change between the standard and telephoto lenses
  • that natural light is always best
  • how to get the photos off the camera and do some basic editing using Picmonkey
  • and as of today I know that I can right-click on my uploaded photos to see what settings they were shot in
Ie. not a whole lot. I know very little about shutter speeds, apertures, and ISOs. I read about them. Hubby tells me all sorts of things about them. But my retention in day-to-day use is near zilch. Which is why when Plum and June announced The Quilt Photography Workshop, I was all ears.

Plum and June
The first assignment was to take photos of fabric. So I just spent an hour or so doing just that. For smallish quilting "subjects" I usually use a light-colored table in my sewing room, right next to a large window. It's pretty much the best naturally lit spot in the house. For this assignment, I have done no photo-editing, other than some minor cropping and resizing to fit my blog space. I also am making some notes here for safe-keeping, so as I share what mode and settings I used for each shot, I'll remember that (for example) 1/50 stands for shutter speed, 5.0 is the f-stop or aperture (size of opening for the light), and ISO is a sensitivity setting. I began in my normal Program mode with the pre-set settings.
P mode: 1/50, f/5.0, ISO 250

For this second shot, I forced the ISO to 800 and it was quite an improvement.
P mode: 1/125, f/7.1, ISO 800

I braved it out of Program mode and into Av (aperture) for the next 3 shots, and obviously, the mid-range aperture was best.
 Av mode: 1/125, f/5.6, ISO 800

  Av mode: 1/125, f/18, ISO 800

 Av mode: 1/125, f/36, ISO 800

Then on to Tv (shutter priority).
Tv mode: 1/100, f/7.1, ISO 800

Lastly, I went to Manual mode, which I know is where I need to head in general.
 M mode: 1/100, f/5.6, ISO 800

 M mode: 1/40, f/5.6, ISO 800

M mode: 1/100, f/6.3, ISO 800

So there you go. The best news is, I've played around with my camera in ways I usually don't. My goal for the very near future? Remember what I've learned today, or at least keep working with my camera so these modes and settings become more familiar. And I want to go through the workshop links to see what other tips I can glean. My long-term goal would be to discover my own style using settings I'm really comfortable with. But I'll face that one step at a time.

Saturday, August 24, 2013

Anticipating Autumn

According to the Bing Dictionary, the definition of "anticipate" is to: act beforehand to address something imminent: to imagine or consider something before it happens and make any necessary preparations or changes. And that is exactly what I did when I asked the members of That Stash Bee to make Modern Maples blocks for me back in June. I really loved the many Modern Maples quilts I had seen around blogland, and wanted one for our own home. This fall. 

I started out making this block as a sample and asked for basic leaf colors on light (non-white) solids or low-volume prints.  
Even a lighter leaf on a darker background was acceptable, and since I only received 1 of those, I made 1 more and brought my total number of blocks to 20.

So earlier this week, I took all my leaf blocks, laid them out, and cut a variety of solid and print squares, enough so I could do the 5x6 block layout I had planned. This would make a nice lap quilt, measuring 60x72".

For a backing, I used a Curious Nature print by Parson Gray. It had some leafy images and also the sense of sidewalk, which in my childhood was the place where all the most interesting leaves were found. (In fact, one of my favorite childhood activities was making leaf rubbings.)
For quilting I used Aurifil 50wt #2000, which is named "Beige" but in reality is much more interesting than its name implies and nicely brought all the colored leaves to blow nicely together. I stitched straight-lines, first making a grid along both sides of the seam-lines between blocks. Then I went zigging and zagging a bit so I went through the stem of each leaf. I added more parallel lines diagonally to decrease the amount of unquilted space, though this is one of the less densely quilted quilts I've done, with the diagonals about 4" apart.
The binding is one of my new favorite prints - Carrie Bloomston's  Collage Scratch in Putty. It was just the perfect shade to blend with the mix of backgrounds, and with its subtle lines is not really a stripe but gives a bit of that effect but in a subdued way, letting the leaf blocks really be the focus. (Click the Collage link and you can see it better.)
So don't get me wrong. I am totally enjoying these last few weeks of summer, and am not over-anticipating the arrival of autumn, but on the other hand, quilt-wise, I'm ready.

This finish is from my 2013 Q3 Finish-A-Long list. Linking up with Fabric Tuesday and Finish It Up Friday.

Friday, August 23, 2013

August Bee Blocks

As expected, there was a nice variety of bee blocks this month. First up was 1 large (24.5" wide by 12.5" tall) Palace Steps block for FAITH Circle, using gray and graduated yellows. It required some thoughtfulness but went together quite nicely.

On the other hand, the improv pieced arrows for Always Bee Learning bee were a bit of a mind-bender for me! But I managed and really look forward to seeing this quilt come together!

Lastly were some comforting and familiar x-and-+ blocks for Mid-Century Modern bee. I've done plenty of these blocks before, but never in one colorway, so that was a nice twist.

That Stash Bee took the month off, so it's kind of ironic that I'm working to finish my own June project with this bee. Funny how things work out.

Thursday, August 22, 2013

Patchwork, Please! :: Happy Hexagon Trivet

Here's another Zakka project that was really straightforward for a paper-piecing-phobe like myself. As often happens, choosing the fabrics I wanted to use took the most time. Beings a trivet is used in the kitchen, I thought a nice linen teapot would be perfect.
When you glance at the template, you'll understand, but basically I found that cutting my fabric pieces 1 1/2" x the length of each triangle + 1" worked perfectly as I stitched my way around the "circle."
When it came time to bind those 60-degree corners, I did a little research, having had trouble with them in the past. This video was helpful, even though I still wasn't 100% happy with my results. If you have some super tips on technique, I'd definitely appreciate hearing.

But overall I really enjoyed this project and am super pleased with it. I am also really enjoying all the different variations in the flickr group! Folks are going totally scrappy, using solids, minimizing the number of fabrics - each giving a different but delightful look. Nice!

Wednesday, August 21, 2013

Falling for Modern Maples

Just about one month ago, I started a flickr group, Falling for Modern Maples. Basically, I was hoping for some company as I made my own Modern Maples quilt. And I got some! Check out the group and see the colorful variety of maple leaf blocks! If you are making, want to make, or even made a Modern Maples quilt, please do join in. And if you need some inspiration, check out the Modern Maples gallery. 

I'm still hoping to have mine finished by the beginning of fall here in the Pacific Northwest. And considering I just finished piecing the top, I'm still hopeful!

Linking up with W.i.P. Wednesday.

Tuesday, August 20, 2013

City Sampler Quilt Along :: Blocks 37, 38, & 39

This week's blocks went together in no time!

Block #37 got a bit of a change-up as I had 1 charm of the focus print and then sewed my hst incorrectly and ended up with a smaller center square. So the frame is wider and I'm not really keen on the placement of the print, but it is what it is. And though my frame looks black - it is actually Kona Raisin - a very deep purple.

Obviously I used a different Tula print than in the book for this block, but I'm liking it ok.

Block #39 falls clearly on "my favorite blocks so far" list!

So there we go for this week!

Linking up with Sew Sweetness.

Tuesday at the Table

Home and back to work after two weeks away, I took a review of the best foodie moments during our recent travels. I'll be updating all these on my Urbanspoon account, where I record restaurants we visit. (True.)

In California for our son's wedding, we had opportunity to try several new (to us) restaurants. Fresh off the airplane, my nephew put in a request for In-N-Out Burger. And to tell the truth, we all really enjoyed the burgers and fries!

With fast food on one end of the spectrum, Bluewater Grill at The District in Tustin was definitely on the other. It was one of those special family meals where not only was every single meal a real treat, but the time at the table meaningful and memorable. The best.

Before we left town we got to revisit Kean Coffee, which we'd discovered back in January. Kean would totally be my coffee shop of choice if I lived nearby.

In Portland for the PNW MQG Meetup a week later, I had the chance to visit Meat Cheese Bread with a new PMQG friend, which was a great intro to this food-savvy town.

Pine State Biscuits was deemed the best meal and restaurant experience of the weekend, hands down. We stood in line at the door, ordered at the register, nabbed a counter seat overlooking the open kitchen, and waited, thoroughly entertained by the bustling activity, eventually being rewarded by one very delicious breakfast. yum.

My biscuit sandwich with fried chicken, bacon and cheese topped with apple butter...oh my.

On our way out of town, we stopped for breakfast at the A.N.D. Cafe, which we discovered was a vegan restaurant after one glance at the menu. The most intriguing thing about this stop was the chance to try Kombucha for the first time. I had heard of it, but had no idea what it was (effervescent fermented sweet tea). I found it refreshing and very clean-tasting. 

So there's the highlights. Nothing like some good food finds while out and about!