Pages

Sunday, January 31, 2016

Five Years

Seriously, how can it be that I've been doing this bloggy thing for FIVE full years? The memory of a time before A Quilter's Table is kind of faint. This blog and its related social media personas, the newsletter, the bees, the quilt guild, the quilt shows, the projects . . . well it's never far from my mind. And I can't deny that it all adds up to a big part of my free time.

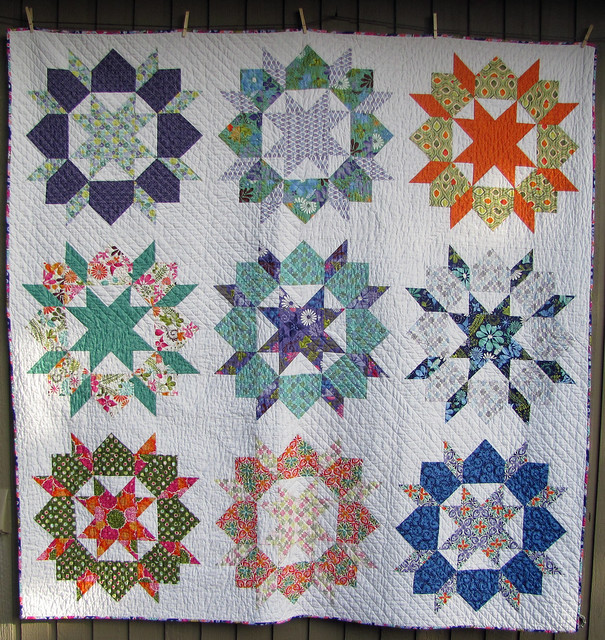
Completed Swoon Quilt!
Swoon, 2011

Every year when I write this annual post, I can't help but go back and read those from previous years. One Year expressed an appreciation of the growth and creativity that had blossomed. (More than one person has told me, "What you do now is sure different from what you used to do." Indeed.) At Two Years, I commented, "What I love about a journey is that no matter how well you plan, there are usually elements of surprise, new experiences you could not have anticipated, and often growth in unexpected ways. And this last year has held all of that for me." Three Years found me speechless and emotional - seriously! Then by Four Years I was a bit incredulous at the changes that had happened - in my stash, my studio, and my sewing itself.


Now I'm marking five years, and I sit here awed by the scope of it all. On one hand, it feels like alot of it has come of its own accord. Invitations, gentle prodding from the community, inspiration in so many ways - it all has drawn me to a place I couldn't have imagined five years ago. But boy am I grateful for it all. Nor could I have anticipated how tied I'd become to our community. I mean, really now, I am so proud to be a part of it all.

HST Love, 2013

At the time I began, I felt late to the game but I'm sure glad I didn't let that stop me. Stepping out to become an active participant rather than just a follower has been so fulfilling, so challenging, and so much fun.


So thank you. Your presence here is a gift every day. I know blog-reading has diminished some with the popularity of other social media avenues, but I tell you. Here is where I get to share my truest creative self, and that still means alot.

Monochrome, 2015

To mark the occasion, my friend Kristina/Fabric Bubb has agreed to partner with me in a celebratory give-away! Just leave a comment on this post for a chance to win a $50 gift certificate to her modern fabric shop. I'm a real fan, and in addition to a beautifully curated selection of fabrics, her customer service can't be beat. Check out the online shop, find Fabric Bubb on Instagram, but before you go, leave a comment. I'll choose a random winner Friday night! And again, thanks for being here.

Saturday, January 30, 2016

Striped Quarter Log Cabin Block

After having such a good time with the X Marks the Improv Block, I chose another simple improv block for Faith Circle for February. Reminiscent of a quarter log cabin block, this one is unique in that it is composed of stripes, finishing at 12 1/2". It is improv though, so it could be easily adapted to any size you want. [Faith Circle, please see our flickr group for more specifics.]


Striped Quarter Log Cabin block
Start by cutting 1 1/2" to 2" wide strips of gray and white fabrics. You can use 14" lengths or cut WOF and trim as you go. Strips would preferable be of angled widths. You'll be building a 'slab' of stripes and then trimming later. Start by sewing a few gray and white pairs together. It would be fine to trim and angle the pairs once they've been pressed.


Piece several strip sets together, inserting one colored (green in photo) stripe. 


Once your slab is about 11" x 14", trim so the left side and bottom are at a right angle. Cut two 3" x 14" colored strips for the two 'borders' and sew to your slab, bottom, then to the left. The number of stripes is not critical, as long as the slab comes off as striped. Trim your block to 12 1/2" square. [Note that the fabric dimensions given are generous, so you can easily use scrap strips if you wish.]

If you try this tutorial, be sure and share by adding to the Quilting with A Quilter's Table flickr group or tagging me on Instagram using the hashtag #stripedquarterlogcabin!

Friday, January 29, 2016

Getting Back Outside

After posting That One Last Step a few weeks ago with some favorite photoshoots, enough folks commented on how much they enjoyed them that I think I'll start doing a semi-regular feature - basically, as I find a handful I really like, I'll ask to share them. So here's the latest batch to catch my eye!

Take Two by Jayne/Twiggy & Opal [twiggyandopal]

Gypsy Wife by Megan/Citystitches [citystitches]

Tula Pink charm along by Kat/Kat's Craft [katgraycraft]


Snow Blossom by Julia/Red Rainboots Handmade [redrainbootshandmade]

So anyone else inspired to get your quilts outdoors and take some really nice photos as that one last step? Try it, you'll like it!

p.s. Check out my Photoshoots pinboard - some of my own, and some I just plain like. 

Thursday, January 28, 2016

Spotlighting Highlight

There were several reasons I was anxious to finish up my #seamqgbom quilt early this month. One, obviously, was I'd been working on it for a year. Enough already. Then there was a show and tell planned for our January SMQG meeting, so that was good incentive. But more than anything, I knew something new was coming, and I wanted to be ready.

My bee-mate Matt is our new block of the month leader, and he has something pretty cool planned. We'll be using the hashtag #seaSLABbom, as we make slabs of improv blocks, exploring a different shape or technique each month. And Matt, amazing as he is, had a sample quilt top already! Irresistible, right?

photo courtesy of Matt Macomber

So our assignment for January is pretty simple: curate our fabrics. Using Highlight, the Kona Color of the Year was on my to-do list anyway, so I figured perfect timing. I'm thinking a mix of neutrals for the background, Highlight as my main color, along with the Pickle and Wasabi, and then Fog for some random pops of color.


To say I'm anxious to get started is an understatement!

Wednesday, January 27, 2016

Modern Sampler :: Block E

After Block D's little issue with accuracy, I was thrilled that Block E came together nearly flawlessly. I'm pretty sure now I just forgot to square up the center block last month before continuing on with the borders. So hopefully that won't happen again.

The little issue this month was my bright idea to piece 9 equal squares together before angling to trim. My method didn't allow me to match the pattern's angle exactly, but I think the effect is still there, so I'm happy. And I was able to use mostly scraps again this month!


I was especially pleased when I put all my Modern Sampler Quilt quilt along blocks up on the design wall together. I'm trying to pay close attention to fabric placement, especially with the more patterned fabrics. So far so good I think.


Monday, January 25, 2016

X Marks the Improv Block Tutorial

The X Marks the Improv quilt was such fun to make that I thought a block tutorial was in order. It's a great block if you're just beginning to dabble in improv, yet provides a design striking enough to attract a more seasoned improv quilter.


This block measures 12.5”x 24.5”, and consists of 2 or more smaller blocks. The smaller blocks can be various widths – 4.5”, 6.5”, 8.5”, or 12.5” – and sewn together, they equal 24.5”. The height of each segment is 12.5”.

To make each block, start with a piece of fabric at least 1” larger on all sides than your desired finished size. Cut a contrasting strip 1” wide and longer than the diagonal dimension of your starting fabric. Rotary cut your ‘background’ piece diagonally.


Insert the 1” strip and sew the 2 halves back together; press.
  

Cut your block diagonally in the other direction, add another 1” strip, and sew the 2 halves back together; press. 


Note: When sewing the final seam, it can be tricky to get the 2 arms to line up. I place my 2 pieces right sides together, pinch about a ¼” seam on the back where the ‘arms’ meet, then flip open so I can see if they line up. If not, adjust a bit until they do, then pin. Alternately, I sometimes place a pin along the ¼” seam-line and then lift to check. Even so, things don’t always line up perfectly, and that’s ok. Just make it as close as you can without stressing over it. 


Trim your block to your desired size, keeping the middle of the cross as centered as you can, being sure to allow for seam allowances. In the example below, my (unfinished) block will be 6.5” x 12.5”. I place the top right corner of my ruler about in the center of that arm, with the 3.25” and 6.25” ruler markings approximately where the arms cross. This isn’t an exact measurement, but gives you an idea of how to keep the cross centered in your block.


Depending on the size and shape of your beginning fabric, your  ‘x’ may or may not land at the exact corners of your block and either is fine. That just adds to the character of the block. Make 2 or more blocks, as needed to make your full block strip 24.5” long.

Sample block: widths of 8.5” + 4.5” + 12.5” sewn together equals 24.5” 
You've probably noticed that I took free license with the 'arms' of each block. Some are all of one fabric; some are pieced with one or more fabrics. The ones with tiny bits of another color are actually trimmings from a previous block. So get creative with those insets and it'll add alot of interest to your quilt blocks.

In case you missed it, here's a photo of the X Marks the Improv quilt.
  

If you try this tutorial, be sure and share by adding to the Quilting with A Quilter's Table flickr group or tagging me on Instagram using the hashtag #xmarkstheimprov!

Sunday, January 24, 2016

X Marks the Improv


From the moment I posted the assignment for Faith Circle, I was excited about this quilt. The 12.5" X 24.5" improv-based block was of my own design, and I was admittedly pleased to be able to provide my bee-mates with structure, yet a chance to stretch their improv wings a bit. A tutorial for the block is coming soon. [ETA: Click here.]


As for colors, I asked for any blue solid for the block backgrounds; any blue, turquoise, teal, or bright green for the crosses. An occasional gold or orange was ok in the cross strips, but wasn't necessary. Both ‘arms’ of each cross did not need to match fabric-wise so the blocks were scrap-friendly in that sense. AND if they feel so inclined, contrasting bits pieced into the crosses were welcome. I used some of my own block trimmings to create cross strips for the next block and found that a satisfying way to use my scraps while still lending a cohesiveness to the blocks.


Dare I say I love how the colors came together?! And those contrasting bits . . . oh yeah.

For the back, I used one full block and then made a few partials, surrounding them with swaths of solids. For quilting, I used the most enchanting Aurifil 50wt #2730 (Caribbean Blue), which brought the kind of continuity that you hope for but can't always anticipate. You can see in the photo above that the straight-line quilting echoed out from an 'X' near the center - that light blue one with an aqua background.


Once trimmed after quilting, I had a width of several inches of leftover backing, pretty  much the perimeter of the quilt. SO, as you can guess, the decision to do matched binding was made for me. Not quite, but still, I had a good start, and it wasn't that fiddly to cut and piece the rest. To me, it was the perfect finishing touch - seen best in the top photo.
 

Measuring 48" X 60", this quilt is the perfect lap size, and I trust it'll bring a smile to its recipient. For me, it was a pleasure to make, thanks to a little help from my friends. And I can't imagine I won't revisit this block again soon.


This quilt was on my 2016 Q1 Finish-A-Long list
Linking up with Finish It Up Friday.

Wednesday, January 20, 2016

Linear

After a month off, Bee Sewcial is back in business! Stephanie/Spontaneous Threads is first up and her chosen theme is "Linear". I really enjoyed her palette of yellow, gray, and neutral, with a hot pop of color! She suggested Print & Pattern: Geometric as a source of inspiration, and yup, I found inspiration there.


Both of my blocks began with elements I saw in the book, then I took them my own way. In retrospect, maybe I shouldn't have so much non-stripe in the block above, but that's where inspiration took me. And since Stephanie ok'd it, I'll leave it as is.

This second block actually was created as two halves, but it seemed too symmetrical or something, so I sliced one half in two, then added a piece to both the top and bottom of the other block. I tried to 'tip' both of those pieces by inserting an angled piece as I connected them to the center portion of the block. This one was especially fun and I enjoyed composing the elements. Each colored 'stripe' is 1/4" finished, and regarding that dotted line - well it's just a trimming from block 1. I keep all those bits until I'm completely done, for uses such as this.


If you want to see more, check out both  #beesewcial and #inspiredbybeesewcial hashtags on IG. I'm loving the 'linear' blocks being created this month!

Tuesday, January 19, 2016

Tuesday at the Table

Some clarification may be in order as you read through this post as to why it qualifies for Tuesday at the Table and the mystery will be cleared up soon enough.

But I wanted to share just a bit of a follow-up to my reveal post for my latest quilt, Confectionery. The good news/bad news plan I mentioned then was to head to the local beach, and use my new photographer's background stand to photograph my quilt.


The good news is that it telescopes both vertically and horizontally (maximum of 9.5' high and a range of 40" to 11' wide), which would feasibly accommodate a very large quilt. The clips (purchased separately) are easy to use, and the whole thing is pretty easy to set up, packs up into a sturdy bag, and is very portable.


The bad news, which should have been obvious, is that it is wind-sensitive. Ie. It is sturdy enough indoors and in very calm weather, but if there's much of a breeze, it can and will tip over. The other negative, to me anyway, is that the whole set up is a bit unsightly. In retrospect, if we'd adjusted the stand higher and wider, I could have photographed the quilt without the feet and sides of the stand showing. That leaves the clips showing, so we'll be working on a way to minimize that, though I definitely don't want to sew a quilt sleeve on every quilt I want to take on location to photograph. If you have any ideas, please do comment.


So leaving the beach with me moderately happy with the photos I'd taken, we passed a distillery that was new to town, and hubby pulled right in. Luckily for me, they didn't open for an hour, so we drove around looking for more places to take photos to pass the time! Then we stopped back by, did a little sipping, chatted up the owner, and topped off our afternoon in an unanticipated way. So note to self - and you too - if you want to keep photo assistants happy, and an assistant does help so much, combine your photoshoot with something fun for the assistant. Plan a shoot around lunch out, a winery visit, the park, or another entertaining outing. Besides making it an enjoyable time for everyone, you'll often find a new, interesting photo opportunity. It's a good thing.

Monday, January 18, 2016

Quilt Math

So a week or so ago, I posted the back for my latest quilt and was asked if I figured out the math myself. Yes, and I guess I usually do. At any rate, that led to a few commenters asking for help with quilt math. I knew several of my quilting friends had already written really fine posts on the topic, so rather than start from scratch, I rounded some up. There's lots of good info here, so hopefully you'll find something that can be helpful!

  • And yes, another post on HSTs is my own tutorial for Big Batch HSTs if you're needing to make alot with the same two fabrics.
So there you go! Did you find a new technique or some tidbit to take with you back to the sewing room? I hope so!

Saturday, January 16, 2016

Confectionery


After all that talk about taking your finished quilt out into the world for a snazzy photoshoot, I really struggled to make this one happen. Basically, due to the size of the quilt (80"x80"), it was too wide for either hubby or I to hold out straight, so we had a grand plan to use the new photographer's background stand that I'd gotten for Christmas. That was a good news/bad news plan that I'll tell you more about later, but let's just say things didn't go as we'd anticipated. Anyway, on with the story....

This quilt which I've dubbed "Confectionery" has been in the making for over 12 months! That's way longer than I usually spend on one quilt, but when it's a block-of-the-month, that's what you do! This BOM with SMQG was unique in a variety of ways":
  • Rather than make a standard block quilt, we started last January by each making a 12.5" unfinished block of our own choosing. 
  • Each of the following eight months, a quilt member would design and post a new border
  • Then for the last three months of the year, as I've mentioned before, I posted finishing technique round ups for the group. 
Overall I really enjoyed making this quilt, though before long I started to seriously doubt my fabric choices. Not that I didn't like them all. I did, alot. But this riot of color on such a large scale overwhelmed me! I persevered, though, and I'm glad I did. I had pulled as much as I could from my stash of prints by Alison Glass, using a variety of low-volume prints as the backgrounds of each border. 


For the backing, I echoed two elements from the front - the churn dash center (etc. etc.), and the 'brick' border. I pretty much figured it out as I went, and have been asked to go into more detail about that, so I hope to also do that in a separate post soon.


Honestly, I wasn't in the mood at that point to do a complicated quilting pattern. My original thought was a diagonal grid, but after marking and sewing just a few lines, I realized I didn't want to go that route, specifically the marking part. Rather, I unpicked and restarted in the center, doing a square spiral using seam-lines as guides and sewing 1" to 1 1/2" apart, depending on each border. I can't say it's overly impressive, but it did the job, works with the quilt design, and I survived to tell about it.


For binding, I used the text print from Alison Glass' Sun Print and Carrie Bloomston's Collage newsprint stripe. My intent was to echo the pair of dark purple corner borders within the quilt, but neither my fabric choice nor the width of the binding contributed to pulling that off. Oh well, I know the little detail is there. 


So mission accomplished. Whew. And I did get to spend a nice afternoon at the beach.


This finish is on my Q1 FAL list! Oh joy.
Linking up with Fabric Tuesday.

Wednesday, January 13, 2016

That One Last Step

I'll confess right off that I don't always take the time or have the time or whatever, but I really do love a great photoshoot. You know, photos of a beautifully finished quilt out in the world. Something about the contrasts with nature, with color, and texture. Let's just say it makes me very happy, and it's the perfect finishing touch to a satisfying project.

So lately, I've seen several photoshoots around blogland that I really love. I'm not going to say much about them, as I think they speak for themselves. But do go check out the posts I've linked to. In every case, there are even more gorgeous shots that I know you'll enjoy.

Red Herring by Yvonne/Quilting Jet Girl

Diamond Sky by Jill/Pie Lady Quilts


Ocean Bricks by Cheryl/Meadow Mist Designs


Black and Red Plaid Flannel Quilt by Amy/Diary of a Quilter

So just a reminder. Take your quilts outdoors! Give them some fresh air and a new perspective. And if someone sees you, don't be shy. You've created a masterpiece, and you deserve to show it off!

p.s. Feel free to check out my Photoshoots pinboard - some of my own, and some I just plain like.