
But I was compelled to do it again.
And last week, I did it yet again.

I guess when it comes right down to it, you'd call it "matched" binding. Basically, I make binding strips in different colors, approximating the size
of what they need to cover and match. Then I trim and add as I get to the next section.
Ie. Machine-stitch, measure-cut-add another color,
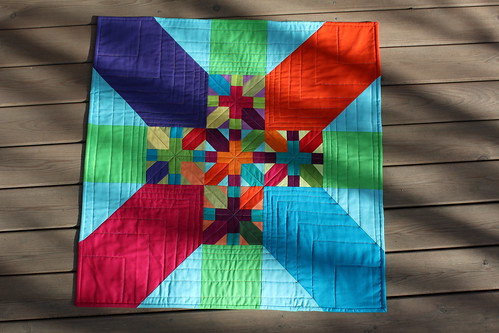
machine-stitch....continue. Matching binding at a 'straight' seam is about 150% times easier than at an angle, which I did on quilts #2 and #3 above. So let's start there!
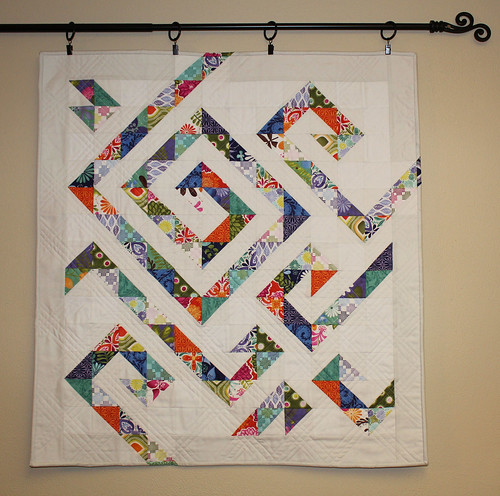
Measure around your quilt and jot down how many inches of each color of binding you will need, allowing yourself at least 6-8" extra in length (more if you will be adding in any particular color more than once, like I did with the white binding in the picture above). Cut and prep binding as you usually do.
Measure around your quilt and jot down how many inches of each color of binding you will need, allowing yourself at least 6-8" extra in length (more if you will be adding in any particular color more than once, like I did with the white binding in the picture above). Cut and prep binding as you usually do.


If you try this method, be sure and tag with #matchedbinding and tag me when you post on Instagram!
Just amazing, you are!! You have no idea how I am squealing as I read this- now just to get brave enough to try!!! :)
ReplyDeleteAll I can say is WOW!
ReplyDeleteI just love your bindings!!
ReplyDeleteI love this binding method - you do it so well! The only time I tried it, I used a angled seam. Straight is so much better for this method! Did you do angled seams on the angled bindings, like the X-block and HST?
ReplyDeleteNot nearly as complicated as it looks! And I thought you had first done this on your X and + mini but I guess I was wrong. Never even realized you had done it on the patchwork quilt first!
ReplyDeleteOh yeah! I was always curious how you did this, now I know! Thanks Debbie!
ReplyDeleteWonderful effect it gives the quilts!
ReplyDeleteThe finished product is really fabulous.
ReplyDeleteLove the neat, polished look it leaves!
ReplyDeleteDebbie, that's sooo fantastic! What an amazing idea, and it looks gorgeous!!!! Thanks for sharing.
ReplyDeleteVery clever...looks fantastic.
ReplyDeleteThanks for sharing your method! I need to give it a whirl soon.
ReplyDeleteWorth your extra effort! The quilt is beautiful.
ReplyDeleteWow - very nice! I might try that too... I like it best on your Terrain quilt - just those two little bits.
ReplyDeleteHuh, I always wondered how that worked, thanks!
ReplyDeleteLooks like you have the binding bug! Great idea on making it look so neat! =D
ReplyDeleteThe Matching binding is so effective!
ReplyDeleteThis is really cool! Great idea and beautifully executed :)
ReplyDeleteI always like your matched bindings! Cool to see how you've been doing it!
ReplyDeleteWow! Why didn't I think of this before? Thanks for sharing. Your bindings really enhance your quilts beautifully?
ReplyDeleteThis is such an effective addition, than you for showing us how to do it.
ReplyDeleteVery helpful. Thanks a lot.
ReplyDeleteAll of your "matching binding" quilts are so beautiful!! Thanks for sharing your know how with us!
ReplyDeleteYour quilts always look so cool...and the bindings are a great addition. Thanks for the tutorial...well done : )
ReplyDeleteI'm impressed. I've never seen that done before.
ReplyDeleteYour tutorial makes it look so easy and I *love* the finished look. I think I need to try this!
ReplyDeleteThanks for the tutorial. I didn't actually read it, but it is something I've contemplated doing. So I bookmarked for future use.
ReplyDeleteStraight connecting seams are the only way to do this, LOL! Looks great!
ReplyDeleteStraight connecting seams are the only way to do this, LOL! Looks great!
ReplyDeleteWow -- that is so neat! I've never seen a binding done that way before. At first glance I thought you'd just slipstitched the edges of your quilt together, like I've seen on a couple of antique quilts (although that gives no wear protection to the edge, which is also the most frequently handled part of the quilt). I'm going to bookmark this post and give it a try the next time I have an appropriate project. The quilt I'm working on right now is pretty scrappy; I'd probably have 30+ different fabrics to piece together for the binding to match. Thanks for sharing!
ReplyDeleteOK you get the award for most awesome binding! I don't know that I would have the patience to do that but it looks amazing! I just might have to give it a try...
ReplyDeleteVicki @ Quilting Lodge
So incredibly helpful!!!!!!!
ReplyDeleteWhat a great idea! Thanks for the tutorial!
ReplyDeleteGreat idea and tutorial!
ReplyDeleteWhen I saw this mentioned on today's post, I thought it would be really challenging -you have made it really straightforward and an approachable new thing to try. Thanks so much!
ReplyDeleteReally nice detailed photos.
ReplyDeleteBeautiful! Thank you for sharing.
ReplyDeleteLoving this soooo much! 😍Thank you!🌟💕
ReplyDeleteYou are very welcome. Enjoy!
DeleteAwesome! Thanks so much for sharing this binding method! Looks Super Fantastic! When I have a quilt project where I think this would work, I'll give it a whirl!
ReplyDeleteEnjoy trying it!
Delete