Thursday, September 19, 2019

Summer Sampler 2019 :: Mission Beach

Oh yay. This week in the Summer Sampler, we're sewing two kinds of hourglass units, something I'm always happy to face. Katie/swim bike quilt designed the block, and honestly, it was a bit of a relief  after the last couple of weeks.


So the countdown is truly on. Just three more blocks before it'll be time to piece them all together with a pretty cool setting plan. Kinda looking forward to that.


Week 17: Scattered [half-hexagons]     Week 16: Twist and Turn [equilateral triangles]
Week 15: Circle Gets the Square [color and fabric placement]
Week 14: Dandelion Clock [freehand foundation piecing/improvisational curves]
Week 13: Altitude [diamonds]     Week 12: Fussy Love [fussy-cutting]
Week 11: Bird's Eye Weave [stripes+curves]     Week 10: Off Kilter [partial seams]
Week 9: Oasis [inset pieced circle]     Week 8: Fierce [tiny piecing]
Week 7: Sparkler [transparency]     Week 6: Cul de Sac [curves]
Week 5: Rope Twist [paper-piecing]     Week 4: Victorian Tile [nested seams]
Week 3: Curious Crossing [improvisational piecing]
 Week 2: Pixelations [half-square triangles]     Week 1: Spring Fever [precision piecing]

Wednesday, September 18, 2019

10 Ways to Make a Quilt Back II

A couple of years ago I first shared 10 Ways to Make a Quilt Back, and it seems time to refresh it a bit. Part of the impetus is the #partyinthequiltback hosted by 3rd story workshop over on Instagram. "It's a festival with daily prizes, community, and fun," running from September 18-22. 

So here are some of the many ways I create quilt backs. It's rarely my favorite part of the quilting process, but a necessary one nonetheless. And it's definitely good to have options, right?


1. Whether it's purchasing a wide-back for a large quilt, or discovering an unexpected find in the ole stash that works perfectly with the smaller quilt top I've created, a whole-cloth is quick and satisfying. The time I used a panel from Jeni Baker's Nordika turned out really fun, showing off the quilting like it did.


And for this baby quilt, it was a chance to really show off a sweet print.


Baby Coin

2. Matched-seam backing is one of the newer techniques I've tried, and I'm still perfecting my skills. Of course, you need to have an extra long length of fabric, depending on the fabric's design, but it's totally worth it.


3. Two years later, it's still true. If I made a backing of stashed fat quarters for all my future quilts, I think I'd be set for life. Simple to sew together, and a great stash buster.


4. Using a design repeated from the quilt front is probably my favorite way to create a quilt back.


5. A close second is using just an element from the front design....


or repeated elements.


6. Something I've just done a couple of times, but with great effect is the use of border prints. I was so pleased how this turned out and I need to do it again!


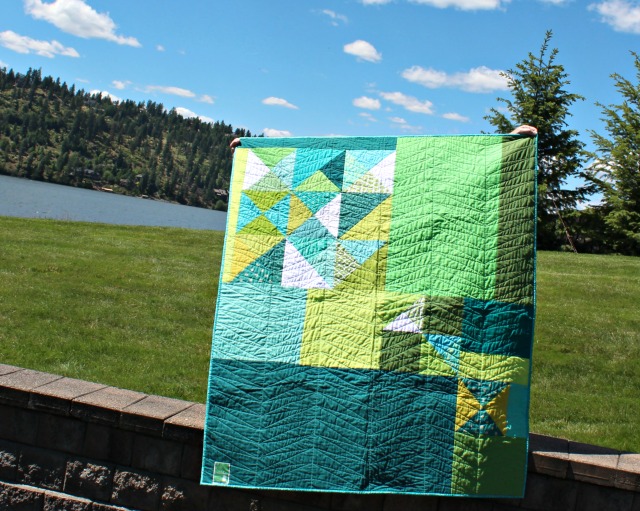
7. Of course, the combination of simple geometric elements is always a win-win.


Both the solid version above and the gingham one below completely use leftover fabrics from the front, a matchy-matchy approach I really love.


8. It's also great fun to super-size just one block from those on the quilt front.


9. And surprise surprise, sometimes an improvisationally pieced back is just the ticket. Oh yeah.


10. And lastly, why not back a quilt top with another quilt top? Won't do a bona fide two-sided quilt every time, but I loved doing it here. And for those of you who have stacks of quilt tops ready to quilt.... well why not?


So tell us about your go-to quilt back, will you? And consider joining in with
#partyinthequiltback. Fun times and inspiration to boot.

Tuesday, September 17, 2019

Crosscut Connections

What a surprise to wake up yesterday, tagged by my long-time friend Andrea/
Quiltmanufaktur, and seeing her gorgeous Crosscut quilt. You may just recognize the improvisational 'pattern' from a quiltalong I hosted a couple of years ago. Oodles of them have been made, even after the quiltalong, and I'm tagged on another nearly every week. But I'm not sure many have seen the notoriety that this one has. 


Andrea was asked by Bernina to create a quilt with very particular specifications. She says, "The sought-after quilt should look masculine and modern, the main color should be blue - the other colors are brownish and yellow. Could I have such a quilt ?! No, I did not have and spontaneously I did not think of any of my many quilt friends who had such a quilt in their repertoire. So I decided to make a quilt with these specifications!" 


It was by mutual agreement that Andrea created a Crosscut quilt top based on my tutorial, all to give a shout-out for the Bernette Brand Campaign. Bernette, by the way, is a brand of the BERNINA Textile Group designed for those who are looking for a high-quality machine with many features yet reasonably priced. 


There was a very interesting twist about the finishing of this particular Crosscut quilt, and Andrea tells all about it in her post. 


Fun, right? If you're new to the Crosscut technique, there are several Instagram hashtags to peruse - #crosscutblocks#crosscutquiltalong, and #crosscutquilt - and you'll see what a fun technique it is, resulting in a unique quilt design each and every time.

All photos used by permission of Andrea Kollath.

Wednesday, September 11, 2019

Summer Sampler 2019 :: Scattered

I'll confess that I took one look at this week's Summer Sampler block, saw that it was made of half-hexagons, and audibly sighed, "oh no." I mean I'm ok with the hexies, but there were SO many pieces (80 to be exact!), that I kind of dreaded it all. Designed by Faith/Fresh Lemons Quilts, Scattered is an awesome looking block though, so I started in, happy that I could use my Hex N More ruler instead of a printed template and that I could cut my hexies 95% out of project scraps. All that helped alot!


And as for piecing, half-hexagons are a breeze. With all the pieces, careful and consistent pressing was required, but even that went well enough. Gotta say, I think Scattered is my new favorite block!


Week 16: Twist and Turn [equilateral triangles]
Week 15: Circle Gets the Square [color and fabric placement]
Week 14: Dandelion Clock [freehand foundation piecing/improvisational curves]
Week 13: Altitude [diamonds]     Week 12: Fussy Love [fussy-cutting]
Week 11: Bird's Eye Weave [stripes+curves]     Week 10: Off Kilter [partial seams]
Week 9: Oasis [inset pieced circle]     Week 8: Fierce [tiny piecing]
Week 7: Sparkler [transparency]     Week 6: Cul de Sac [curves]
Week 5: Rope Twist [paper-piecing]     Week 4: Victorian Tile [nested seams]
Week 3: Curious Crossing [improvisational piecing]
 Week 2: Pixelations [half-square triangles]     Week 1: Spring Fever [precision piecing]

Monday, September 9, 2019

Paladin Pouch

Last week was super busy, and come the weekend, a new short-term project was a welcome diversion. I'd been eyeing Sara/Sew Sweetness' new Paladin Pouch pattern, marveling at its construction. With three separate compartments and an interior zipper pocket all protected by one top zip, it looked useful as well as intriguing.... I was really curious how the design came together!


I rummaged around in my stash for fabric, and happened upon a piece of hand-printed linen that I'd won from Salty Oat in a sewalong ages ago. Created by Sarah Waterhouse, this was the project I must have been saving it for. With a Carolyn Friedlander Architextures print for the lining, I was set. Considering my main fabric was a little heavier, I forewent the requested fusible fleece, and instead just interfaced the lining with Pellon SF-101.


Unfortunately my choices in zipper colors wasn't the greatest at my local shop, so I spruced up the beige with a leather tab a la Anna from Noodlehead. Oh yeah. Another tidbit about the zip - I mis-followed directions (user error!) and ended up without proper zipper stops at the other end, so added a bit of leather there too, so my pouch is special like that.


Meanwhile, the construction did indeed prove very interesting! I had treated myself to a version of Sara's pattern that included a video, and I'm glad I did. Kind of felt like Sara was there to hold my hand, especially during the tricky part of the final construction. haha


Anyway, all turned out great, the design IS ingenious, and at 10-1/2” long x 8” tall x 3-1/2” deep (the largest of three sizes available), the pouch is good and roomy. Even without the fusible fleece, it stands on its own, and is perfect for its intended use.

Friday, September 6, 2019

WIP Pouch


Gotta say, I was pretty pleased when Svetlana of SOTAK Handmade asked me to participate in the IG book hop for her book, That Handmade Touch. Published by Lucky Spool, it's a wonderful mix of projects - for you, your home, your craft space - and your pet!


The project I chose to make for the hop was the WIP Pouch, a 10" x 11" quilted, vinyl-fronted pouch perfect for storing works-in-progress or a score of other things of course.


I dug deep into my stash for a focal print I really love, and for the zipper facing and binding, a fun little stripe. The construction of the pouch was straight-forward and relatively quick, which made it especially enjoyable. Really, the only tips necessary about sewing with that vinyl are don't touch it with your iron, and use wonder clips instead of pins Otherwise, it's smooth sewing.


Though I normally bind by hand, I did choose to machine-bind the pouch, just thinking it might be easier with the vinyl component, and I'd do that again.


And yes, the finished pouch could easily be used for a work-in-progress, but instead, I'm using mine to gather up all my zipper pulls for future zips. They'd been in a messy pile in a drawer before, and this makes them so much easier to access and fun to peruse.


So the WIP Pouch isn't my first project from Svetlana's book! I've also made the Pleated Pouch twice (here and here), and same for the On-the-Go Project Bag (here and here). Time to decide what's next!

That Handmade Touch Book Hop runs September 2 - 13. Here's a list of the participants, and I'm linking to their projects as they go live. Enjoy!
9/2 - Heidi Staples/@fabricmutt ~ On-the-Go Project Bag
9/3 - Jeni Baker/@jenib320 ~ QAYG Zipper Pouch
9/4 - Jo Avery/@mybearpaw ~ Pleated Pouch
9/6 - me!/@aquilterstable ~ WIP Pouch
9/9 - Rachel Hauser/@stitchedincolor ~ Wall Pocket
9/12 - Minki Kim/@zeriano ~ Catnip Toy
9/13 - Svetlana Sotak/@sotakhandmade

Thursday, September 5, 2019

Summer Sampler 2019 :: Twist and Turn

When this week's Summer Sampler pattern came through in my email and I saw the design up close, I was totally surprised to find that it was composed of equilateral triangles. Designed by Jemima Flendt of Tied With a Ribbon, I found it more finicky to sew rows together than I did the actual triangles. Go figure. But all is well enough, and I really like how the 'white' fabric is a key player in this one.


SO, we're 16 blocks in, and I'm feeling good about how all my blocks are playing together.


Week 15: Circle Gets the Square [color and fabric placement]
Week 14: Dandelion Clock [freehand foundation piecing/improvisational curves]
Week 13: Altitude [diamonds]     Week 12: Fussy Love [fussy-cutting]
Week 11: Bird's Eye Weave [stripes+curves]     Week 10: Off Kilter [partial seams]
Week 9: Oasis [inset pieced circle]     Week 8: Fierce [tiny piecing]
Week 7: Sparkler [transparency]     Week 6: Cul de Sac [curves]
Week 5: Rope Twist [paper-piecing]     Week 4: Victorian Tile [nested seams]
Week 3: Curious Crossing [improvisational piecing]
 Week 2: Pixelations [half-square triangles]     Week 1: Spring Fever [precision piecing]

Wednesday, September 4, 2019

Begonia :: September

With this month's round on my Seattle MQG Begonia quilt, the end is in sight - just one more round + borders to go! Right now, it's 60" square, and I love those oblong 'boxes' this round added in the corners. Considering this is a mystery quilt-along, there are new surprises with the design at every turn.


Check out the #begoniaquilt hashtag to see more of the growing quilt tops from our guild. I'm really enjoying seeing all the wonderful and varied palettes my guildmates are using. And now, with ALL my HSTs prepped and ready, I'll just wait patiently for next month's instructions!

Tuesday, September 3, 2019

Quilters Meet & Greet

Hello! If you are visiting from the 2019 Online Quilters Meet & Greet, Welcome! Our hostess, Benita of Victoriana Quilt Designs has gathered a circle of quilt bloggers as a way to connect, get acquainted and share what we do, and of course celebrate the community of quilt blogging. Even though I love Instagram and post there regularly, A Quilter's Table is my 'home base' and it's here that I share in more detail about everything I make, as well as the periodic tutorial and newsletter.

I have a deep appreciation for traditional quilting and feel a connection with it in nearly everything I sew. Though my current love is improvisational piecing and quilting, I never forget the influence of those that have gone before me. The quilt I'm choosing to share today is "Timeless", my entry in the 2019 Pantone Quilt Challenge, and a perfect example of a modern quilt being informed by a traditional block pattern. Hourglass blocks are a personal favorite, and making them in multiples makes for a fun exploration. After making oodles of them in a variety of sizes and color combos, I also used two different coral fabrics to make plenty of 'tone on tone' blocks to allow the piece some breathing room. The block-puzzling and layout for quilts such as this can be a challenge, but it's the kind of challenge I really enjoy.


So have fun continuing on with the meeting and greeting by clicking over to Benita's blog, where all the participating bloggers are listed. From there you can link over, meet new quilters, and 'Click to Enter' for a chance at the big grand prize - and it's a goodie! We're talking fabric, Aurifil thread, batting, and more!


And for those of you visiting A Quilter's Table, here's the button to click for an additional chance at winning.


THANK YOU for stopping by! And thanks to Benita for hosting the blog hop and of course the sponsors for their generous contributions. Enjoy and good luck!

Monday, September 2, 2019

Scrap-ish Plaid-ish


Unfortunately I let making a back for my Plaid-ish quilt stall progress, but once I got that done, it was smooth sailing to a finish. 


The Plaid-ish Scrap Quilt is the creation of Erica/@kitchentablequilting, and is a free tutorial that uses several different scrap sizes, which makes it a great one for working through that scrap basket.


As for that backing, I pieced it from stash, including a length of Denyse Schmidt's Flea Market Fancy I'd been hoarding for quite a while. I figured there's no time like the present, right?


For quilting, I went with an uneven grid, following along with seams for some lines, and eyeing others, with meant for pretty stress-free quilting. For the first time, I quilted a grid using Erica's method: from center out to the right, then rotate 90-degrees, and repeat, etc. etc. It worked really well, though I didn't realize till I was done that in her tutorial, she quilts a diagonal grid. Whatever, it worked like a charm, and I'm really happy with how the quilting suits the quilt design.  I used Aurifil 40wt 2024 [white] which provided a pretty subtle look while still coordinating well enough with all of those scraps. 
  

And then when it came time for binding, I actually started in with piecing some scrap bindings from other quilts, but I just wasn't feeling it. So out came the tried-and-true Michael Miller Clown Strips. Considering there IS quite a bit of black in the quilt, I think it turned out being a good fit.


Sooo.... it feels great to have a summer scrap quilt complete.  It finished at 64" x 82", and if you take a peek at the #plaidishquilt hashtag on Instagram, I daresay you might find yourself making one for yourself soon!

This quilt is on my 2019 Finish-A-Long list!