Friday, April 30, 2021

Salsa Medallion I

So I'll tell you right off that I'm behind. In fact, until now, I hadn't even started in on this year's Seattle MQG block of the month. Other things just seemed to take priority. But (hopefully) I'm ready to catch up now and stay on board.

This year's Block of the Month is super clever! It's called the "Salsa Medallion," obviously a medallion quilt; and offers mild, medium, or spicy options every month. SO many options, all around a central theme each month. In fact, it's very much like a 'choose your own adventure' BOM!


Deciding on a palette was a quandary as is often the case, but I finally settled on making this project the first where I dabble with the Pantone Colors of the Year, Illuminating and Ultimate Gray. So Kona Highlight and Cotton Couture Pewter will be my main focus; and already in this one block I've added in bits of Kona Punch, some stripes, and a couple of other random scraps, including one lone piece of a  print by Yoshiko Jinzenji.

So for now at least, I've created my center focal block. I really debated what to do, but when I saw what Laura Loewen/@quiltfortco was doing with her Rocky Mountain Puzzle blocks, I was drawn in that direction. My block measures 13..5" x 17". I thought it might be interesting to begin with a rectangular block as the center focus rather than square. We'll see how that works out!

If you're interested in following along or just want to explore a great resource, do feel free to check it out. There's so much good information there.

Monday, April 26, 2021

the postcardquilt project :: my quilt block

So shortly after I shared the postcard I made for Zak Foster and Amanda Nadig's #postcardquilt 'experiment,' I received an inspiration postcard from Heidi Parkes, and then the pressure was really on!


After staring at her postcard for a week or so, I finally got to work over the weekend, pulling fabric directly inspired by it, right down to that gray smudge. The off-white fabric was slightly textured, just like the surface of the postcard; and the green print, as you will see, included some white 'stitching.' It's the little things, right?


On one hand, I got pretty literal, when it came to the two 'sprouts' on Heidi's card. But then I got into some other improvisational green growing thing shapes, as well as a few gray 'clouds,' as that's what I determined that smudge must represent.


Just over 14" squarish, I was pretty happy with it. 


But something felt missing. And that was a little hand-stitching. You may have noticed that Heidi hand-stitched the fabric onto her postcard; and knowing most of what Heidi creates is hand-stitched, I felt I had to at least give it a go. 


If you scroll back to the first photo, you'll see a faint peach-colored postmark of some sort. That gave me the idea to add a little peachy detailing to the 'flowers' in my block. I left my little quilt - as there is indeed batting and backing - as I may add more stitching before binding, though I'm just not sure. But for now, I cropped it square, per Zak's request, and went ahead and submitted it.


I was surprised at the feelings that arose as I worked on this little project. The whole theme of the project was "newness," and I definitely felt that in all the green, just as I am in real life these days. Newness, spring, hope, all those things; yet still so much uncertainty. And that's why including the 'clouds' felt important.... maybe a bit of shadow over it all? At any rate, my piece is submitted, it was an enjoyable exercise, and I'm looking forward to seeing what inspiration Heidi found in the postcard I sent her, as well as the completed group 'quilt.'

Thursday, April 22, 2021

Hillside Tote + Minimalist Wallet

Spring is definitely here, and even though we're still not going out much, a new bag was in order. I settled on the Hillside Tote, a pattern by Anna Graham of Noodlehead. I love that she makes multiple versions of each of her patterns in different substrates or other options. After perusing several, I decided I'd make one similar to her Green Hillside Tote. With a Waxer Canvas exterior and a canvas 'lining,' Anna omitted the use of any interfacing and that sounded like a win to me!
I did have to hunt a bit to gather all of my supplies. Thought I'd list them all here for your reference as well as mine.


As usual when making a bag, I took my time, doing a few steps per sewing session. An important thing to remember is NO PRESSING when using waxed canvas, but luckily finger-pressing works great. Also, if you haven't used it before, don't freak out too much as your canvas gets scuffed up as you work with it. It can't be avoided, and really shouldn't be, as it definitely adds to the look of the finished bag.


I made the 'mini' version of the bag, vs. the 'regular.' It measures 8 ¼” wide by 2 ½” deep (measured at base), 8 ¼” tall, width at top opening is 10 ½”, and I think it's perfect for something lightweight yet sturdy for spring and summer. It went together swimmingly, and despite one slightly crooked rivet on the strap, I have no complaints whatsoever.

Soooo, once the tote was done, it suddenly made perfect sense to make a coordinating Minimalist Wallet to use with it. Another pattern by Anna, I made the 'mini,' which measures 4 ½” W x 3 ½” H rather than the 'regular,' which is sized more like your average wallet. Happily, I had enough of the mustard canvas to use for the exterior. I found a sweet stashed fabric for the zippered pocket, and I have no idea why, but I also had a gold 4" zipper on hand, which was perfect!

There was a slight misunderstanding on my part which left me to spending a little time with my seam ripper, but it wasn't too traumatic; and before long, I was back on track and had a finished wallet. 

I made it a little harder on myself by going off-script as to Anna's suggested fabrics for this little project, but then again, I have a pretty cute little companion to use with my bag, so there's that.

Gotta say, I really enjoyed the little bag-making detour and am looking forward to putting my new pair to good use!

Tuesday, April 20, 2021

Punchy Geometry

Unfortunately I was so anxious to get Marci/@marcigirl's blocks to the mailbox, I took one mediocre photo, and that was it. Marci's Bee Sewcial prompt was "Punchy Geometry" - "Graphic, clean, simple. True shapes (triangles, squares, ovals, rectangles) they are improv but no blobs (ex. kidney bean.). Geometric not organic." Fun, right?


Marci did share a Pinterest Inspiration Board from which I took alot of inspiration. I didn't expect it to at first, but her chosen palette really drew me in!

Monday, April 19, 2021

Variations

Last month when I took our guild's Traditional Variations class with Cheryl Arkison, I didn't really plan on starting a new quilt. I mean, Cheryl even said as much as our session began - we were there to play, with no end result necessary. But whatever, right?

During class, I played with scraps, and that continued over the next few weeks until I just had to pull from stash a tiny bit to finish some of the larger blocks. Not quite sure why I was so liberal with the block sizes, but that was part of the fun. They ranged from 9" x 15" to 20" x 21".

So somewhere along the way, I decided to create a lap-sized quilt, and at 54" x 65", it's pretty perfect. For a backing, I was really happy to find that the good-sized piece of Denyse Schmidt's Big Dot from her  Franklin line coordinated nicely. To bring it to size, I added Lori Holt's Cross Stitch, one of her backgrounds, some scraps of which are in my blocks as well.

Quilting was a simple diagonal grid, and for binding, I cut from a leftover piece of Carolyn Friedlander's Doe wideback - that thing has been a part of several of my quilts - I just can't seem to use it up!


Anyway, this one was really satisfying fabric play, just as it should have been.


Thursday, April 15, 2021

Meanwhile....

So behind the scenes, I'm quilting my improv log cabin scrap quilt; but also, I've snuck in a couple of smaller projects. You may have already seen one if you subscribe to my newsletter, The Scrap Basket. It's a zipper pouch I made by repurposing one of my actual mini quiltsHomemade Emily Jane gave me the idea in her post, How to Make a Mini Quilt Zipper Pouch, and now that I've done it, I think it's brilliant.


The quilt I started with measured just 14" x 15", a small, scrappy little one. I actually didn't quite use all of it for the pouch, as I had to consider the zippers I had on hand. And yes, it did hurt just the tiniest bit to cut the bindings off a finished project.


But really, it was perfect for it's new life as a pouch! Where Emily actually starts by making a mini quilt as a part of the pouch-making process, I used a finished quilt; but still needed to add a lining like usual, so the quilt-back gets hidden, which is a small price to pay.


So the pouch finished at 7" x 7 3/4", and a leather lacing zipper pull was a logical addition. It'll soon be off to a new home. Fun, right?

Then, after finishing my most recent Dropcloth Sampler, I needed some hand-sewing to work on in the evenings. Between that, and the bleak status of my stash fabric usage, I decided to stitch up some Running Stitch Napkins, a tutorial from Purl Soho


A fortuitous find were the remains of a fat-quarter stack of Anna Graham/Noodlehead's Forage fabric collection. The group is all printed on Essex cotton-linen blend, which obviously makes for a pretty substantial napkin. The only solid I had enough of that worked even reasonably well for the back of the napkins was a Northcott Colorworks in Pearl, a very very light gray, which I'd been 'saving' for quite some time. But as I spend several hours stitching the napkin edges with perle cotton, I decided the Pearl was perfect to bring the grouping together, especially as I stitched each napkin with its own coordinating thread.


My napkins measure 15" square finished, which is as large as I could go with the fabric at hand. I did pre-wash all the fabric before I started cutting, and I think they'll get even softer with subsequent washings. Oh! And one little detail I wanted to be sure and mention was that, per the tutorial, all knots are on the right-side of the feature fabrics! Though I've seen others do this, I never had, so it felt a little naughty, but very fun, just the same!


Anyway, I really enjoyed making these too and using several yards of stash fabric in the process. Now back to quilting!

Tuesday, April 13, 2021

Snowflake Sampler :: Large Snowflake

Well, I just finished my latest Snowflake Sampler block, and it's the biggest one so far at 21" square! I used the same variegated blue floss as in the Tiny Snowflakes block due to the snowflake 'theme.' A couple of new stitch designs were included in this block so that added to the enjoyment.


Sadly, I tried several times to get a good photo of my block, and wasn't too successful. But here are a couple of close-ups!


In case you missed my previous blocks, I'll keep a running list as I stitch along:

X and O Star   +   Tiny Snowflakes   +   Lacy Flowers

Thursday, April 8, 2021

the postcardquilt project :: my postcard

When I saw Zak Foster post about his #postcardquilt 'experiment,' I went and signed up right away! According to Zak, "This creative collaboration is designed to help us get our creativity primed and ready for a new season of making." Sounds good to me!

It's easy to participate, though the timeframe is snappy. Basically, you make a postcard, expressing the theme of newness. Then you mail off your postcard to your assigned collaborator. That means you'll receive a postcard too! And then inspired by the postcard you receive, you create a quilt block!  Once you post it on Instagram, you're done! Zak will use all the block photos to create a digital community quilt. See the nitty gritty about dates etc. on Zak's blog.

The project is co-hosted by Amanda Nadig. If you're interested in participating, be sure to watch the video she and Zak made about this creative challenge. Amanda gives SO many great ideas on how to let the postcard you receive inspire your block (and future work!). Be sure and sign up today, April 8, as mailing assignments will be emailed out tomorrow!

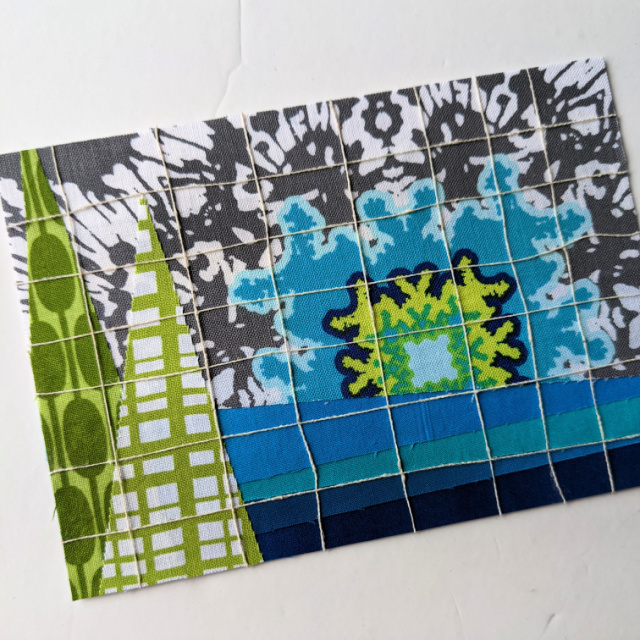
SO, I made my postcard last evening! Apologies to artist Frederick Stuart Church, who painted his "Girl with Rabbits" in 1886, which now hangs at the National Museum of American Art in the Smithsonian. I proceeded to cover his lovely art with mine.


I used a few scraps to tell my story of newness. If you've followed me on Instagram, invariably you've seen photos of the lake view seen from our home. Well part of the joy in the change of seasons is how the view changes. It feels new every day. Very simply, I portrayed the 'view' on my postcard - the colors of the lake, green trees, a rising (or setting) sun, and a 'sky' full of clouds.


I forgot to take a photo once I'd gotten that far, but something was definitely missing. It came to me that I see the view most often from the small screened window in our bathroom. I debated briefly how to add the 'screen' to my little art piece, and decided to try using the threads from a scrap of linen.


All of the fabric elements are just glued to the front of the postcard. We were told we could sew or otherwise apply them, but were challenged to use a method that wasn't our usual - such as glue. So it'll be interesting to see how my card travels through the postal system, but I'm looking forward to finding out. I'll report back once it reaches its destination and I receive my inspiration card. And don't forget, sign-up today if you want to join the fun!

It seems I've taken the prompt more literally than some, but that's OK! See the other cards folks are making at #postcardquiltwip.

Wednesday, April 7, 2021

Bow Ties No. 1

Finally! After watching lots of wonderful 'black & white + one' quilts pop up on Instagram, I was able to clear the schedule for my own participation in the Black and White Challenge with the Quilt Improv Studio. The guidelines are pretty simple, and the time-frame generous, quilts not being 'due' until May 16. First up was sharing your fabric. My 'plus one' to add to my black and white was Kona Pickle.

Random note: several weeks ago, I found out that unbeknownst to me, my grandma made bow tie quilts back in the day. I've been itching to dabble with the bow tie block ever since, and the challenge felt like a good time. I had in mind how I might make them improvisationally, but then browsing through Gwen Marston's Liberated Quiltmaking, I saw she had included a liberated bow tie block, so that sealed the deal. I set in making blocks out of 2.5" squares of all three colors.

Choosing a layout for my blocks required some design wall play. Alot of the more traditional layouts would call for more of a 'background' than I was interested in. Luckily, I tried arranging them in such a way that I only needed setting triangles, and making those black let the whole design float in a way that appealed to me. Plus I really like the secondary designs that were created, though I didn't over-think their placement as much as maybe I could have.

At any rate, on to quilting! I was able to find a backing in stash that in my mind, 'fit,' and not just in palette. Bow ties on the front; martini olives on the back. What's not to love? Remember Midwest Modern by Amy Butler? Well this is Martini in Mustard. Considering this was one of my most cherished old favorites, I hesitated only slightly before cutting it to size. I have a couple of large-ish scraps, so hopefully they can find their way into another project soon.

For quilting, I revisited an oldie but goodie from the AQS blog: 25 Nine Patch Quilting Designs. It apparently doesn't have a name, but it's a combination of angled lines, which I stitched with my walking foot using black thread.


I gotta say, black solid fabric really attracts the lint! Even after 'cleaning' it several times with my lint-roller, it still felt messy. I finally went ahead and threw it in the wash. Not sure that even helped much, but it did add the expected crinkle.

Finishing at 26" x 26", this was an enjoyable first go at those bow ties, and I expect I'll explore with them again.

#quiltimprovstudio #improvblackandwhite

Friday, April 2, 2021

ABC Sprinkle

Another month, another Dropcloth sampler! If I'm not mistaken, this is the 7th one I've finished since the stay-home time began in our area, the 3rd with ABCs (also Disco Nap and ABC Max). Every one, of course, is my new favorite.


With this one, I kept the palette very controlled, mixing both solid perle cotton and variegated. I think I was successful in using two different threads in each letter. At first I was afraid I'd get bored with this one, since it was stitched only with the running stitch; but thankfully, that never happened.


So perfect timing on this finish, as the newest Snowflake Sampler block just dropped, and I'll have that to work on for a while. But I hear Rebecca has another Dropcloth Sampler in the works, so I'm patiently standing by.

Thursday, April 1, 2021

March Fabric Usage

This saga is quickly becoming a very pitiful story. Between actually winning fabric and birthday gift cards, the fabric just keeps coming in. This month it resulted in restocking a few solids, increasing my blue stash, and happily, a new pressing table cover.


Several of the blues found their way into A Storm Story, which was quite perfect, actually. So once again, I'm not feeling terrible about it, just hoping to keep heading in the 'use the stash' direction.

March Fabric Usage
Used up: 10.5 yards
Brought in: 10.25 yards
Net: -.25 yards
Year to date: -.54 yards