Showing posts with label zip pouch. Show all posts

Thursday, April 15, 2021

Meanwhile....

So behind the scenes, I'm quilting my improv log cabin scrap quilt; but also, I've snuck in a couple of smaller projects. You may have already seen one if you subscribe to my newsletter, The Scrap Basket. It's a zipper pouch I made by repurposing one of my actual mini quiltsHomemade Emily Jane gave me the idea in her post, How to Make a Mini Quilt Zipper Pouch, and now that I've done it, I think it's brilliant.


The quilt I started with measured just 14" x 15", a small, scrappy little one. I actually didn't quite use all of it for the pouch, as I had to consider the zippers I had on hand. And yes, it did hurt just the tiniest bit to cut the bindings off a finished project.


But really, it was perfect for it's new life as a pouch! Where Emily actually starts by making a mini quilt as a part of the pouch-making process, I used a finished quilt; but still needed to add a lining like usual, so the quilt-back gets hidden, which is a small price to pay.


So the pouch finished at 7" x 7 3/4", and a leather lacing zipper pull was a logical addition. It'll soon be off to a new home. Fun, right?

Then, after finishing my most recent Dropcloth Sampler, I needed some hand-sewing to work on in the evenings. Between that, and the bleak status of my stash fabric usage, I decided to stitch up some Running Stitch Napkins, a tutorial from Purl Soho


A fortuitous find were the remains of a fat-quarter stack of Anna Graham/Noodlehead's Forage fabric collection. The group is all printed on Essex cotton-linen blend, which obviously makes for a pretty substantial napkin. The only solid I had enough of that worked even reasonably well for the back of the napkins was a Northcott Colorworks in Pearl, a very very light gray, which I'd been 'saving' for quite some time. But as I spend several hours stitching the napkin edges with perle cotton, I decided the Pearl was perfect to bring the grouping together, especially as I stitched each napkin with its own coordinating thread.


My napkins measure 15" square finished, which is as large as I could go with the fabric at hand. I did pre-wash all the fabric before I started cutting, and I think they'll get even softer with subsequent washings. Oh! And one little detail I wanted to be sure and mention was that, per the tutorial, all knots are on the right-side of the feature fabrics! Though I've seen others do this, I never had, so it felt a little naughty, but very fun, just the same!


Anyway, I really enjoyed making these too and using several yards of stash fabric in the process. Now back to quilting!

Monday, January 22, 2018

Giftable Projects

When Svetlana/s.o.t.a.k handmade asked if I'd like to watch her new Craftsy class, I jumped right on it! I've made many of her patterns and tutorials, and am a real fan!  Her class, Giftable Projects: Zippered Bags & Purse Organizer actually includes three projects: The Easy Coin Pouch, The Two-Zip Pouch, and her Keep-It-Neat Purse Organizer.

The projects are presented in order from easy and quick to more detailed, so obviously I started with the small coin pouch.


Truth be told, I was over-eager, and jumped right in without having the suggested 5" zipper on hand, adjusting the pattern size ever so slightly to accommodate the 6" zip I did have. But the zipper had bronze metal, and I had no bronze snaps, so I mixed things up and chose to use a stud closure instead. And of course once I decided on that I opted to switch out the pocket tab for a scrap of leather. All that to say, maybe not the best idea if you are new to pouch-making, but once you have the basic techniques under your belt - and you will definitely get them in this class - you'll find pouches fun to customize.


So personal tweaks aside, I did make a rookie oversight. In step one, Svetlena guided the making of a handy wrist strap but can you see my little predicament? Yup. My darling zip doesn't allow for the strap to be attached. So I guess I'll set it aside for another pouch!


Meanwhile, I can highly recommend Svetlana's class. Though I only made one project so far, I reviewed all three of them, and found that Svetlana really packed in a nice variety of metal zipper applications and plenty of little tips throughout the lessons. Plus she has a nice, comfortable teaching style and the Craftsy platform made it easy to follow along while adding a fun new way to take advantage of her delightful pouch designs. The one thing about video, is it clarifies every step so well.

Metal zips especially can be a little intimidating to some, and if that's the case for you, I think you'll be pleased how Svetlana helps you master them while making three attractive and usable pouches. Looks like right now all classes are on sale too - bonus!

Friday, December 22, 2017

Make, Making, Made

Feeling pretty in control of all the Christmas prep by last Sunday, I thought I just might have time to whip up some zip pouches for my coworkers.

First up was a tutorial I'd been wanting to try, the Boxy Pouch by Svetlana/s.o.t.a.k handmade. I opted for a whimsical bee print from Laurie Wisbrun's Bright and Buzzy line. It's an older one that I think was waiting in the ole stash just for this time. I copied the use of the black and white stripes from Svetlana, and I think it makes the pouch.


Then there were a couple where I kept the shape simple. The first got a strip of contrasting fabric, and one of my leather labels....


and one with what to me seemed a Scandinavian-inspired design that suited the recipient.


And then two Color Block Pouches, also a s.o.t.a.k handmade tutorial, which I made with shot cotton. For some reason, I think this pouch design and the shot cotton really pair well together, which is why I've used this combo several times before. [And I just now noticed that I flipped the front panel 180-degrees on one of these.... oops!]


All of the flat pouches were made with SF101 interfacing (the boxy pouch got fusible fleece), metal zippers from Zipit, and either suede or deerskin lacing pulls.


Happily, all were well-received when they were gifted yesterday. Small makes, they allowed me a little sewing time during a busy season, while letting me share the gift of handmade. Oh yeah.

Monday, November 2, 2015

Hello Sophia

When I was looking to make a pouch to coordinate with my mom's new bag, I hopped right on over to s.o.t.a.k handmade to see what Svetlana had that I hadn't tried yet. There I happened upon the sophia pouch, and I can now say it's a new favorite.


For 5"x8", this pouch has plenty of extras - a roomy exterior pocket with velco closure, an interior pocket, plus a 1" gusset that allows for extra space. And the pouch has what I consider Svetlana's signature zipper technique, which personally I like alot, and which you'll also find on her lola pouch. Though the pattern calls for piping, I went without this time, but it's definitely another nice design element.

Fabric-wise, I believe the 'main' fabric I used was a chambray, though I'm not 100% sure. It gave just the look I was after though. All other fabrics were Cotton + Steel - the dark blue/black on the exterior pocket and zipper binding is from the Honeymoon collection by Sarah Watts (same as mom's bag); the interior pocket and lining fabrics are both from Zephyr by Rashina Coleman-Hale. Mom chose them all from my stack of C+S, and I think they go really nicely together.

Making a new pattern like this, I go super slowly, reading and rereading each step. But that aside, it was easy to follow, and the pouch was very enjoyable to make. I'd definitely make it again....

Linking up with Finish It Up Friday.

Tuesday, February 3, 2015

Hello, Lola!

Every now and then, don't you just get the urge to drop everything and do something totally unplanned? I sure do, and I did just that Friday night after checking out the new lola pouch pattern from Svetlana/s.o.t.a.k handmade.
I made the larger of 2 sizes offered, which measured a roomy 12” x 6.5” x 4”. Black Essex yard dyed linen was my choice for the exterior bottom, and the rest of the fabrics are Cotton + Steel. I do love fussy-cutting now and then, and it was perfect for the main print (Night Sky in Indigo) so I could get as many complete butterflies as I could, and match that 'bunting' on both sides. Sometimes I don't want a really poofy pouch, so I opted to use Pellon SF101 Shape-Flex in place of the suggested fusible fleece on the exterior pieces. (It's also used on the lining.) I think this combo makes for a sturdy yet flexible finish.

My favorite detail of the entire pouch is that recessed zipper. I'd never done one, and Svetlana's technique was flawless. I really loved the stripe she'd used on the zipper binding of her own pouches (click the pattern link for photos), but there was no stripe in my C+S stash, so I made do by cutting the Backgammonish print just so to create the stripe I wanted. Very fun!

I'll definitely be adding Lola to my zip pouch repertoire. It's a keeper!

Linking up with Fabric Tuesday.

Friday, August 8, 2014

Littles

Even though I'm working on a couple of larger projects, I snuck in a few small ones this week and enjoyed that little breather.
First were two pouches. The Dumpling Pouch by Michelle Patterns was a new one to me, and isn't it cute?! I did "the easier one" (yes, there are two on the pattern sheet) and I'm glad I did. Just because it's small, the turning was a little finicky. I do think I'll try a thinner batt the next time, but the technique itself was so clever, and don't be afraid of that curved zip, as it's easy peasy. The pattern suggests hand basting, though I was brave and just pinned with my littlest pins - worked like a charm.
Next was a zakka pouch from Zakka Style - a pattern I made back with The Zakka Style Sew Along. Here's the original, more like the pouch in the book, done in hexies and tweed . . .
And here's the latest, done in bright modern fabric, without the linen corners. I like it both ways, and even though you can't see the bright purple zip I put in this new one, the slight curve along the bottom is more prominent - a feature I really like. Either way, it's a great little pattern by Hey Porkchop! and it was fun to revisit.
The next little project were some Cotton+Steel luggage tags, using the tutorial by Flamingo Toes. The first one I made is on the right below, and see how it has a 'pocket' on the flip side of the vinyl? That's designed for business cards - a clever idea for sure, but since I used the vinyl I had on hand, certainly thicker than the recommended 12 gauge, the little thing was very difficult to turn. So on the next few, I left off that pocket. Options are good, don't you think?
So the two salmon ones are for me, and the two navy are for hubby - similar but different.
By the way, when I showed hubby the first holder, he was concerned about our address info coming out of the vinyl pocket. So at his suggestion, I added a teeny-tiny (1/4" by 3/4") velco fastener to the pockets of the remaining tags. You can see the stitching on the one in the photo below.
So back to the bigger projects waiting, yes indeed!

Linking up with Finish It Up Friday.

Monday, April 21, 2014

So Many Zips

In an effort to make a few little gifts over the weekend, I pulled out all my zips. I know there are two camps when it comes to zippers - organized or not. It's pretty obvious which camp I subscribe to. yikes.
But it works for me. As did the fun little tutorial I tried: the Coin Purse Tutorial by Keeper of the Skies Wife (aka sewbettyjane on Instagram). Not unexpected, it took longer to choose fabrics than it did to sew these up.
Just for the record, the tutorial has you cut your fabrics 5"x8", which turned out really cute, though I decided after a couple, to cut 6"x9", and continued to make most of the pouches that larger size. All except the tiny pink one for grandgirl, which I cut 4"x6 1/2". So yes, this tutorial is very adaptable.

After this, I need to touch base with zipit and stock up again. But it was totally worth a few hours of fun.

Sunday, August 12, 2012

Triple-Zip Pouch :: A Tutorial


Supplies Needed
  • 3 zippers, 9" or longer
  • fabric for pouch body, accent pieces, and linings (fat-quarters are plenty for the pouch body and linings; accents can be made from scraps)
  • fusible fleece
  • coordinating thread (which may be more than one, depending on your choice of accent fabrics)
     All seams are 1/4”
     * Note: The piece indicated is one already partially stitched onto the pouch. Now you will be stitching on the other end; will be a lining piece that you are working with, except for the last instance, where it will be the main body fabric.

Cutting Instructions
1 –  main body fabric, 8” x 9 ½”
1 – fusible fleece, 8" x 9 ½” (not shown)
2 – front accent pieces (can be the same or contrasting), 8" x 1 ¼”
2 – pieces fusible fleece, 8" x 1 ¼” (not shown)
6 – zipper ends (all matching or matching pairs), 2 ½" x 3”
1 – main zip lining fabric, 8" x 12 ½”
1 – center zip lining fabric, 8" x 9 ½”
1 – bottom zip lining fabric, 7" x 8”


Preparing Fabric

Adhere fusible fleece to matching fabric piece. (not shown)

Preparing Zippers
Fold and press 1/4" fold in each of the 2 1/2" x 3" fabric pieces, along a 3" edge. Fold each piece in half again so each measures 1 1/2" x 2 1/4".
Pin the folded 'tabs' over the zippers so they extend approximately 3/4" in from the edges of the main body fabric. Stitch across each folded edge.
Pull back each tab and trim off excess zipper at one end, extra zipper tape at the other end.
Also trim along edge of zipper, so tabs basically just cover both zipper ends, without excess, per picture below.

From here forward, zippers will be referred to as #1 (bottom zipper from front view), #2 (center zipper from front view), & #3 (main/top zipper from front view). Bottom edge of each zipper will be referred to as “B”; top edge of each zipper will be referred to as “T”. We’ll be installing the zippers from the bottom up.

Zipper Installation
  • For zipper #1B, lay on your work surface, in order given:
Main fabric UP
Zipper #1 face DOWN, zipper pull to the left
Bottom (smallest) lining face DOWN

Pin well, between layers if needed.

Using a zipper foot, stitch 1/4” seam along length of zipper, removing pins as you go.
(Confession: sometimes I need to sew along until I reach the zipper pull, remove from machine & rearrange the pull out of the way, then continue stitching.)

Once stitched, remove from machine and arrange fabric so zipper is fully visible, & main fabric and lining are wrong-sides together. Press well & top-stitch close to zipper.
  • For zipper #1T, lay on your work surface, in order given:
Bottom (smallest) lining face UP* 
Zipper #1 face UP, zipper pull to the left
Accent piece #1 face DOWN

Pin well, between layers if needed.
Using a zipper foot, stitch 1/4” seam along length of zipper, removing pins as you go. Once stitched, remove from machine and arrange fabric so zipper is fully visible, pressing pocket lining down & accent piece up. Top-stitch close to zipper.
  • For zipper #2B, lay on your work surface, in order given:
Accent piece #1 face UP
Zipper #2 face DOWN, zipper pull to the left
Center (medium-sized) lining face DOWN

Pin well, between layers if needed.
Using a zipper foot, stitch 1/4” seam along length of zipper, removing pins as you go. Once stitched, remove from machine and arrange fabric so zipper is fully visible, pressing pocket lining down & accent piece with zipper up. Top-stitch close to zipper.
  • For zipper #2T, lay on your work surface, in order given:
Center (medium-sized) lining face UP*
Zipper #2 face UP, zipper pull to the left
Accent piece #2 face DOWN

Pin well, between layers if needed.
Using a zipper foot, stitch 1/4” seam along length of zipper, removing pins as you go. Once stitched, remove from machine and arrange fabric so zipper is fully visible, pressing pocket lining down & accent piece up. Top-stitch close to zipper.
  • For zipper #3B, lay on your work surface, in order given:
Accent piece #2 face UP
Zipper #3 face DOWN, zipper pull to the left
Main (largest) lining face DOWN

Pin well, between layers if needed. Using a zipper foot, stitch 1/4” seam along length of zipper, removing pins as you go. Once stitched, remove from machine and arrange fabric so zipper is fully visible, pressing pocket lining down. Top-stitch close to zipper.
  • For zipper #3T, lay on your work surface, in order given:
Main (largest) lining face UP*
Zipper #3 face UP, zipper pull to the left
Main body fabric face DOWN*

Pin well, between layers if needed. Using a zipper foot, stitch 1/4” seam along length of zipper, removing pins as you go.
Once you sew this step, your project will be inside out, and somewhat odd looking. No worries! You're still on the right track!

To Finish

This is where it got really difficult to take meaningful pictures, so read carefully and just go step by step.
  • Reach in through the main lining fabric fold and turn inside out, so all you see is the main lining, right side out. Reach in and unzip the main zipper. 
  • Work from here on one side edge of pouch at a time. Line up edge, pushing main lining out of the way as best you can. Pin edges together, and starting from bottom, stitch up the side of the pouch, removing pins as you go and going up as far as you can. 
  • Now bring the lining back where you can work on it, pushing the seam you just sewed into the pouch, out of the way. Press edges of lining in 1/4", pin sides together, and starting from bottom, stitch up the side of the pouch, removing pins as you go and going up as far as you can. 
  • Repeat for other side.
  • Turn pouch inside out through open main zipper, pushing out corners to shape. Press edges with your iron for a clean finished look!

The story behind this pouch can be found here. If you make a Triple-Zip Pouch or are inspired by this tutorial, please feel free to post a photo in my flickr group ~ Quilting with A Quilter's Table. Thanks!

Friday, July 27, 2012

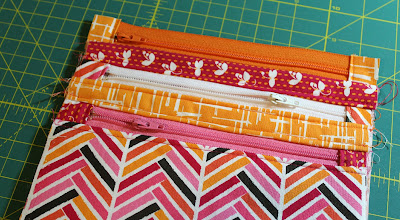
Triple-Zip Pouch

There is a tutorial half-written, that hopefully you will see one day soon. I was well on my way to sharing it today, but you all know how life happens. And it did. So instead, I'll keep working on it and test it out a bit, and for today, I'll just share the result - my newest zip pouch.
It all started when a friend brought me a pouch from her trip to Hawaii. It's an awesome blue with sea turtles swimming all over it, and it's perfect storage for my rotary cutters and blades and such. Anyway, she handed it to me, saying five little words: "Here's a challenge for you!" Challenge indeed! This zippy has 3(!) zippers. I hate to say that the gifted pouch has been sitting on my work table for a while . . . waiting. And what better occasion to give it a go than my friend's birthday this week. 
It wasn't really the zippers that scared me. It was the linings. It was a mind-bender figuring out how it all went together, and well, how it worked . . . But surprisingly, once I started measuring and cutting and stitching, it only took me a couple of hours to make it happen.
Next challenge?

Linking up with sew & tell and Fabric Tuesday.