Whew! I really need to make up for lost time on a baby quilt that should have been done by now (oops!) but that aside, the #pinnieparade was great fun, and I'm glad I did it. Did I really need nearly 25 new pincushions? Uh, not really, But it was a really enjoyable diversion, and even though on several days when I literally didn't have a spare moment I shared old favorites, most days I sat down for 30+ minutes to try a new pattern or an improvisational design. Here are links to the previous round-ups [one, two, three], and below you'll see my final batch!
Day 24 - I kinda love pink flamingo and red together. For this one, I used the flying geese paper-piecing template from Amanda Jean/crazy mom quilts' Plenty of Pincushions Vol. 1, but neglected to glance at the instructions again or I would have noticed there should have been another strip of gray to the right of the geese. I still like it so oooh well.
Day 25 - On this day, I challenged myself to just use the scraps piled on my cutting table. Even with it's tiny improv curves, I still really enjoyed making this one.
Day 26 - This one was inspired by the scrappy strings 9-patch by @therootconnection.... and is one of my favorites.
Day 27 - After posting the Improv Quarter Log Cabin tutorial, of course I had to make one pincushion size, totally drawn from the scrap basket in black and white and red.
Day 28 - Oh goodness. This little one featuring Cotton + Steel Strawberry Peach was so fun. As I mentioned on Instagram, I had grandgirl on my mind when I made it, even tho she told me over the weekend that she didn't like quilting.... When I made a sad face, she quickly changed her story... "I'm sure I will when I'm older, Grammy!" Fingers crossed!
Day 29 - Though this little liberated star kinda fades into the background. Um.... plaid.
Day 30 - I'm a little disappointed in this one, inspired by my X Marks the Improv block tutorial, basically because I wish I'd cut the Xs narrower. OH well. This is actually one of the smaller pinnies I made.
Day 31 - And for the last day of the #pinnieparade, I know sewing is not in the cards, but that's OK, because I really needed to include this Circle of Geese. I made it a few years back for my friend Sharon/@redapplestitches after seeing Kelly/Jeliquilts' "A Circle of Geese" pincushion. The pattern is by Piece by Number, printed at 33%. I kinda love it.
Soooo. I made it! Thirty-one days, and I managed to make at least one pincushion on 23 of them. Yikes! But cool.
Pages
▼
Thursday, August 31, 2017
Tuesday, August 29, 2017
Coming Soon: Curated Quilts
A while back, I heard about Curated Quilts, the brainchild of Amy Ellis and Christine Ricks, and my ears perked up (so to speak). Not one to peruse quilting magazines much, the idea of a 'quilting journal' sounded really interesting.... A printed quarterly journal that will curate a gallery of quilts, share current trends, impart interviews with artists and lend inspiration.
Maybe you've already discovered the Instagram hashtag @curatedquilts or the facebook page. If not, now you have the links!
I was more than pleased to be asked to share two of my quilts in the quilt gallery, this first one on linear quilts. I'll let you be surprised about what quilts, OK? ;-)
Sounds pretty cool, eh? Curated Quilts is available for pre-order now, and will be shipping near the end of September. There's a special on the first 100 subscriptions, and individual issues can be purchased as well. Here's a link.
Monday, August 28, 2017
Fragmentary
Finally sharing this finish with you is such sweet relief! I've been working on it off and on since spring, letting it rise to the top of the w.i.p. pile and then be covered up again. For me, it's some of the best kind of random scrappy sewing, and I'm debating starting in on another, as my scrap basket is still plenty full!
I used a variation on the Improv Quarter Log Cabin block tutorial that I shared yesterday. The only self-made rule was to begin with a 'square' of natural Essex linen for each 12 1/2" block. That little bit was all the continuity I was after.
For quilting, I used a serpentine stitch, basically because I like it and it goes relatively fast. I really didn't need any twisting and turning or fancy stuff for this one. At 72" x 72", I'll just say: I wanted it done. Thread was Aurifil 50wt #2309 (Silver White), which was relatively unobtrusive while still being visible enough on the darker sections to add interest.
So whew! It definitely feels good knowing I used oodles of scraps in this one. Why the scrap basket is still half full remains a mystery.
This quilt was on my 2017 Q3 Finish-A-Long list!
I used a variation on the Improv Quarter Log Cabin block tutorial that I shared yesterday. The only self-made rule was to begin with a 'square' of natural Essex linen for each 12 1/2" block. That little bit was all the continuity I was after.
For quilting, I used a serpentine stitch, basically because I like it and it goes relatively fast. I really didn't need any twisting and turning or fancy stuff for this one. At 72" x 72", I'll just say: I wanted it done. Thread was Aurifil 50wt #2309 (Silver White), which was relatively unobtrusive while still being visible enough on the darker sections to add interest.
I save all my binding scraps, and combined most of the solid ones to bind this quilt - blues, grays, and golds.
This quilt was on my 2017 Q3 Finish-A-Long list!
Sunday, August 27, 2017
Improv Quarter Log Cabin
Early last year, I shared an Improv Quarter Log Cabin block tutorial on the Seattle MQG blog, and considering it's a block I am really fond of and keep coming back to, I figured it was high time to share it right here.
We used black and white prints with a white solid, so the instructions are written accordingly. Obviously, you can change things up according to your preferences, including fabric choices and number of rounds, even block size. But this will get you going on the basic block.
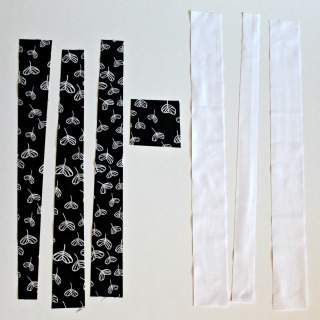
Begin by cutting a squarish shape from the black and white fabric, about 3 1/2″ square, i.e. it shouldn’t necessarily be a square but close. Also cut several strips of both fabrics, 1 1/2″ – 3″ wide. Feel free to slant the strips or you can wait to give it some wonk when you trim each row before continuing on.
Suggested strip lengths:
2 each of white solid: 6″, 8″, 12″
2 each of each print: 8″, 10″, 14″
Or you may work with WOF and trim as you sew.
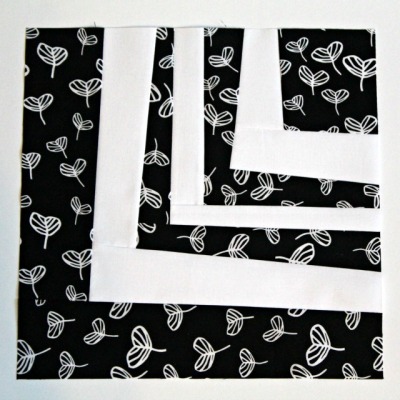
Sew a white strip to the left of the square; press and trim along bottom edge. Sew a white strip on the bottom of the square; press.
Continue adding rows, alternating solid and print. Trim left edge and bottom each time before going on to the next round.
Keep an eye on how your block size is progressing as you go – it might make a difference how much you trim or what size strip you use next. The final block size should be 12 1/2″ square. When you square it up, though, feel free to give it some wonk.
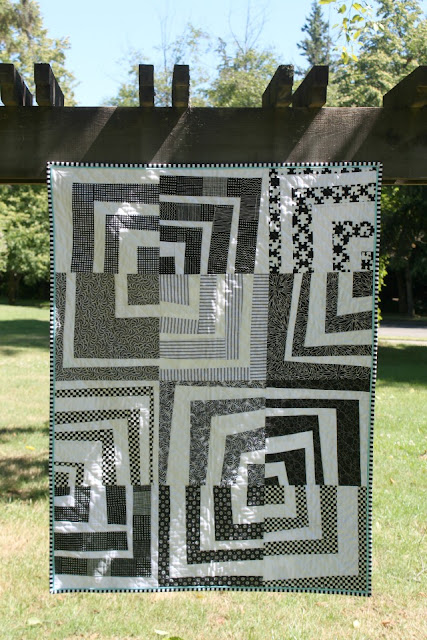
Here are the two quilts the guild made with these blocks:
You might remember I also had Faith Circle of do.Good Stitches use the block to make Quartersaw, which we finished early this year.
And, I've been working on a scrappy improv log cabin quilt for most of the spring and summer, and finally have it done! So stay tuned.... I'll be sharing that next!
Friday, August 25, 2017
Showing Off Improv Stripes :: Two
You guys! I'm just so enamored with all you've created with your improv stripes! If you missed the first round-up, look here. Then sit back and check out this batch. They are stunning!
Andrea/andreanaeht
Audrey/audreymarie_km
Tina/barkinghen
Cindy/clammon
Ellyn/ellynz (blog post)
Wow, right? I think I've shared all the current finishes between this post and the last, but if I'm missing someone, please let me know! And keep them coming and tagging them #improvstripesqal cuz we want to see them!
Andrea/andreanaeht
Audrey/audreymarie_km
Tina/barkinghen
Cindy/clammon
Ellyn/ellynz (blog post)
Giovanna/jonik71
Evie/landry.evie
Laura/llinkshwk
Beth/lovelaughquilt
Martina/malu27117
Martha/mjemyers
Oggi/ogginelle
Wow, right? I think I've shared all the current finishes between this post and the last, but if I'm missing someone, please let me know! And keep them coming and tagging them #improvstripesqal cuz we want to see them!
Thursday, August 24, 2017
Still Making Pincushions!
So the third week of the #pinnieparade is behind us, and I've yet to become tired of making a little pincushion nearly every day. In fact, it's been good!
Day 15 - After seeing Andrea/@3rdstoryworkshop's Glossary in Colour, in Pincushions, I of course had to try her Quilt Improv Pincushion tutorial, and it was quick and fun.
Day 16 - I happened upon the Color Wheel Pincushion perusing my Pincushion pin board, and I'm so glad I gave it a go! The pattern is by Erika Mulvenna on we all sew and I was surprised how nicely it went together. I love the shape, the solids, and I confess, even the black-and-white stripe I impulsively used for the back.
Day 17 - A non-sewing day was a good chance to share my two-sided 6" everyday pincushion. When I made it, I wanted crinkle in that patchwork, so I hand-washed both top and bottom 'blocks' before adding the sides and filling. It's still a favorite....
Day 18 - This one was inspired by a #pincushion in @crazymomquilts' #noscrapleftbehind, except I used some #scrappy #crazypiecing bits I had leftover from another project. Can't say it's my favorite, but I'll try again sometime and actually follow the pattern.
Day 19 - I really like how this mini #crosscutblocks pinnie turned out, though its small size and my use of Essex for the background made it a little fiddly to work with. No worries. I still love it, it evoked happy memories, and that dense grid quilting was good fun.
Day 20 - This log-cabin variation was a joy to piece, just pulling random choices from the solid scrap bin. I did get a little carried away size-wise (4" x 7"), but I again washed the top prior to final construction to get that extra crinkle, and that made it pretty much perfect.
Day 21 - I'm still smitten with improv spikes, and luckily it dawned on me to use them to make a pincushion! A random selection of scraps from the basket, and I made quick work of them, got a little carried away again and ended up with another largish 4" x 7" pinnie. But I'm ok with that!
Day 22 - Yesterday when Heidi/Fabric Mutt posted her Diamond Block tutorial, I had an 'ah-ha!' moment, and immediately thought pincushion. Simple and sweet, I'm so glad I did!
Day 23 - Shared an oldie but goodie yesterday where I started with the 12 1/2" New England Quilt Block tutorial by A Bright Corner, then down-sizing it by 50%. This was the first big 6" pincushion I made and besides its generous size, I love the controlled scrappiness and matchstick quilting.
Whew! I'll close for now and face the final week!