Pages

Wednesday, November 30, 2016

Pixelated Heart

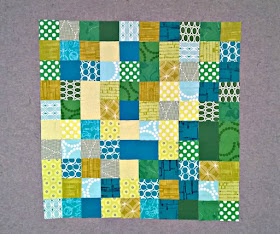
New arrivals in our extended family means baby quilts are definitely in order, and admittedly, I've gotten a very late start. But with this pixelated heart quilt, one can be on its way.


The pattern is from Blue Elephant Stitches, and since I had alot of 2 1/2" squares already cut, I used them rather than the suggested 3" squares. To up-size the quilt just a bit, I added two extra 'background' rows on the left and the bottom.


I used my everyday Aurifil 50wt 2021 (natural white) to quilt a grid, sewing on the right side of each column and the bottom of each row, just to add to the 'offset'.

My original idea was to grow the quilt even more with a 2" finished binding pieced of several of the low-volume fabrics. Which worked great - but as I was sewing it on, I realized it reminded me of the satin edge on a baby blanket - and I liked that alot.


The finished quilt measures 36" x 38" and is super sweet, exactly as I was hoping it should be.


Monday, November 28, 2016

Archipelago

Definition #3 according to Merriam-Webster: "a group or scattering of similar things" .... which is exactly what I set out to create in my latest quilt. What led me to even think of Archipelago as a quilt name was my use of Bahama, one of the Free Spirit Designer Essentials, as my background fabric. I intentionally opted for a color outside my norm, and it was an enjoyable diversion.


A modern interpretation of the very traditional log cabin block, this quilt was made intentionally as an entry to 2017 QuiltCon's American Patchwork & Quilting Nine-Patch Challenge. Whether or not anyone else thinks it qualifies as a nine-patch remains to be seen, but meanwhile, its blocks were exceedingly satisfying to make and the finish pretty darn close to what I'd had in my mind's eye when I began.


The one frustration - and there certainly was one - was the quilting. Measuring 75"x88", this quilt was bigger than I was comfortable with to quilt as I'd originally hoped - something with alot of turning that echoed the mood and shape of the blocks. My second idea was to free-motion quilt it, still with that echo in mind. But within 15 minutes of that, I could feel the stress rising dramatically and knew I wasn't up for what it would take - or do it well. Fast-forward through several tedious unpicking sessions, and I got back to it, this time with an angled grid that I felt pretty good about. I usually quilt much denser, so I'm not real keen on the looseness of the fabric in some portions of the grid; yet on the other hand, it fits the scale and odd angles of the blocks. I used Aurifil 50wt 5006 (light turquoise), a lovely shade that is visible enough while still nestling in discreetly.


Finished off with faced binding, I'll honestly say though I'm very pleased with the result, I'm glad it's done. Though piecing the blocks was quite fun, this one reminded me that a discomfort quilting larger quilts still exists. oh well.


 This quilt was on my Q4 FAL2016 list

Friday, November 25, 2016

Improv Layered Circle

After making what I'm calling an Improv Layered Circle for my Bee Sewcial bee-mate, Leanne/she can quilt, there were several requests for a tutorial. So here was my process for what it's worth!


Cut an improv circle. I started with one about 4-5" in diameter. If you're not happy with your first cut, just trim it up a bit until you like it.


Lay your circle on your next fabric (called 'fabric 2' going forward) so it's overlapping only by 1/4 or 1/3 of the circle's circumference. Cut along the circle as indicated by the arrows. Discard the bit that was under the circle.


Clockwise from upper left: Flip fabric 2 over onto the circle, right-sides together, and start sewing where the two meet, working up to 1/4" seam as you sew around the curve. Fabric 2 will look bunchy when you are done, but press the circle seam edges out and things will smooth out. Turn over to right side and press again. Click here for a little video of the sewing bit, in case that helps.


Trim fabric 2 so there's a nice curve, starting and ending right at the circle edge. Repeat with your next fabric!


This is a fun technique that really isn't as difficult as the end result might imply. Go slow on the curves, careful not to pull on those bias edges. After a few rounds, evaluate what you've done and trim as needed before continuing on.

I'm anxious to see how you use the technique, so be sure and use the hashtag #improvlayeredcircle if you post on Instagram.

Monday, November 21, 2016

Baconrific


Where the idea of bacon emerged as a prompt for Bee Sewcial, I have no idea. But once I thought of it, I couldn't let it go. A food-related item seemed to 'fit' for A Quilter's Table, and well.... bacon.

In The Bacon Consideration, I gathered photos of both actual and superficial bacon, offering it up to my bee-mates as inspiration. As far as palette, I suggested solids such as Kona Brick, Brown, Mocha, Chestnut, Spice, Cinnamon, Cocoa, and Caramel. If a 'background' or more neutral element was needed, I asked for off-white or natural, not white-white. Linen, shot-cotton, leather, or any other texturally-interesting substrates were most welcome. Note that when I told the group to feel free to use a mix of 'fabrics', I didn’t expect them to embrace that so strongly. They included velvet, shot cotton, linen, raw silk, hand dyed cotton, suede, quilter’s cotton, and even fuzzy selvages! 

Here are all the blocks up on the design wall, ready for the gaps to be filled in, always the trickiest part of a quilt like this.


I really liked the mix of blocks - some quite literal with their curves and all. Some much more impressionistic, like the middle block of "bacon bits." But one thing that this circle-loving group wasn't inspired to make was circles! And it came to me that the quilt needed some pancetta blocks.


I added three to the quilt, and have heard from both fans and detractors, but for better or worse, they're in there to stay. [Watch for a tutorial for this kind of layered circle block later this week.]


For quilting, I chose four bacon-imbued thread colors, Aurifil 50wt 1103 (burgandy), 2000 (beige), 2155 (cinnamon), and 2350 (copper), stitching in wavy lines across the quilt to echo that bacon essence.


The quilt, measuring 56" x 64", was finished with a faced binding, which is my favorite method for more 'artsy' quilts like this.


And then the big question loomed - where to go for a photo shoot?

Yes, the local meat market was the obvious choice! So how many of you have stood at the meat counter to pay for your bacon and steak, and posed the question, "I made a quilt inspired by bacon, so would it be ok if I took photos of it in front of your store?" Yeah. 

Much credit goes to the hubby who snagged that empty parking spot while a car was waiting to pull in, so I could get my photos!


Even more difficult than coming up with a photoshoot location was deciding on a name for this truly bacon-inspired quilt. I kept coming back to what grandgirl told me when she saw it in progress weeks ago - "It's baconrific, grammy!" And so it shall be. [Though honestly, hubby has miscalled it "baconstein" more than once, and I'm fond of that too!] 


Lastly, many thanks to LeanneMarciFelicityKarenKariStephanieHillaryAnne, and M-R
for embracing my quirky yet distinctive prompt and working their improv magic. I for one enjoyed it immensely!

This quilt was on my Q4 FAL2016 list! Linking up with Finish It Up Friday.

Thursday, November 17, 2016

Me Neither

It’s kinda funny when you (or others) say “I couldn’t do what you do” referring to my improv work. Five years ago NEITHER COULD I! šŸ˜‰ I was a very traditional quilter – like what else WAS there? But just trying things like cutting fabric up to see where it takes me – that’s all I do. I've gone back in time to show you a bit about my improvisational progression. In other words, to prove to you that you've gotta start somewhere!

Here's one of the first improv pieces I could find.... a little quilt from 2012. Improv lines are a fantastic way to start - letting your eye and your rotary cutter direct you as you go.


A wonky cross, also from 2012, and another terrific way to start.


It was also in 2012 that I took a class with Katie Pedersen, where we explored every technique in her and Jacquie Gering's book, Quilting Modern. The result of that class was this two-sided quilt that hangs over my studio desk as a reminder to try new things.


The techniques, even guided by Katie and her book, felt foreign, and it would be another year before I attempted improv again. This time, in another class with both Katie and Jacquie, we explored the cut-and-insert method further. It's still a pretty controlled style of improv. and the outcome was Fissures. which coincidentally went on to win 2nd place in the modern wall quilt category the 2014 AQS. Talk about affirmation.


I began to dabble a little more on my own, and in Unknown Journey, I incorporated scraps, an uncertain path, and carried the design into the quilting. Note that at this point in time, I was still using a ruler to guide me.


Making Red Hots in 2014 was the first time I used improv curves, and it was earth-shattering.


And so it went.... occasionally you'd see me come up with an improv quilt design. Just as often, not so much. There is no doubt that joining Bee Sewcial in January 2015 was a turning point. I saw other makers doing things I'd never seen and certainly never considered. A door that had been opened a crack opened much wider.


In most of my own quilts, the improv I do is relatively simple. But with my Bee Sewcial blocks, inspired this year by the themes "linear", "stretch", 'layers", "triangles", "direction", "lake country", "transition", "self love", and "circles", oh my, it's been a different story. I've tried new things again and again, most often just walking up to my cutting table with rotary cutter and a stack of solids and getting to it. That's the crux of improv for me - the exploration of it all. If it's not you, fine. Do what you love. But if you are curious but just intimidated, I encourage you to test the waters. Just start - anywhere - and give it a try.

Tuesday, November 15, 2016

Maximalist Circle-Inspired Improv

Wow. That post title is a mouthful, isn't it? But it's exactly what Leanne/she can quilt asked for this month in Bee Sewcial. The guidelines were very loose, which is pretty typical for this bee. The one requirement was the maximalist use of color.

I started in with a vague notion of where I was headed, which never really means much when it comes to improv. It started with a circle, and a quarter-circle, where I added layer upon layer, totally mixing up those brilliant colors.


Eventually, it was time to try the big experiment - inserting the quarter-circle into the whole. Oh so carefully, I hera-marked, rotary-cut, pinned, stitched, and pressed. Whew. 


I did need to even out the 'circle' a bit by adding another layer or two. Finishing with a diameter of about 20", I'm thinking it'll pass the 'approximately 12.5"x24.5" but not necessarily a rectangle' block requirement.

Meanwhile, folks on Instagram are clamoring for a tutorial of sorts for the layered circle technique, so I'll work on that, so stay tuned.

Friday, November 11, 2016

Slab Nine :: Hourglass

There have been plenty of hourglass blocks in my life lately, both traditional and improvisational, but still, when it came time to do the final slab for our guild's improv block-of-the-month, I couldn't resist playing with them again.


This slab is nearly 15" x 30", and with it, I'm more than anxious to begin puzzling the quilt top together. I expect there will be a bit of 'fitting together' needed, as in the way of improv, not all of my blocks came out exactly at the sizes suggested. Then it will go right in line behind the bacon quilt and improv log cabin for quilting. All three are on my Q4 Finish-A-Long list, and I so want to make it happen!


Thursday, November 10, 2016

Effective Fabric Selection


October was so full, I didn't get around to even think about doing the Mighty Lucky Quilting Club challenge. but luckily I was able to tackle this month's from Amanda/crazy mom quilts, as it caught my interest right off. The topic, "Effective Fabric Selection," was one I think all of us strive for, right?


Amanda provided several prompts to choose from, and considering I rarely consult a color wheel when planning a quilt, I chose that as my prompt, specifically selecting an analogous color scheme - colors directly next to each other on the color wheel.

 
Including curating a fabric pull from stash, the challenge included arranging fabrics in a variety of ways. First, personal preference (above), totally by random (below)....


And arguably one that definitely felt better than totally arbitrary, random with veto power. I let things be as they may except when exactly the same color and value.


Even with this very simple design, I decided to go ahead and make my customary 17" quilt to represent this challenge, mostly because I loved the colors so much. Yeah, it has some similarities to that made in March, but considering I gifted that one to mom, I'm ok with it.


Quilted with an organic grid and trimmed on an angle.... it'll be a good reminder to consider the color wheel now and then as well as design principles Amanda had us consider. There's so much to ponder....

Linking up with Finish It Up Friday!

Monday, November 7, 2016

heƄrtland Blog Tour :: colossus


Welcome to the first day of the heĆ„rtland Blog Tour! Pat Bravo's new line from Art Gallery Fabrics is a beautPat has said her heart 'traveled to the inland forests throughout Scandinavia,' in designing this collection, and I find it captivating to imagine such a place. Choosing fabrics sight-unseen is always a bit uncertain, but I tried to select a variety of color, value, and scale, (plus the geometrics I was most drawn to!) for my project, and boy was I pleased with my choices once I had the fabrics in hand.


When I was deciding on a quilt plan for my heĆ„rtland fabrics, I really wanted to do something with larger piecing that would show off those prints. And I wanted something that would be easy enough for others to make, if they so chose. I finally settled on a giant plus quilt, using Leanne/she can quilt's tutorial, and I never looked back.


A twist in Leanne's design is to remove the center block of a few of the pluses and replace it with a block of 'background' fabric. I opted for this tweak just three times, all in close proximity, and I love the look.


For the background of my quilt, I had chosen the low-volume Pearl and Gold in Metallic, and lucky me, I had a good piece left to use as the centerpiece of the pieced backing, as well as the binding.


For quilting, I went with a dense organic crosshatch using Aurifil 50wt 2021 (Natural White), which gave the quilt beautiful texture.


The patterns and color mix of the heĆ„rtland collection were a joy to work with and I find the end result so tranquil, just as I imagine those heĆ„rtland forests to be.


Congrats to Pat on her new line, and many thanks to Amy/During Quiet Time for hosting and kicking off the tour by offering a free copy of her new pattern designed specifically for heĆ„rtlandYou're here at the first stop, and tomorrow, check in with Jess/Craftiness is not Optional AND Charise/Charise Creates


      Here's the rest of the schedule so you don't miss a thing:

Wednesday, November 9  ~  Jade/Stitch mischief
Thursday, November 10  ~  Amanda/Jedi Craft Girl
Friday, November 11  ~  Kari/Craft happy
Monday, November 14  ~  Stephanie/Spontaneous Threads
Tuesday, November 15  ~  Christopher/The Tattooed Quilter
Wednesday, November 16  ~  Kerry/kid giddy
Thursday, November 17  ~  Nichole/Wildboho
Friday, November 18  ~  Krista/poppyprint

Enjoy your stroll through the heƄrtland!

Find Pat @PatBravoDesign on Instagram, and see the hashtags #PatBravoDesign, 
#HeartlandFabrics, and #ArtGalleryFabrics.
This quilt was on my FAL2016 list!