So I thought I'd bring the tutorial - short and sweet as it is - back to my own blog, where my followers can find it more easily. This tutorial creates a wedge slab 6 1/2″ tall, and you can make it as long as you want. The guild made slabs 18 1/2″ and 24 1/2″ long, though obviously your quilt plan could be easily adaptable to other sizes.

Start with two pieces of fabric approximately 8″ tall. I started with a length (navy shown) just to help keep the orientation straight, but it doesn’t really need to be that long. Layer one fabric on the other as shown, and cut at an angle on the left side of the ruler. Discard the excess bit.
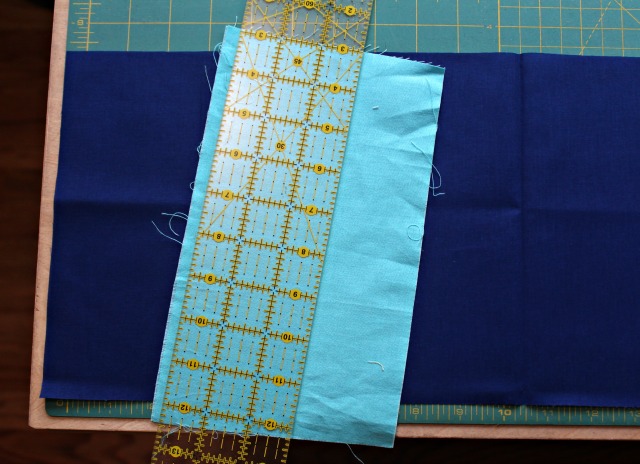
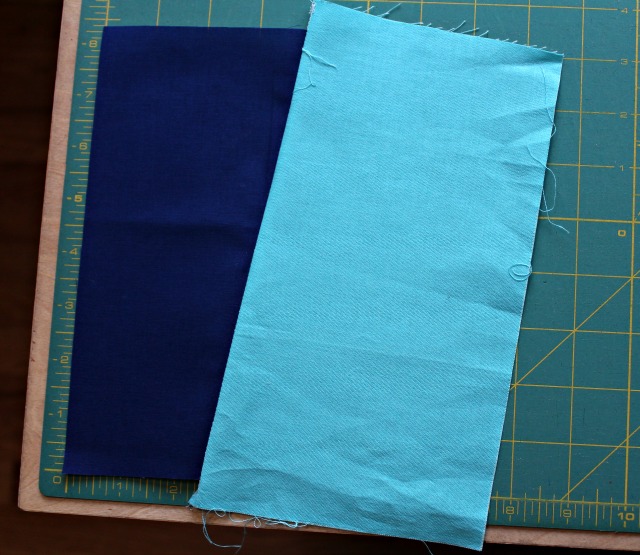
Flip the top fabric over onto the left and line up the raw edges, sewing 1/4″ seam along that cut edge.

Press seam and position fabric with right-side up. I find it helpful to line up loosely with the corner of my cutting board. That way I can make sure my slab is relatively straight as I continue to add to it.
Repeat first step of layering, cutting, flipping, stitching, and pressing until you exceed your desired length slightly.

If you have a 6 1/2″ x 24 1/2″ ruler, it’s perfect for determining your upper and lower trimming cuts.

Next trim your block ends to bring your block to length.

You might remember I also asked for multicolor wedge slabs from Faith Circle not long ago.

The result was Jazzy. Each palette is its own wonderful mix, don't you agree? I'm thinking this might be a good way to work thru my solid scraps. Hmm....

I'm not going to lie to you, the fourth photo confuses me greatly. The one with the two sewn together (medium and dark blue) to the left and the new light blue piece on top. You can see that line of stitching. How do you flip that piece? WOW nevermind. After closer examination I see that isn't a line of stitching but rather a cut line. LOL I need glasses pronto!
ReplyDeletesame here! :)
DeleteIt still doesn't make sense to me!
DeleteNot only is this a lovely tutorial, but a gentle introduction into slight improvisation (with a ruler!) for those looking for a great place to start.
ReplyDeleteExciting mix of colors.
ReplyDeleteThanks for sharing the tutorial.
Super fun idea - and a great way to work through solids OR prints/batiks in the stash.
ReplyDeleteGreat tutorial Deb! I'm definitely going to be giving it a try!
ReplyDeletePS I see you have added a comment to beat the blogger thing - a fix for it is change the email you use to notify of comments in settings, save, change it back, save again and you will get an email wanting to confirm. It worked for me
This is a very tempting way to make a quilt! Thanks for showing how you do it!
ReplyDeleteKATRIN W.
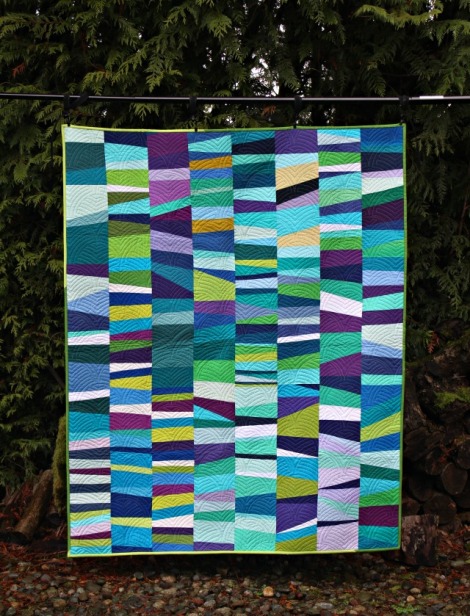
It is just awesome! Love how this gets sewn together - and I love the quilting you did on it. It looks like some straight, and some wavy lines in between. Beautiful!!
ReplyDeleteWhat a beauty! I'm loving the blues and still find it hard to believe that a group of many can make the blocks all cohesively come together!
ReplyDeleteWhat a fun project! I love the colourway chosen too!
ReplyDeleteI love the variety and variation that the wedges and angles give to the quilt. The color scheme and quilting design are awesome too!
ReplyDeleteThanks for sharing this Debbie. It's a great way to use up scraps!
ReplyDeleteI love these quilts. They are both just perfect in their own ways. Again and again fun to look at. Mhhh, maybe a project for my solid scraps... xo
ReplyDeletevery beautiful and so lovely work :) i like your good idea ,Thanks for the inspiration!
ReplyDeleteดูหนังออนไลน์