Showing posts with label Wordy Mouse Pad. Show all posts

Monday, October 12, 2020

Backing Up

I went back in time yesterday. Just for a bit, and only in that I revisited a project I'd made back in 2013. It was the Wordy Mouse Pad - do you remember? I'd written a tutorial and here's the original.


It came up in conversation the other day when my co-worker went to get something from my office, which I haven't worked in since March. She noticed the mousepad on my desk, and put in a request for one of her own.

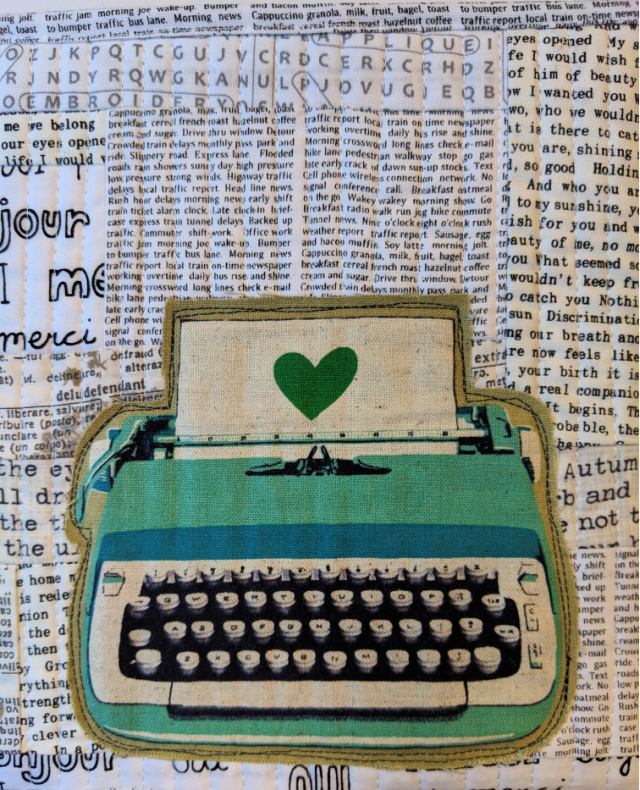
The focus of the original is of course that typewriter, cut from Melody Miller's Ruby Star Shining collection way back in 2011. Sad that there was just one lone typewriter left in my stashed piece. I'm definitely a proponent of using those treasures though, so I just dug right in.

It had been ages since I'd cut into my collection of text fabrics, so that was fun. Piecing, quilting, and finishing was easily accomplished in under an hour. Here's the new one!

Once construction is complete, a simple purchased mouse pad is inserted in the sleeves sewn on the back. The finished mouse pad cover measures approximately 8 1/2" x 11", though the size may need to be adjusted depending on the mouse pad you purchase. Nice thing is, if the purchased pad is slightly too big, it can be easily trimmed using a ruler and rotary cutter.


So sadly, the typewriters are gone, but I'm thinking other interesting patchwork and quilting can still make for an interesting mouse pad. So I've ordered a few spares and may just see what I can come up with.
Wednesday, May 29, 2013

W.i.P. Wednesday

I was happily able to make some good progress this last week!

Completed projects
Mouse Pads - No, you're not seeing things . . . I made more mouse pads!

I actually made one more that I gifted to daughter dear before I got a picture! But in doing all that text and typewriter sewing, I did take time to write a tutorial. Hope you enjoy it!

Lined Drawstring Bag - That gifted mouse pad needed a gift bag and I turned once again to Jeni's no-fail solution. I love it every time.

Bee Freebie - I was so smitten with the paper-pieced bee that Badskirt posted over the weekend that I just had to make one! The bee was made from a variety of scraps, the background in Essex linen in denim. I'll be incorporating this block in an upcoming as-yet-to-be-determined project! (And just fyi, I copied the pattern 150%, so each side measures 3".)
paper piece bee pattern by Badskirt

Ongoing projects
Lucky Stars BOM - Just in the nick of time, I got the May block done, so I'm ready for June's!

City Sampler Quilt Along - Not sure if I'll be able to keep up along with cohosting an upcoming sew along (starting MONDAY!), but I did manage to get the first 3 blocks done on schedule. I'll share them soon.

x and + blocks {#xplusalong} - This has been the main excitement in the studio the last few days! I finished my 80th block and began piecing them together. I decided to piece in 20 block sections (4x5), and have 2 sections done! I'm super excited to have made it this far on this one!


Improv Slice and Insert Quilt - No progress here.

Polaroid quilt - Still receiving blocks. Pretty excited about this too!

Upcoming projects
* Patchwork, Please! sew along projects
* baby quilt - need to start soon!
* June bee blocks
* prepping more City Sampler blocks
* pillows for Mom/pillow for grandgirl
* mail bag

Linking up with W.i.P. Wednesday at Freshly Pieced.

Saturday, May 25, 2013

Wordy Mouse Pad :: A Tutorial

A while back I made a mouse pad for my desk at work and have really been enjoying the fun bit of quiltiness in my office. When I decided to make another for a friend this week, I decided to document it in case you'd like to make one too!


Supplies Needed:
  • one plain standard mouse pad, 7 7/8" x 9 1/4"
  • cotton batting, 8 1/2" x 10"
  • a variety of text fabric strips, cut 1" to 2 1/2"
  • one piece text fabric, square or rectangle cut no larger than 3 1/2" on any side (will be used as 'center' of off-set log cabin piecing)
  • two pieces of fabric for mouse pad bottom sleeves, cut 6 1/2" x 10", pressed in half so they each measure 3 1/2" x 10"
  • backing fabric, at least 8 1/2" x 10"
  • typewriter motif for applique (one shown is from Melody Miller's Ruby Star Shining collection, trimmed about 1/8" outside of design lines)
  • binding fabric (for single-fold binding, 1 1/4" x approximately 40", pieced as needed)
  • coordinating thread for piecing, quilting, and binding
  • contrasting thread for raw-edge applique
  • needle for hand-stitching binding
  • spray-baste (I found spray-baste to be a good way to secure pieces without adding bulk. If you prefer, feel free to use another method.)
Instructions:

Begin by placing the 'center' square or rectangle on your batting, off-centered toward the upper-left corner. I prefer for a good portion of it to show once the typewriter is sewn on. Secure the 'center' to your batting with a quick spritz of spray-baste.

For your first seam, place a fabric strip along the right side of the 'center', lining up top and right side edges. Stitch a 1/4" seam, stopping when you have reached the bottom of the 'center' piece. Trim away the extra length of your strip. Finger-press open, so both pieces of fabric are right-side up. From there, continue constructing your log cabin 'block' by sewing additional strips to bottom, left, top, right, etc., finger-pressing each strip open after sewing before placing and sewing the next strip. The next two photos show the adding of a strip a few rows out.


If your batting becomes covered on any one side, just ignore that side as you continue adding strips until your entire batting piece is covered. Press well.


Baste your completed piece on top of your backing fabric, wrong sides together, using a bit of spray-baste. Quilt your piece as desired. Trim front and back fabrics even with your 8 1/2" x 10" batting piece if needed.

Baste typewriter motif off-centered on quilted piece, securing with another spritz of spray baste. 

Using contrasting thread and a regular stitch length, raw-stitch applique around motif, stitching between design edge and fabric edge (only about 1/8" wide). Slow your machine as you stitch around corners or curves to keep the stitching within the tight margin. Go around your motif twice. It is not necessary or even desirable to sew exactly on top of your first stitching the second time around. 

Turn your mat so back is facing up. Place a folded sleeve piece along the right and left sides of the mat, matching raw edges. Sew the three edges on each side (right and left) so sleeves are secured to the back of your mat. I sew just inside the 1/4" seam allowance.

Use single-fold binding to bind your mat. (verykerryberry has an excellent tutorial if this is a new technique for you.) Basically, sew edge of binding around the perimeter of the mat, mitering corners and allowing for seaming where ends meet. 
From right side, press the binding towards the outside as well as you can. It will look something like this from  the back side.
Fold raw edge in to meet edge of mat, and press as well as you can. Fold binding in towards the mat and hand-stitch along seam line.
Take your purchased mouse pad and slip into your quilted 'cover'.

There! Your Wordy Mouse Pad is ready to use!

Linking up with Fabric Tuesday!