
This little gift bag idea has been on my mind for a while, and with the holidays coming up, I thought now was a perfect time to finally get a tutorial written. So without further ado, here's the Trim-Tied Gift Bag.
Supplies needed:
- 1 fat-quarter non-directional linen-blend fabric, or a piece measuring 8"x21"
- 1 1/4 yd 3/4" twill tape
This tutorial makes a bag measuring 3 1/2"x4"x8" when fully open.
1. Fold an 8"x21" piece of fabric width-wise, wrong sides together. Place fold nearest you. Fabric should now measure 8"x10 1/2". Using a removable marking pen, mark parallel lines 2" from each side. Flip fabric over and repeat on the other side.

2. On one side, mark 1 3/4" squares in bottom corners.


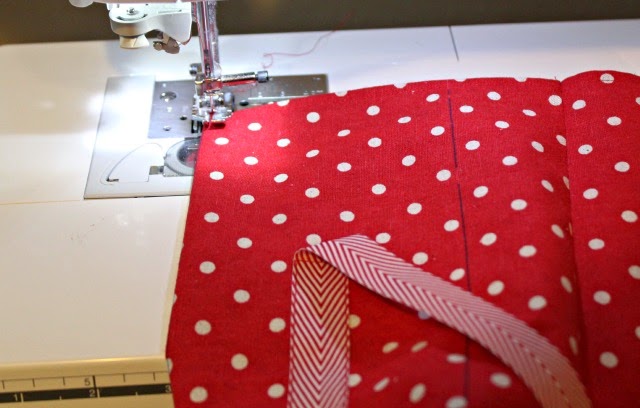
4. Open up fabric and lay wrong-side down on table. Find center of ribbon length and place on fold of fabric. Lay ribbon down center of bag, pinning about 4" from each end. If needed, use fabric glue to hold ribbon in place while you sew, or more pins. Stitching 1/8" from ribbon edges, sew ribbon onto bag fabric, overlapping a few stitches at the end to secure.

5. Take your piece to the ironing board, and double-fold each of the ends towards the back side 1/4", keeping ribbon ends out of the way. Stitching close to each edge, make a narrow hem on each end.

6. Now fold bag right-sides together, and sew side seams using 1/4" seams. Finger-press seams open.

7. Make gussets on each bottom corner by bringing seam to the fold, right sides together. Because of the seams you have already sewn, they won't match up 100%, but very close. Stitch 1/4" seam across each corner.

8. Turn bag right-side out, and here is what you have. Almost done!

9. Folding along 1 marked line on bag front, stitch 1/8" from edge beginning at the top of the bag, and sewing just to the corner where the side and bottom meet. (An alternate suggestion would be to press on these lines prior to stitching them.)

10. Leaving your needle down, remove pin and raise your foot and pivot so you can continue sewing along the bottom of the bag (along the front/back, not a side where the seams are), to the next corner, then again folding on a marked line, back up to the bag top. Be sure and secure your stitching at beginning and end. (Note that when you are sewing along the bottom of the bag, there is no marking line, but the distance is so short, simply folding it is guide enough.) Repeat on the opposite side, and your bag is done!

This unlined bag would also make a fine wine bottle bag when taking a hostess gift. Because heights of bottles differ, I'd suggest cutting your fabric about 6" longer than the height of your bottle or 20-22" if you don't have a particular bottle in mind. Other than your trim needing to be longer, all other dimensions and instructions would remain the same.

All fabric used in sample unlined bags is Moda Linen Mochi Dot by Momo (70% cotton/30% linen). Canvas or home dec would be other options. I source 3/4" chevron twill tape from FreshModernFabric, who has a nice variety of colors and will gladly cut continuous lengths. I've ordered some of the 5/8" Striped Edge Woven Cotton Trim also to have on hand as an option.
And for those of you who may not have access to the linen blends, or would rather use 100% quilting cottons and make a lined bag, I've tested that out for you too.

Here's what you'll need to do differently for the lined bag:
- Cut 2 pieces of fabric, both 8"x21" - 1 for the exterior and 1 for the lining. Mark right side of outer fabric per step #1.
- Follow steps #2 and #3 for both outer fabric and lining.
- Follow step #4 as written, on the exterior only.
- Ignore step #5 entirely.
- Follow step #6 EXCEPT on one lining seam, leave a hole about 4" long, securing your stitches well on either side of it.
- Follow step #7 for both exterior fabric and lining.
- Turn exterior fabric right-side out and nestle into lining which is wrong-side out. Line up raw edges of tops at side seams and pin. Pin a few more times as needed to keep top edges lined up. Stitched along entire top edge.
- Pull entire bag through the hole you left in the side lining so entire bag is right-side out. Hand or machine-stitch the opening closed.
- Nestle lining into bag, pushing corners into place. Press top edge nice and neat, and top-stitch closely to the edge along the entire perimeter.
- Follow steps #9 and #10 as written. I found with the lining snug and neat in the bag, it was easily caught in this narrow stitching.
So enjoy - whatever style you choose to make. Please post any finished bags in my Quilting with A Quilter's Table flickr group so we all can see!
Linking up with Fabric Tuesday.
Linking up with Fabric Tuesday.
I just love this cute bag! and that green one!!! My sister will love one of these for xmas. I better get crackin'!! XX!
ReplyDeleteAdorable! Thank you for sharing your design!
ReplyDeleteThis is a wonderful gift bag, Debbie! Thank your for sharing your expertise with us!
ReplyDeletevery cute!
ReplyDeleteHow perfect for holiday gifting! What a fabulous idea -- thanks for sharing it!
ReplyDeleteNeat, I'm defo going to be using this idea. Thank you 😃
ReplyDeleteSuch a great idea. Thank you for the tutorial. I'll be making a few of these.
ReplyDeleteLove those bags! I like to make my bows out of fabric (i use craft fuse for stiffness). I had never thought about using regular twill tape. Much faster! You always post the most fabulous stuff Deb!
ReplyDeleteI love your blog, number one on my list. One day I'll sign up for Instagram so I don't miss all the stuff you post over there. Apparently, bloggers are using IG more than blogging and I hate I miss anything from you!
These are super, Deb! Great reusable package....thanks for sharing :)
ReplyDeleteVery cute! Tnanks for the tutorial!
ReplyDeleteYou are such a brilliant woman! These little bags are just so dear :) I'll be making a few of these in the very near future-for sure:)
ReplyDeleteGreat idea, I will have to make some!
ReplyDeleteWondering if a scrappy version would work!?
ReplyDeleteWhat a sweet bag! Thanks for sharing.
ReplyDeleteLovely idea for a gift bag
ReplyDeleteLove this idea. I'm usually pretty bad about holiday sewing but just maybe I'll put this to use for our guild party.
ReplyDeleteThe bag looks so elegant, but using your instructions looks very easy to sew. A person could make quite a lot of these. Thanks!
ReplyDeleteThanks for a new great pattern!
ReplyDeleteMerry Christmas!!
Karin på Ösäter
Very clever! I make wine gift bags all the time, but this is great for so many other kinds & sizes of gifts.
ReplyDeleteI plan on expanding the size on these for some specific gifts my husband has made. Hope I can do the math right! Have you tried to make them deeper/bigger?
ReplyDeleteAnd I guess I didn't realize a linen-blend was firmer than a quilter's cotton. I would have thought it was "limper".