After making the center layer, and all the basting and marking, it was finally time to start stitching on my Cozy quilt! Size 8 perle cotton was suggested, so I went ahead and chose a palette of threads I thought would go with my Cozy fabrics. Below is my first selection, though I have since added two different grays, and have yet to use the solid black and the dark green. I'm kind of choosing colors as I go.
Thursday, February 8, 2024
The Cozy | Stitching
Monday, January 29, 2024
The Cozy | Middle Layer.Basting.Marking
Sharpie Twin Tip Marker
Cozy Needles - Milliners 3 - Set of 25
Thursday, November 19, 2020
Stitch Club :: Wool Applique
Well November holds the final installment of the six-month Stitch Club hosted by Alison Glass. It's been good, and definitely delivered on my purpose in joining - to add more hand-stitching into my life. So the last focus was on wool applique. I'd done quite a bit of felt applique years ago, so this wasn't all that different.
After picking a project from the November Stitch Club Journal, I purchased a yellow Mill Dyed Wool Color Pack from Sue Spago, which consisted of six 1/32nd (9" x 7") cuts of wool in various shades of yellow to gold. For stitching, I used a variety of #8 Perle Cotton that I had on hand.
The project, as you can see, is a garland. I made mine with Christmas in mind, consisting of gold wool stars appliqued onto pennants cut from Kaleidoscope in Iris. I used the simple whipstitch to attach my stars, periodically adding a smaller star in the center of the first.
A bonus to the stitching was creating tassels from embroidery floss - something I don't think I'd ever done before! There are all sorts of tutorials on YouTube, from simple to fancy. This tutorial has several variations as well (I used #2). I kept mine pretty basic, but did use four different colors of floss for each one, then placing them randomly on my garland. The embroidery floss was purchased from Amazon, an "Old Gold" gradient.
The completed garland measures a tad more than five-feet long, and for now, I've hung it across the screen standing behind our bed.
Tuesday, October 20, 2020
Stitch Club :: Embellishing Printed Fabric
Though I started out with larger ambitions for Stitch Club this month, I ended up doing a pretty small project. With a theme of embellishing printed fabric, I ordered up some Menagerie in Mermaid from Alison Glass' Sun Print, with the intention of cross-stitching its Xs and embellishing some pillowcases.
But friends, those Xs are small, too small to stitch for long with my eyesight. But I did like the fabric, especially the bee. So I chose another project where I could highlight that one section. I revisited Happy Sew Lucky's Round Pincushion, a sweet puck-shaped pincushion pattern that offers a nice variety of shapes. I chose to make mine 2" tall by 4" across, perfect for my stitched bee.
Speaking of said bee, I stitched with size #8 perle cotton, backing the piece with a layer of batting before I started. The out-line stitches were added to define the design a bit more.
So that's it. Small maybe, but still let me participate along with the club. Just for the record, I did complete a much larger project using a similar stitching on printed fabric technique a while back - so overall I'm feeling ok about things and anxious to see what's next.
Friday, September 11, 2020
Stitch Club :: Outline & Filled Stitches
Each month of Stitch Club has been so enjoyable and it's felt really good to be consistently hand-stitching again. This month's focus was outline and filled stitches, and I stuck to the program as they say, and did a project suggested in our Stitch Club Journal - embroidered cloth napkins.
For the napkins themselves, I used a lovely Kaleidoscope Bundle offered in Alison Glass' shop with six beautifully cool colors. Purl Soho has a simple fringed napkin tutorial that I followed to the letter (except the size), then added a simple doodle from Doodle Stitching: The Motif Collection by Aimee Ray. The stitching of the design was easily done with the use of Wash Away Stitch Stabilizer - I printed the design times six right on a sheet of the stabilizer, then cut them apart and placed one on each napkin.
As luck would have it, I had a partial spool of variegated Sulky 30wt #4021 [Truly Teal] "Blendables" that I used to hem the edge of the fabric squares which I had cut at 16". And then for the doodle-stitching, I used a spool of Wonderfil! variegated perle cotton in mermaid, and I think the consistency of having the embroidery the same on all the napkins really brought the set together.
The one finicky part of the whole project was that even though I tried to cut my fabric squares on-grain, invariably not all four sides were on grain.... some not at all. So that meant for some careful pulling and trimming of threads to make the fringe. I found my Tula Pink Large Ring Micro Tip Scissor invaluable in that trimming, so that certainly helped.
Anyway, that was of minor consequence, as I think the bi-color fringe adds the perfect finishing touch to these napkins, so it was well worth the effort.
If you missed my previous Stitch Club projects, you'll find them here [Kantha], here [Sashiko], and here [Couching]. A quick glance at all my Stitch Club projects can be found here.
Monday, August 17, 2020
Stitch Club :: Couching
My first project used Mariner Cloth as a stitching base-cloth, and that worked extremely well. With my stitched piece, I made a big ole 5" pincushion. I considered a variety of styles, but decided the most basic would be best, considering all the fancy stitches. I kinda love it.

Then I had another - much larger - project in mind. But after couching on a pretty good-sized piece of Kaleidoscope in Iris, I realized I'd rather make more smaller projects instead. SO I cut it up and first made another flex case using the pattern in Aneela Hoey's Stitch & Sew.
Lastly, I finished up with a Streamliner Pouch, a new-to-me pattern by Elnora Chambers/@elnorac. Gotta say, I love this simple little pouch with its rounded corners, and it went together in no time. I'll definitely keep it in mind for the future.
If you missed my previous Stitch Club projects, you'll find them here and here. A quick glance at my projects can be found here.
Monday, July 13, 2020
Stitch Club :: Sashiko
So first, I used Alison's Observatory Pulsar in Meteorite, which actually has +s printed right on it. I chose the color I did as it was dark blue and off-white, a clear nod to traditional sashiko. I stitched right over the +s with #8 perle cotton, not traditional, but great for a first try. The design is called a modified Asagao, and I purposely stitched on an oblong piece of fabric - about 6 1/2" x 18" because I had a tentative final project in mind. And just for the record, I backed it with a length of Kona cotton for my stitching.
I really enjoyed the stitching! I suspect the distance between the +s was larger than might be traditional, and the finished stitching is somewhat loose, but it really was a fun way to go.

So having recently made a Modern Japanese Rice Bag using the pattern by @kzstevens, I thought that would be a perfect pattern to use with my very first sashiko piece. I forewent the boro patches and stitching and just let my saskiko be the focal point.
A favorite detail of this bag are the drawstring casings which are especially fun with a mix of fabrics.
And I was so happy that I had enough left of the Yoshiko Jinzenji fabric that I used in the first bag that I could use it for a bit of the exterior plus the lining of this new bag. The piece is Rose Petals - neutrals on gray. "arbre Rose" translated means "pink tree" in English.
For my second Sashiko project, I chose to purchase an all-over pattern printed on 100% cotton Sashiko cloth from a Japanese company. The one I chose was 12" square with a Kaku-Shippo design. I used an off-white Japanese sashiko cotton thread that I purchased from snuggly monkey with Tulip long sashiko needles. I enjoyed stitching this piece very very much.
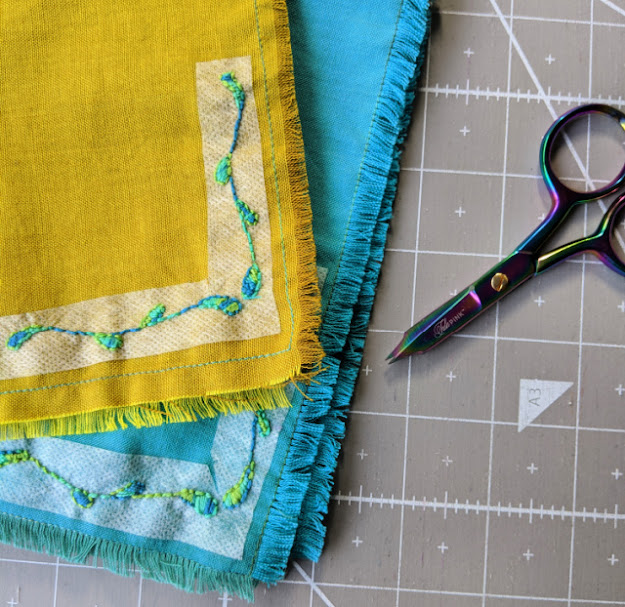
Once complete, I chose a simple Table Mat pattern from Simple Sashiko by Susan Briscoe.
I used Essex Linen in Ivory for the backing, as it pretty much matched the thread I used. What drew me to this pattern, besides its simplicity and being something I would actually use, was the way the 'backing' peeks out on the sides by just 1/8", and is secured by hand-stitching. Something about that little detail really 'fit' for me.
So I don't expect that Sashiko will be my go-to stitching going forward, but I was more than happy to give it a try.
If you missed my June Stitch Club project, you'll find it here.
Monday, June 15, 2020
Stitch Club :: Kantha
I was already mulling over what to work on next when I saw Alison Glass post about her new Stitch Club. I went and read about it and joined right in.
"A Hand Stitching Club With a New Theme Each Month," Stitch Club sounded perfect.... some community via Instagram and a private Facebook group, which I really enjoy; and a chance to focus on a variety of types of hand-stitching. In fact when I received the first 'journal,' I was really impressed and excited to get started.
So jump forward a few weeks, and I just finished my first kantha-stitched project, a 12" x 24" pillow.
All the stitching lines were marked before I got started, with a hera-marker. Most of them stood the test of time as I did my stitching. Just the whitest of the fabrics needed a little extra marking midstream.
But otherwise, the stitching went very well, and I found it very relaxing. I used a mix of neutral fabrics found in my stash, and #8 perle cotton that I had on hand. I had in mind to made something that would coordinate with the quilt on our bed, and these quiet fabrics fit the bill.
Probably the most curious thing about this type of stitching for me was the leaving tails of thread to deal with at the end. Once done with my stitching, I went ahead and tied my threads off for added security.
For the back of my pillow, I once again used the lapped zipper tutorial by Pile O'Fabric. I would have loved an exposed metal zipper on this one, but I didn't have a workable size on hand, so opted for the lapped method with a standard polyester zip.
SO, I'm really happy with the finished pillow, but even happier with how much I enjoyed the kantha, or running-stitch, stitching. Totally hope to try it again.