Friday, February 27, 2015

Still Sketching

After making myself a patchwork sketchbook to take to QuiltCon, I decided to make a few more covered composition books as gifts.
I used the tutorial by Stitched in Color for the basic instructions, and made up the actual patchwork on my own. For the first one shown below, I did use the North West block by hey, let's make stuff.
On one, I just did some improv piecing built around a wonky log cabin block.
On another, I started with a mini version of shecanquilt's Canvas pattern and then did improve from there.
 I tried to make a more masculine version that wasn't quite so patchworky . . .
Then it occurred to me that the cheater-type C+S prints might be fun to try, so I made a couple more covers where 3/4 was made from 1 fat-quarter.


By the way, I did make sure to hunt down composition books that had 4 squares/inch. Mine is already well-used from taking class and lecture notes. Any chance you could use one too? The first 4 shown above have all been gifted, but the final 2 - 1 with a fussy-cut flower and 1 with galloping horses - are up for grabs. If you'd like a chance at one, just leave a comment telling me which you'd rather have. I'll choose 2 random winners over the weekend. This time, U.S. only please. This giveaway is now closed - thank you!

Wednesday, February 25, 2015

QuiltCon Abbreviated

Right off, I'll just say QuiltCon was nonstop, overflowing, overwhelming, and absolutely amazing. Every day, we hit the ground running, and we fell into bed late at night filled to the brim and exhausted. It's hard to even know where to start when it comes to sharing the experience, and knowing so many of us have shared extensively on Instagram, now that I'm home, I'll just share some highlights. It could take a few posts, but I certainly don't want to forget.

One of the things I was most looking forward to was the Emphasis class with Carolyn Friedlander. Honestly, when I registered for the class, I thought it was topical - about adding emphasis to a quilt. In actuality, it was a paper-piecing class making the pattern Emphasis, from Carolyn's book, Savor Each Stitch: Studio Quilting with Mindful Design. I was eager enough to meet and learn from Carolyn that I took the class anyway, even though you know paper-piecing isn't necessarily my favorite. BUT, I learned several new techniques in the class that made the actual paper-piecing in the class easier, so I'm really pleased I took it, and am excited to finish the project I've started.
Getting started
 Rachel/Snippets of Sweetness, me, and Carolyn

 My project so far - half of a  "Stripe" table runner

Carolyn and all of our projects on the design wall

The other class I took was Basic Improv Quiltmaking with the Quilters of Gee's Bend. It was definitely an honor to be in class with them, and touching to have them begin class with a song and a prayer. After that, though, there was no instruction other than "start sewing." So we did. After working on my piece for a while, one of them caught me mulling over what to do next. I was told, "your heart will tell you."
 Getting started - 1 shirt, some linen & voile scraps, and a stack of modern scraps 

My project so far

The Quilters of Gee's Bend - China Pettway, Mary Ann Pettway,
Lucy Lee Witherspoon, Gloria Hobbins - and me

After making a Cargo Duffle specifically to take to QuiltCon, I couldn't resist joining in on the Noodlehead bag meet up, though I know there were way more Noodlehead bags there!

And another fun thing to do was to take the Test Your Kona IQ challenge! You got 2 1/2 minutes to try and identify 30 colors, and I came away with a score of 200 (out of 300). Not bad! Made me realize I really need to see all of those newest colors though.

Well that's enough for now. More to come . . .

Wednesday, February 18, 2015

#helloquiltcon

If you're on Instagram, you've probably seen  a lot of photos with the #helloquiltcon hashtag lately. Selfies are so not my thing, but I couldn't resist this time!

So 8 months after that hectic morning of registration, it's finally time to GO to QuiltCon! I'm all ready with new moo cards and pins to swap.
 
And to some degree, I'll be traveling handmade. You know, the requisite new bag, the purse of course, my favorite Zakka messenger bag, my fresh patchwork-covered sketch book, my snugly cased Kindle, and of course a myriad of handmade bags and pouches. That all should keep me fabric-happy while away from my sewing machine, eh?
 
Here's a list of lectures and classes I'm scheduled to take, though I'm still waitlisted for a few classes, so things could change:

LE03 Creative Exercises to Inspire Your Design Process with Alexia Marcelle Abegg

LE04 Improvisational Process and Patchwork with Sherri Lynn Wood

LE06 Becoming A Better Quilter with Angela Walters

620 Emphasis with Carolyn Friedlander

515C Basic Improv Quiltmaking with Quilters of Gee's Bend

LE22 Art History and the Modern Quilter with Casey York

LE24 Architecture, Quilts + Us with Carolyn Friedlander

LE25 Keynote with The Quilter's of Gee's Bend

LE26 Making Old Favorites Feel New Again: Methods of Modern Traditionalism in Quilting with Elizabeth Dackson

LE28 Modern Quilt Documentation with Susan Beal

LE31 Alternate Gridwork with Heather Grant

LE32 The Changing Social Media Marketing Landscape with Christen Barber

Yeah, my schedule's pretty full! I have a few meet-ups scheduled, and then there's the Moda Party and the Noodlehead meet-up too. It's going to be a very full few days!

I'll have two quilts at QuiltCon - Fissures will be hanging in the show, and Red Hots will be in the Pinwheels booth along with other Oakshott projects.


And lastly, if you want to peek in on the action, there will be lots posted on Instagram I'm sure. Watch hashtags #quiltcon, #quiltcon2015, #quiltconpinswap, and the more personal #debandrachdoquiltcon that my daughter Rachel/Snippets of Sweetness and I will be using while we are there. I'm hoping to blog a bit, but internet accessibility, time, and energy will determine that for sure.

So....does it sound exciting? Yes! Does it sound overwhelming? Yes! Off we go!

Sunday, February 15, 2015

Motley

When Nicole/mama love quilts emailed me a few days ago and told me her new pattern was ready for testing, I totally did not expect to hop right on it, with QuiltCon less than a week away. But with a couple of free hours Saturday night, I thought, "I'll just get started." And before I knew it, I had the top done!
The pattern is The Motley Wheel, which finishes as a 20" color wheel mini quilt. I had never made a color wheel, which is probably one reason I was so excited about it. There was paper-piecing involved, but the easiest kind, and Nicole gives good direction about color placement. Once the quadrants were pieced and trimmed, I even found the corners a breeze to sew on, due to their size. So if you're skittish at all about curves, feel confident trying these.

One of the options given in the pattern is the choice of an improvisationally pieced low-volume background, or a background using just one fabric, which is what I did. Since Nicole's original color wheel had the scrappier background, I thought I might as well test with the other option, plus I had a print I really wanted to use - Gramercy's NY Circuit Ashen by Leah Duncan for Art Gallery. Something about it told me it would be awesome here.

I really debated on the quilting, and I think there are a lot of patterns that would be fun to try on this mini, but I finally decided on a spiral for the 'rainbow,' using Auriful 50wt #2843 (palm leaf), which definitely shows, but isn't stark. Plus I used it on my City Sampler quilt, and it worked beautifully there.
For the background, I used Auriful 50wt #2021 (natural white) to create a starburst type of effect, quite similar to what I'd done on my Riley Blake Meets Mango early last year. I couldn't decide what to do on the center circle, so I left it alone for now, finishing the mini off with more of the Gramercy, letting the color wheel really stand out.
 
Quite simply, this mini was a joy to make. I highly recommend Nicole's pattern - look for it to be available for sale shortly. Meanwhile, check out #themotleywheel on instagram to see several versions of the pattern already in process. I can't wait to see more!

Saturday, February 14, 2015

Valentines

Earlier this week, there was a Valentine quilted postcard swap at our SMQG meeting. I began mine by making paper-pieced hearts, and then referred to the tutorial on Quilted Postcards by my guild-mate Louise/I'm Feelin' Crafty for finishing.
I used raw-edge applique to attach the hearts to the backgrounds, and thread sketching to add a little detail to each.
Here's just a glimpse of the variety of postcards swapped. Sweet, no?
Happy Valentine's Day!

Thursday, February 12, 2015

Through the Lens :: Photo Challenge 1

It's been a few weeks since the new Camera Challenges & Tutorials series hosted by The Littlest Thistle was announced and I shared about my camera and where I am photography-wise. The first challenge was posted soon after and it's time to report in.

Here was the 1st challenge:
For each preset [on your camera], take a photo of a subject appropriate to the preset in both the preset mode and the full automatic mode.  

My camera's presets are:
Program
Automatic
Portraits
Landscapes
Close-ups
Moving Subjects
Portraits at Night

I chose to take each set of photos with three presets, Program, Automatic, and then 1 of each of the other modes. Hubby and I took the camera with us on a Saturday adventure to the city. Note location, presets, and shooting order in each photo.


Seattle Center ~ Portraits (l-r), shot in program, automatic, portraits

Kerry Park ~ Landscapes (l-r), shot in program, automatic, landscapes

Chihuly Garden and Glass ~ Close-ups (l-r), shot in program, automatic, close-ups

Seattle Center International Fountain ~ Moving Subjecs (l-r), shot in program, automatic, moving subjects
 
Writing this post, I realized I forgot to take portraits at night. And I see I need to work at taking the exact same frame if I want to accurately compare my shots. Lots to learn. But I'm anxious to see what others have done on this first challenge, as well as take in what Katy has to say. At the very least, I'm a tad more familiar with the camera settings available to me.
 
Linking up with Camera Challenge 1.

Tuesday, February 10, 2015

Those Scraps

Scraps were a big part of the action in the studio last weekend, which was quite fun and timed well, don't you think, since today is link-up day for Scraptastic Tuesday. First were my improv blocks for Faith Circle. We were asked to "think modular and send an equivalent amount of blocks" to equal 2-12" blocks. Half or less were to be low-volume, and half or less were to be scrappy brights. You can see what I was in the mood for!
Come Wednesday at our guild meeting, we're having a Valentine postcard swap. Louise/I'm Feelin' Crafty did a nice tutorial on Quilted Postcards, which was also timely, and even though I'm not going to show them off in their entirety quite yet, trust me, they are scrappy!
I also got a few more Inside Addition blocks cut out, but I've discovered that as much as I like the concept of leaders/enders, I just don't do it. So I've got a nice stack of blocks ready to go when I'm in the mood.

I've also discovered that even though you actively use your scraps, the amount really doesn't decrease if you are doing other sewing too. Even grandgirl noticed the other day, "Grammy, you've got some new ones in here" as she was rummaging through the scrap basket. Hmm. That could be a problem.

Linking up with Scraptastic Tuesday.

Monday, February 9, 2015

Two Blocks

One of my goals for the weekend was to work on my monthly commitments. I'll share 2 of them here, and more tomorrow on Scraptastic Tuesday.

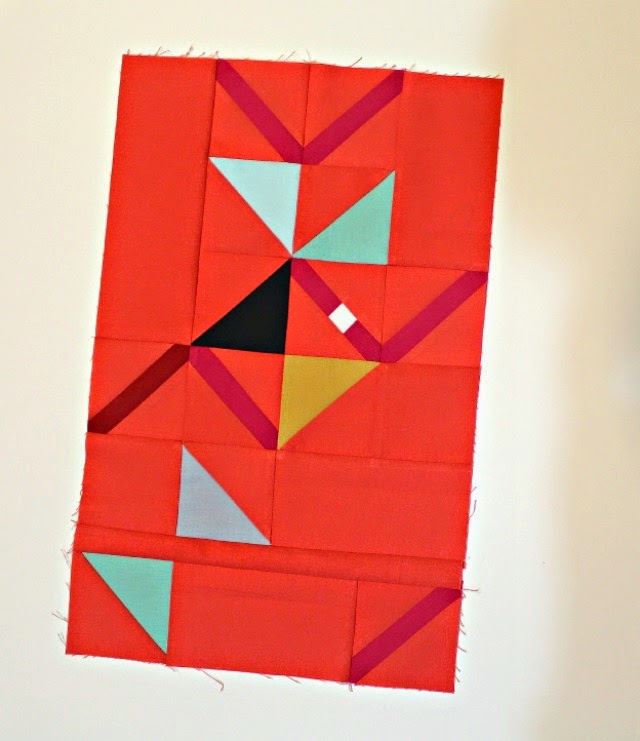
First up, and most challenging, was my block for Kari/craft.happy for Bee Sewcial. Kari requested 10"x16" "poster blocks". In addition to a very interesting palette, we were also given this Pinterest board as inspiration. A painting by Louis Reith caught my eye and totally influenced where I went with my block. Kari's palette of "hot reds, corals and pinks with the muted mint, aqua and mustard, with dove gray, cream and black" was so fun to work with and I tried to include every color. I chose Kona Coral as the background in an effort to really give the block some punch.

In an extreme turn in about every way, I also made the first block for a new quilt. Our guild is doing a unique version of block-of-the-month this year, with each of us making our own medallion quilt. I considered all sorts of more modern (and complicated) blocks, but in the end, I went with a double churn dash, using the Skinny Churn Dash tutorial by Toni/Hoosier Toni. I'm thinking of using plenty of low-volume prints in my quilt with colors based on that center square.

So I'm off to a good start getting my 'must-do's' out of the way, which feels really good.

Thursday, February 5, 2015

Grandgirl's First

This post should have been written 3 years ago, because that's when this tale began. I remember clearly, because it was the day I was babysitting grandgirl and wrote this post about our trip to the grocery store. And after that little episode, we went on to the fabric shop, with little one sitting in the front of a shopping cart once again. She was 15 months old, and happily entertained as I wheeled her up and down the rows of fabric. At one point I stopped to glance at some yardage, and when I turned back to her, I saw she had reached out and grabbed a bright and soft flannel fat quarter covered with doggies. When I tried to put it back, her little fist just clung tighter. So of course I bought it, and ever since I've considered it her 'first fat quarter', and fully intended to make her something with it. But what?
Fast forward those 3 years and that fat quarter was still hanging around, pulled out of the stash now and then, and eventually put away again. It happened to be on my cutting table last weekend when grandgirl was over, pulling scraps from my basket and creating on the design wall as her mother and I sewed. I mentioned the fat quarter, showing it to her, and telling her that I really wanted to make something for her with it but I didn't know what. Well she lit up and got all excited! "Grammy! Make my dolly a quilt!" Well who would have thought to wait until the child was old enough to choose for herself?
So that night, I got to it, fussy-cutting those doggies as best I could. I didn't follow a pattern, pulled scraps for the framing, and just sewed. It's nothing extraordinary, but when I gave it to grandgirl tonight, she hugged it tight, yelling, "you made it!" Indeed I did.
Now this is a little girl, barely 4, who is watching closely, and by some strange yet wonderful power, soaking it all in. She calls fabric, fabric, and corrects you if you call a quilt a blankie. She already knows the joy of creating and that something made with your own 2 hands is something pretty special. I like to think that one of these days she'll be sewing right alongside her mom and I. Time will tell, of course, but for now at least, I'm just glad she appreciates creating for the gift it is.

Linking up with Finish It Up Friday.

Wednesday, February 4, 2015

Have Bag Will Travel

Daughter dear's first words when I showed her my progress on my new travel bag were, "Mom, what have you done?" Remember, I get much of the credit for teaching this girl to sew, so it's kinda ironic and sad-funny when mom doesn't pay good attention to the directions and has to back up and redo while daughter forges on ahead. I could easily blame my kindle (in fact, I think I did), but in reality, I kinda just thought I knew what I was doing. Right.
Anyway, we had each prepped some of the steps and were planning on finishing our noodlehead Cargo Duffles last weekend on our monthly sewing day. We had chosen our fabrics and gotten everything cut out before we got together. For mine, I chose Essex Yarn Dyed Linen in black for the bottom accent/gusset and handle accent, grey Remix by Ann Kelle for the main exterior, and Indelible by Katarina Rocella for the pockets, main handle fabric, and the lining (more on that later).  I also had my pockets all ready to go and most of my quilting done. And that's where I'd basically overdone it. I had in mind how the sections had been quilted when making my Weekender a while back, and just plain got carried away, quilting areas that shouldn't have been quilted yet. Let's just say the whole lower portion of each bag side is double-thickness due to my error, but in the end it turned out ok. 
We had been talking about making our bags for a couple of weeks, even sharing a cargo duffles Pinterest board to gather blog posts with tips and variations. That's where I got the idea to use ByAnnie's Soft and Stable instead of canvas as the base of the bag. It was easy to sew with and the bag ended up just as the name indicates. My only issue was not cutting the Soft and Stable smaller than my main fabric pieces, so it's a little poofy in the seam allowances. That doesn't affect the final look of the bag, but I can feel them inside. What was more major was the shrinkage that occurred with quilting the bag pieces. I overlooked the pattern note to cut quilting cotton pieces to allow for said shrinkage and had to add more fabric quilt-as-you-go style. Thankfully, due to the way the bag was constructed, my 'extra' got covered by the bottom accent pieces. whew.
Things I love about this bag:
  • the handles - Construction was a bit unique, but I love the look of them, and dare I say, my choice of fabrics. I did insert a strip of Soft and Stable in each, and they feel really good in the hand.
  • the zipper - I couldn't find a metal zipper long enough, so I used a plastic parka zipper. It's still pretty sturdy, and the way it's installed was very straight-forward (read: easy).
  • the pockets - There's a lot of visual punch for not much effort. They were not complicated to make or attach, which was a relief.
When I started to list what frustrated me about this bag, I realized the biggest things were due to my customization of the bag:
  • My use of the Soft and Stable (no offense to the product itself!) and my dense quilting affecting the size of my bag pieces. It caused me some angst to rectify that, but it all turned out well in the end, and I really should have known better.
  • My choice to line the bag rather than bind the seams as suggested (another idea I'd pinned). Not sure why but my lining ended up rather baggy, though I did machine-tack at each corner as well as between both handles. I also covered and quilted a double layer of Soft and Stable to nestle into the bottom of the bag. That all helped.
And lastly, you'll see my pockets don't have snap closures. yet. I purchased the snaps and thought I had the right tool, but maybe not. My test-run didn't turn out as nicely as I'd like, so I'm still hopeful I'll find a helpful video (or person) to help me get those attached.
Bottom line, I enjoy sewing quilts much more than bags. But I'm really glad I made the duffle, I love how it looks, and though maybe a tad small for a weekend, it is definitely a nice sized carry-on. Let's just end by saying I'm pretty excited about its maiden trek to QuiltCon.

If you'd like to see daughter dear's finished bag, just click here.
Linking up with Fabric Tuesday.

Tuesday, February 3, 2015

Hello, Lola!

Every now and then, don't you just get the urge to drop everything and do something totally unplanned? I sure do, and I did just that Friday night after checking out the new lola pouch pattern from Svetlana/s.o.t.a.k handmade.
I made the larger of 2 sizes offered, which measured a roomy 12” x 6.5” x 4”. Black Essex yard dyed linen was my choice for the exterior bottom, and the rest of the fabrics are Cotton + Steel. I do love fussy-cutting now and then, and it was perfect for the main print (Night Sky in Indigo) so I could get as many complete butterflies as I could, and match that 'bunting' on both sides. Sometimes I don't want a really poofy pouch, so I opted to use Pellon SF101 Shape-Flex in place of the suggested fusible fleece on the exterior pieces. (It's also used on the lining.) I think this combo makes for a sturdy yet flexible finish.

My favorite detail of the entire pouch is that recessed zipper. I'd never done one, and Svetlana's technique was flawless. I really loved the stripe she'd used on the zipper binding of her own pouches (click the pattern link for photos), but there was no stripe in my C+S stash, so I made do by cutting the Backgammonish print just so to create the stripe I wanted. Very fun!

I'll definitely be adding Lola to my zip pouch repertoire. It's a keeper!

Linking up with Fabric Tuesday.

Monday, February 2, 2015

Thank You All . . .

Your many comments on my 4th blogiversary were much appreciated - thank you!! Congrats go to #67, Debbie of Mine-rSewFun, who was randomly chosen to receive a gift certificate to fabricBUBB! Thank you all for sharing in my little celebration!

Sunday, February 1, 2015

Fresh Sewing Day

January felt slow-motion at the beginning. After a hectic holiday season and busy family times as the year got going, it took me a while to get moving. My first finish, though, was just a treat. Having bee blocks gave me a head-start of sorts, which was helpful. I proceeded to learn  just how versatile half-rectangle triangle blocks can be, and came up with Ziggity-Zag, a quilt that really pleased me.
Next was Oh, Baby!, a sweet little Clustered Star quilt . . .
And the last major project was also from bee blocks, so a snap to piece and finish - a quilt I named Junctions, a nod to its Intersection blocks.
Per usual, there were some bee blocks and other littles, my absolute favorite being that patchwork sketchbook cover. I think working on that spurred me on for the rest of the month.
So now February is upon us and it's going to be a busy one with QuiltCon and all. I can't wait!