Tuesday, March 31, 2020

March Fabric Usage

You guys, I tried REALLY hard to sew from stash this month. There weren't any big quilts, but I made enough smaller projects that they added up. The main intake was the lovely stack below, purchased with a birthday gift card. Haven't cut into it yet, but soon!

March Fabric Usage
Used up: 13.12 yards
Brought in: 4.45 yards
Net: -8.67 yards
Year to date: -32.77 yards


So three months into the year and I'm still feeling pretty good about tracking my fabric usage. In fact, it continues to be very motivating, which I didn't really expect but am super happy about. Hope that continues to be the case!

Monday, March 30, 2020

Faux Pas

So I made some 'new' potholders over the weekend. Actually new out of old. Back story... a few years ago I took a class from Carolyn Friedlander at QuiltCon, and ended up making a table runner that was really special to me. Fast forward to a few months ago when it was irreparably damaged. I think the culprit was a plant that was repeatedly watered with no saucer under the pot. Oops.


But anyway, I just couldn't throw the runner away and finally over the weekend I had the courage to cut into the best of what was left and re-purpose it. Thought I might share about what I did, just in case you find yourself in similar circumstances. Highly unlikely, but still.


So first of course was cutting the 'good' out of the 'bad.' I started by cutting 9 1/2" squares. Even though the runner had the three typical quilt layers, I treated it as front + batt. So I also cut squares out of Insul-Bright and backing fabric, placed my quilt 'top' on top, and spray-basted the layers together. Next was some minimal additional quilting, just to hold the layers together. Considering they were relatively small pieces, they didn't need much.


Then I cut 2 1/2" binding - thicker than my normal - but I figured with five layers it might be a good idea. I went ahead and machine-stitched the binding on just because. I really wasn't in the mood to drag this 'redo' out. But, in spite of the mishap, I ended up recreating something, if not better, at least very good. Whew.

Friday, March 27, 2020

Pear Pouch + Scissors Cozy

In amongst everything else, I've squeezed in a couple of zipper pouches lately, one specifically for myself, the other just because. First off, I tried Sarah Kirsten's Pear Pouch tutorial purely because I was intrigued that it was constructed with French seams.


So no leaving a hole in the lining to turn and stitch later. What a nice option, right? And it leaves you with a beautifully clean finish.


Plus I added a leather label made with my alphabet leather stamps. Yeah, I slipped a little on that last "D" but it just proves the point, or at least that's what I tell myself. ha.


Also happened across SOTAK Handmade's Scissors Cozy tutorial the other day, which I've made several times, but never for myself, and I have no idea why, because I actually needed one. So I remedied that in no time.


For both of these projects, it felt good to just grab a bit of favorite fabric from the stash and have something to show for myself just an hour or so later. That kind of sewing is always refreshing.

Tuesday, March 24, 2020

Take Away

It feels like it's been a while since I've participated in a Curated Quilts mini quilt challenge, but now definitely felt like the right time. For the upcoming Half-Square Triangle issue, the theme is "quilts that use subtraction as a design feature." To clarify "subtraction," CQ posted Less is More, and in addition to some clarification, it's a nice little quilt show.


I kind of struggled with a plan for a while, then a glimmer of an idea came to me, which led me to create a single block....


It only made sense to make more blocks (which I did). and then play with them till a firmer plan materialized (which it eventually did). 


I actually had the top all pieced when the thought of a ghost block came to me, and that was really kinda fun to execute. For the first time, I used Aurifil 28wt for machine-quilting, and loved the result. I'll be trying that again. 


The spool I had happened to be the same color as I was using on the mini [#2600. light gray], so that was handy. I did go ahead and use 50wt for the quilting, hoping that would help the ghost block stand out, and I think it did. Rather than do strictly matchstick quilting, as was my original plan, I did a dense organic straight-line, which is one of my favorites to execute.


A faced binding became the way to go when I realized I didn't have enough of the light gray solid left, which would have been my choice for a regular binding. I tried Cotton & Bourbon's method for a change, as I'd noticed it was single-fold, and I thought that might be a good option for a mini. And I think it was!


Oh, and for the backing, I used a favorite print from the deep stash with some bits left on my cutting board. Maybe not the most profound use of fabric ever, but it gave me alot of pleasure.


So, this little quilt finished at 16" square, the maximum size for the challenge. I really debated on whether to crop close to the HSTs or give them room to float, and I obviously settled on the latter.


So I'll get this baby submitted, but no matter what, that was just what I needed. This is exactly why sometimes, it's really fun and freeing to work small.

Monday, March 23, 2020

The Kintsugi Experiment

So I shared in my last post how I was trying out the improv Kintsugi technique found in Nicholas/@quiltsfromtheattic's Inspiring Improv. And you guys, I really really enjoyed the process. I'm not quite sure why, but I found the technique very enjoyable to execute, though I will say, it had an element of 'figure it out as you' to it, as after cutting each background square, I had to decide what feature fabric to sub in where. Personally I like that kind of puzzling, but just fyi.


It felt right to create a backing pulling from the same fabric pull, though I needed to add some orange-y solid to bring it to size.


Quilting was done in a diagonal grid using Aurifil 50wt #2310 [light beige] which nestled in nicely into the Natural Essex Yarn Dyed Homespun background, yet shone very subtly on all the non-neutral fabrics.


The piece finished at 24" x 42" and when we put it on our table in the living room, it looked like it belonged there. Love when that happens!

Wednesday, March 18, 2020

Improv Kintsugi

These uncertain times resulted in, among other things, a cancellation of a planned quilt retreat this week, and a restlessness about what to even work on here at home. I finally settled on a table-topper of sorts for a vintage table in our living room that needed a little protection.

I flipped through Nicholas/@quiltsfromtheattic's Inspiring Improv to see what else might be fun to try and boy did I find it. Actually, I found a couple of things and asked hubby to pick one. That helped me settle on Improv Kintsugi - another thing I knew nothing about!


Picking fabric was really fun, as I worked to coordinate with our living room. I came up with an assortment of Carolyn Friedlander prints in brown and orange, a beautifully rich Kaleidoscope Persimmon from Alison Glass, and for a background, a textural Natural Essex Yarn Dyed Homespun.


Soooo, after measuring my table's top, I figured out that a 4 X 7 arrangement of 6" finished blocks would be perfect. So that's where I am now, piecing them together and thinking about quilting. This kind of diversion is the best!

Monday, March 16, 2020

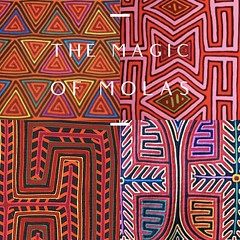
The Magic of Molas

This month's Bee Sewcial theme from Stephanie/@spontaneousthreads is "The Magic of Molas," which are handmade textiles of Central American origin.


A part of Stephanie's request was that we zoom in on just a portion of a mola to create our block. To do that, I used a tip I learned in a class with Michelle Wilkie/@ml_wilkie a few years ago. Using a blank index card, I cut out a rectangle in the proportion I wanted my finished block. Then I just moved it around on Stephanie's inspiration post and chose a section that I was drawn to.


Not an exact replica of course, nor should it be, but I think my block has the essence of the original, and definitely required playing with geometry, scale, and color. Eventually, my bold design finished at 13" x 23". So interesting!


Thought you might enjoy this video of The Spririt of the Mola exhibit a few years ago at The San Jose Museum of Quilts & Textiles. Just fyi....

Friday, March 13, 2020

Cross Country

The story of this quilt began in January when I took a Seattle MQG-hosted class with Anna Maria Horner. It was a fun day, and I went home with a small amount of my quilt pieced, but thanks to Anna Maria, a good idea of where I was headed. So happily, a couple of weeks later, I had a quilt top to share.


Still deep in quilting my Summer Sampler, quilting another large quilt just wasn't sounding fun. So I treated myself and asked my guild-mate Pam Cole of Keeping it Simple Quilts to help me out. We settled on a quilt design and I'm so pleased with what we chose. Quilted with medium gray thread, Pam used 80/20 Hobbs batting, which resulted in a very cozy quilt.


You might remember I pieced a big ole quilt back for this one, and I'm glad I did. Love seeing the variety of Anna's fabric. And those Canvas Corners really proved themselves.


This time I did machine baste them on using thread coordinating with the front, and things felt much sturdier than when I pinned them on. Hubby says he just needs some sturdier dowels and  then we'll be set. Oh, and here you get a peek at the binding I chose - one of the prints used in the quilt front - from Indie Boheme by Pat Bravo. It 'reads' like a stripe but obviously isn't really


So this was a really fun one.... on one hand, not my typical style, but I really kinda love it. Just having the experience of meeting and planning with Anna 'sewn' into it, as well as using pretty much all of the AMH fabrics from my stash make this one's story a unique one.... one I know I will keep enjoying.

Tuesday, March 10, 2020

Round and Round

So when I last shared my Improv Rings project, I was still adding rings, but I had run out of scraps in my colorway, and was cutting into stash. Which wasn't really a problem, but I didn't want the project to grow too big. I was having so much fun with it, I wanted to move on to the quilting, finish it up, and see what was next.


After posting my progress, folks responded to my request for layout suggestions, and in doing so, some suggested projects other that a quilt.


I'm not sure anyone actually suggested making a pillow out of it, but once that came to mind, nothing was stopping me. Not just any pillow mind you, but a round pillow. Come to find out, round pillow forms aren't as easy to find, but I managed, purchasing a 22" round - 2" larger than I planned to cut my 'quilt top.'


So back to the quilting.... I basically made a small quilt, batt and backing and all. I followed the rings round and round with Aurifil 50wt #2975 [Brass]. Not sure why that color felt 'right' but I really like the effect and the mild contrast.


Ok, so what came next wasn't pretty, and I'm not showing it here. I went to press the finished top, and my iron spat on it, unfortunately. I went ahead and stay-stitched around the edges and threw it in the wash. Thankfully the icky spots disappeared and I moved ahead. But that's why the finished pillow front looks all crinkled.


I decided to make the back kind of fun, using both a contrasting metal zip and zipper ends. I realized after the fact that using a zipper that much shorter than the pillow back would make it tight to stuff that pillow form in. It worked, but I'm a little confused at the rippling around the edge, since the pillow is definitely 'full.' But I'm hoping use will improve that, and besides, the overall effect is so darn pretty, I can overlook it.


When all is said and done, it was fun to make a pillow for a change. And try a new technique using a bunch of scraps. Now to decide what's next.

Monday, March 9, 2020

Project Bag

A couple of years ago, I made a project bag for a guild swap, "personalized" with our guild's initials, SEAMQG. I remember at the time that my friend, Ellyn/@ellynz really liked it, especially considering she was soon to become president of her McKinney MQG. After that, I totally meant to make her one, just for fun, except that I never did. Until a few weeks ago.


As with the first, I used My First Alphabet by Diane/From Blank Pages for the letters. They are paper-pieced, and I made the 3" option, totally winging it on the lower case 'c'. The rest of the bag exterior was Essex natural, quilted onto batting with straight lines. Then the bag was lined as I installed the zipper, 
finishing at 12" x 18".


I decided to personalize Ellyn's bag using the new alphabet leather stamps hubby got me for my birthday. [Fact is, I want to personalize everything now!]


So I'm glad I finally got that made and sent off to Ellyn. Mark a long-time goal off the list....

Tuesday, March 3, 2020

Improv Rings

After completing my little Interlude participating in Nicholas/@quiltsfromtheattic's Improv Triangle Sewalong, I was totally up for some more improv. So I grabbed my copy of Inspiring Improv and settled on Improv Rings as my next little experiment.


To add to the fun, I pulled over the scrap basket and started pulling another random palette together. All the peaches and pinks and oranges, just a purple or two, and a pair of 'pickles'. It all seemed a little off, but then again, I kinda liked it. ALOT. 


So I'm still at it, probably not for long, as my 'long enough' scraps in these colors have been used up, and I need to pull from stash to continue. Now I'm debating whether to keep going for a bit and then 'just' square it up or float it on one fabric as a background. Whatcha think? (no promises, ha!)