Showing posts with label scraps. Show all posts

Monday, July 27, 2026

The Rest of the Scrappy Grab&Piece Blocks

Gotta say, these grab&piece blocks aren't for the faint of heart. The crazy mix of shapes, sizes and colors from the scrap basket take some patience to press and then puzzle together. But I've made good progress!

Block #4, 19" x 22".


Block #5, 20" x 23".


At the end of each block, before I reached into the scrap basket again, I re-sorted the scraps I had left from the previous block. I liked to keep the smallest pieces next to my machine, as I always start a new block by piecing those together.


So then I add the new pull, all pressed and ready to sew before starting to compose the next block. Here's #6, 15" x 22".


Six blocks in, I took a photo and meant to share here, but got busy with other things. So I just kept making blocks. 


Block 7, 11" x 20".


Block 8, 20" x 24".


AND finally Block 9, 12" x 20". For this one, I tossed all the scraps left from Block 8 back in the scrap basket, mixed them up, than pulled a couple handfuls out for this final block.


And THEN, on Sunday, I managed to get them all sewn into a quilt top, 53" x 60". I very briefly considered rearranging the blocks for better distribution of color, but then I thought why? As random as the scrap pulls and blocks have been, why not just let the quilt be what it was? And so I left them alone.

Saturday, July 4, 2026

Tonal Strings

Ready for another scrappy improv quilt, I turned to Free Form Quilts & Patchwork by Jessie Cutts @cuttsandsons for inspiration. While perusing the projects, I was drawn to the instructions in step one of Project 1, "I start by tipping out my scrap basket...." so that's where I began.


Even though it's not that visible in the photo above, as I pawed through those scraps, I felt like there was quite a bit of brown. And I quickly settled on a palette for my next project. I'm not sure if it quite fits the 'tonal strings' theme of the project in the book, but this is what my scrap basket had to offer me.


Per Jessie's instructions, I began by piecing the smallest pieces together. 


And before long, I had a quilt top, about 25" square. As you can see, I tried hard to use even the tiniest bits - those were cut-offs from piecing the other strip sets. Not my norm to even keep those, but I like what they added to this piece.


I pieced together what was left on the cutting table, included the three smaller improv blocks below.


All that didn't make a large enough quilt back, so I pulled some Kona Punch from stash to bring it up to size.


I'm sharing this part of the project now, because it'll be a while before I have a finish to share. I'm going to hand-quilt this one, and I know that will keep me busy for days (weeks?). I'm already a few sessions into it, and I don't even have the center blocks done. But it's looking good, so I'll be back to share it once I'm done.

Monday, July 14, 2025

Improv for Everyone :: The Scrapbuster Edition

Last Saturday, I was able to join the Improv for Everyone workshop with Maria Shell @mariashellquilts, The Scrapbuster Edition. 

This was the third Improv for Everyone (AKA budget-priced) workshop I've taken with Maria - the others being On the Grid and Perfectly Pointless. One of the first methods of using scraps mentioned in this workshop was that of the repeated unit or block inspired by a traditional block design. 

This caught my imagination and when I thought of combining my teal solids scraps with my basket of low-volume scraps to make improv plus blocks, I was off and going.


Seriously, I love these so much. I could have kept going and going.


I had to leave the workshop early, so there may be more scrappy ideas that I add to this bunch, but right now, I'm totally invested in making more of these plus blocks and using them together. I've been mulling over what scrappy quilt to make next, and this just might be it.


So for now, I'm just noting the start of this exploration. Time will tell where it takes me - and how long the teal scraps hold out. So no specific plan at this point. Just enjoying the improv and the scraps until I don't.

Monday, May 19, 2025

The Scraps (and Stash) Have Been Beckoning

Over the last several weeks, I've been digging into my scrap baskets, trying to use some up in a variety of ways. I've posted most of these on Instagram, but though it would be fun to do a little round-up here on the blog.

A fun little surprise for the family at Easter brunch were Mini Fabric Easter Baskets made from charm squares and scraps. For the baskets, I used the tutorial by @craftyforhome. Then I made my own version of 'bows' by cutting them out with my pinking shears. Charm squares and pinking shears.... two things I haven't used for ages but were fun to play with again.


And then I made another back of Quilted Bookmarks, using kraft-tex and my own tutorial. They have all already found new homes - most through our Little Free Library - so I really need to make another batch soon.


Tiny quilts stretched on tiny (3") frames. I pieced the centers with scraps of scraps - those extra small pieces that were actually destined for recycling. Then the backgrounds came from the regular scrap bins; a little hand-stitching was added, then the fabric was wrapped around to the back and stapled. This batch has been gifted and/or shared through a local Free Little Art Gallery, so I'd like to make more and maybe even perfect my finishing technique a bit. Whatever, they were very fun to try making.


Not really made from scraps, but a random use of stash, was this floral drawstring gift bag for my mom on Mother's Day. This is the Artist Bag size from the Lined Drawstring Bag Pattern by Jeni Baker @jenib320, using the Mini Accent variation from her Expansion Pattern.


And finally, for this round-up at least, I made a denim tote bag to use as a gift bag for my daughter's birthday (the first one I'd made had gone home with my oldest granddaughter one day). I used a pair of my worn black jeans, following the free video tutorial from Sotak Handmade @sotakhandmade, Learn How to Turn a Pair of Old Jeans into a Stylish Tote Bag.

Just for fun, I added a new Stick and Stitch Embroidery Design from Dropcloth @dropcloth to the front. I'm anxious to find more uses for these little embroidery designs. Meanwhile, I accomplished a bit of upcycling and gifting handmade, which is always fun.


P.S. I've also been putting a lot of scraps into a quilt top I've been working on. Once I finish the quilt, I'll share more about it. And I hope to keep finding ways to sew through scraps in the coming weeks and months. I already have a couple of ideas brewing....

Saturday, February 1, 2025

14 Years of A Quilter's Table

Yesterday was the 14th(!) anniversary of my beginning A Quilter's Table, the blog, back in 2011. I really wanted to post here, as an acknowledgement of sorts, but the words just didn't come. So instead, I sewed. Come to think of it, sewing, has really been the impetus for my writing all this time, right? So maybe this year, that was ok. Don't write, if the words aren't coming, but do what feels right to do. Just sew.

So in that small way, I did celebrate my blog anniversary, making a new thing that I could share with you all. I grabbed the bag of scraps that I'd gotten in the Studio Mystery Box from Anna Graham @noodlehead531 a few weeks ago. They suddenly seemed perfect for a journal cover I'd been wanting to make. I used a tutorial I'd used before by Rachel Houser @stitchedincolor, and luckily, I had just a few composition books stashed, so that was fortuitous.

Knowing the dimensions I'd eventually need - 12" x 29.5" - I started laying scraps out, piecing sections, and just figuring out shapes and placement as I went. I love working improvisationally like that!


Due to the lightness in color of some of the fabrics, I chose to line the cover, as Rachel suggested. The fabric I chose to use was something I'd ordered by mistake, Brussels Washer by Robert Kaufman. Though the color was perfect, I didn't realize until later that it was a linen/rayon blend. Its texture caused me to loosely quilt the layers together, which despite my first inclination, ended up working out ok. At any rate, once it was all sewn together in its final shape, I thought it was more than fine.

Admittedly, friends, I had no profound words to share on this anniversary. But I AM profoundly grateful for your presence here. Whether you're new, or you've been around for years, as many of you have been, I appreciate you. No matter what I choose to share (or not), you are encouraging, affirming, and kind. For all that and more, thank you.

Friday, July 19, 2024

QAYG Apron

Do you wear an apron when you cook? IF you cook? I'm the main dinner cook in our family, and I wear an apron almost every night, because otherwise..... Well, you know. I actually have two that I alternate between and one of them has just about been worn out. I realized writing this post, that I made it 10!! years ago. It began with a purchased Chef Works Unisex Apron just like the ones I used to wear when I worked in a bakery. I added patchwork pockets and it's served me well over the years.

SO well, in fact, I thought I'd do something similar again - embellishing a purchased chef's apron. So I bought the exact one again, got out my mostly blue and green scraps, and used the quilt as you go method. QAYG isn't something I've done a lot of, so I referenced a tutorial by Svetlana @sotakhandmade. I appreciated her mentioning that it's a good idea to sometimes piece a longer strip before adding it on - it gives a more patchwork appearance, than sewing a bunch of long strips would. You can see I did a little of both.

Of course, I was curious how much fabric I'd use in my patchwork, so I weighed the apron before I got started (5.6 oz.) and once I was done (9.5 oz.). That means just under 3/4 yard. For the edges, I turned under about 1/4", pressed, and pinned, and then topstitched. I think it might have been easier to make a big patchwork panel, and then line it with quilter's cotton and made the neck loop and ties. But I really like the fit and durability of the chef's apron, and my method worked well enough.

I didn't really worry about what the back looked like, with a few changes in bobbin threads to use up miscellaneous colors. The top I pieced and quilted with Aurifil 40wt [Medium Mint], as it blended with both the blue and green scraps. At any rate, it was a fun experiment, I used up some scraps, and it'll serve me well in the kitchen. Now back to quilt-making!

Wednesday, August 30, 2023

Threequel

It feels great to have another quilt finish before the summer is quite over here in the Pacific Northwest. My third plaid-ish quilt (see Scrap-ish Plaid-ish and Twofold), the Mini Plaid-ish quilt pattern is also the creation of Erica/@kitchentablequilting, and is a free tutorial that uses several different scrap sizes. 
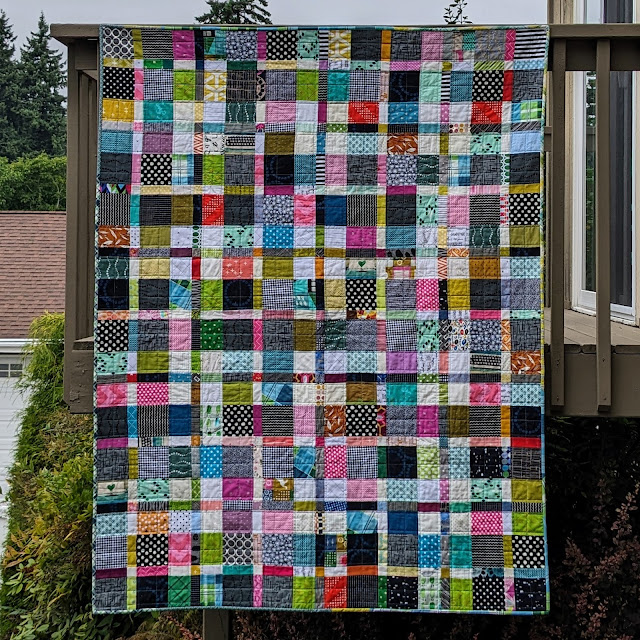
The Mini Plaid-ish is basically a smaller version of the original Plaid-ish, which was 64" x 82". The mini is 58" x 66". And just for reference, the Plaid-ish2, which is similar yet different from those two, is 69" x 86". So yeah, the mini is definitely the smallest of the three, but still a very nice lap-size. I'm more than pleased I was able to create my quilt top entirely from scraps from the scrap basket. Where Erica did not repeat fabrics in her version, my goal was strictly to use the scraps, and there are definitely some repeated prints, and I'm ok with that.

Cutting the scraps for a quilt like this is no-doubt the most tedious part, with the smallest pieces measuring 1.5" square.... smaller than I usually choose to work with. But there was really never any doubt in my mind that I'd make this third plaid-ish version. By now, it's tradition. haha

Rather than over-worry about value, I focused on choosing 'light' fabrics that were low-volumes, 'medium' fabrics that were pretty much any non-neutral color, and 'darks' that were primarily black or gray. Erica said, "even if your values aren't perfect your quilt will turn out great." and I trusted that to be true. And I do see that the plaid in my finished quilt top may not be quite as pronounced as others, but I'm totally fine with it. I let my scraps speak, and that was my goal.
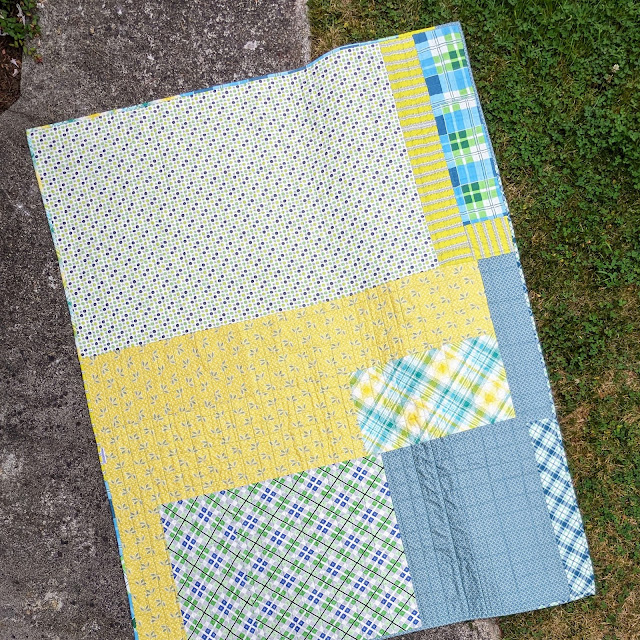
For the quilt backing I combined a mix of Denyse Schmidt fabrics that I'd long had stashed. And wouldn't you know, I had just enough of the trimmings to make a scrappy binding from them. A few of the prints can also be found in the quilt top, though I don't think all. Still, it was a satisfying choice.

For quilting, I went with an uneven grid, which I'd done on the original with good result. I stitched along with seams for some lines, and marked others with my hera marker. It was all quite stress-free quilting, for which I was grateful. Now, whenever I quilt a grid, I use Erica's method: from center out to the right, then rotate 90-degrees, and repeat, etc. etc. It works so well, and I really like how the grid quilting suits the quilt design.  Probably the biggest surprise might be that I used Aurifil 40wt 1148 [Light Jade] thread for quilting. While piecing the blocks into a top, I'd felt like there was a lot of pink in the mix. But when I started considering quilting thread choices, that jade just really worked. Plus it was fun! I like to think by using it and the binding which has plenty of teal and green in it, I've changed the focus somewhat from the pink to the cooler colors I prefer. That part could be wishful thinking on my part but let's go with it, ok?


So anyway, this was a satisfying finish. I expect this quilt will be used around the house as we head into fall.

Tuesday, August 15, 2023

One More Time

After finishing up my recent Both Sides Now, I had scraps! And rather than toss them in the scrap basket, I started to piece them together, made a small quilt top (first photo), then a few days later, cut it up and pieced it back together again (second photo). Then it waited for me for a couple of weeks while I worked on other things.

So I finally got back to it over the weekend. Luckily I hadn't put away the stack of fabric I'd pulled from to support those scraps - a Marcia Derse print, Spotted Graffiti in Thimbleberry, along with Konas Lipstick, Poppy, Eggplant, Sangria, Tomato, Wine, and Rich Red. Kind of an odd combination, but even so, I really love it.

Along with the quilt front, I'd pieced a back. 

And for quilting, I pulled several Aurifil threads in several weights - 50wt 1103 [Burgundy] and 2250 [Red], 40wt 2570 [Aubergine], and 28wt 2260 [Wine] and 2265 [Lobster Red]. 

I did vertical straight-line quilting with the red threads to start, ranging from 1/16" to 5/16". And then I went back and did some fancy straight-line using the purple. In retrospect, that purple thread stands out an awful lot, but I do enjoy the added angles it adds to the piece.

The piece is bound in Kona Wine and measures 16" x 22.5". I had a little trouble getting good clear photos of it, but the one below is the truest of them all.


This piece was totally for fun, and wouldn't you know, I still have scraps left! Hmmm. What to make?