Showing posts with label sewing machine cover. Show all posts

Monday, January 4, 2016

2015 Finish-A-Long: Q4 Finishes

There was a part of me that really thought I could make it happen. But a weeks-long virus that left me listless, Thanksgiving travel, Christmas prep. Well it all added up against me. So mark me down for 2/3 for my Q4 list. I'll get over it.

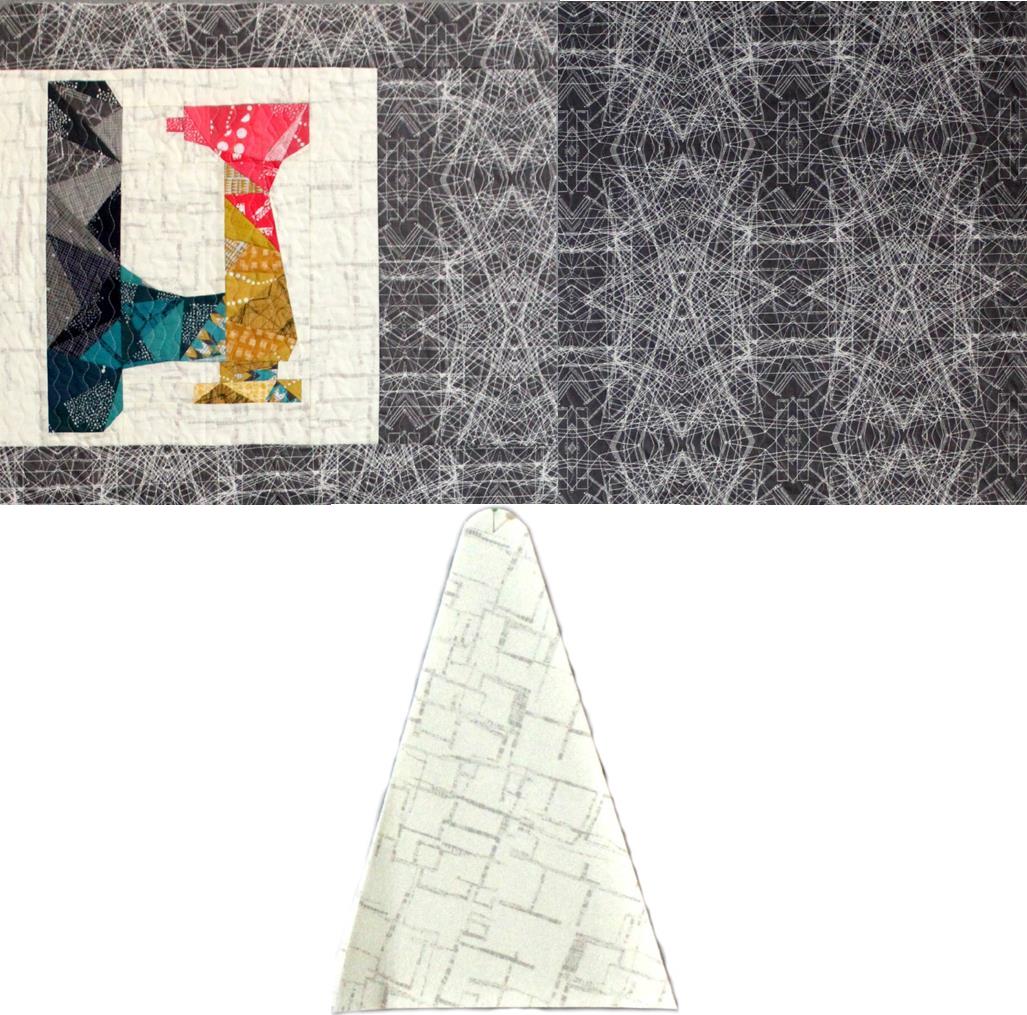
1. I'd made Quiet Play's Geometric Sewing Machine block late in the summer and had decided early on that I wanted to incorporate it into a sewing machine cover to fit my machine when my thread cone was on.


I made it up as I went and it actually worked!


2. I had the top of my mid-century modern Bee Sewcial quilt all pieced together when the quarter started...


and though you're probably sick of it by now, Mod Mood still feels like a pretty major accomplishment.


3. And here's where I slacked off. I only had 2 more borders for my SMQG BOM medallion quilt top. It seemed so doable. But instead of sewing on it, I wrote round-ups for the guild instead: one each on quilt backs and basting, quilting, and binding and labeling.


So with the end of the year in sight, I gave it a push last week and at least got those remaining borders on. Guess what'll be at the top of my 2016 FAL Q1 list? You got it!


Time to get going on next quarter's list! I sure hope you're joining me in the 2016 Finish-A-Long!

Sunday, November 22, 2015

Studio Seven :: Customized Sewing Machine Cover

Years ago, I made a perfectly good sewing machine cover using Camille/thimble blossoms' Just Swell pattern, and it served me very well until I purchased a cone of Aurifil 50wt late last year. Quite simply, the original cover no longer fit. And even though I sew frequently, if not covered, my machine gets very dusty very quickly. So I've been wanting to replace my method of tossing a small quilt over the machine with a cover that actually fit it.


Back in the summer, when I made the paper-pieced Geometric Sewing Machine by Kristy/Quiet Play, I though it would make a fun front for a sewing machine cover. Nowhere did I find a pattern for a cover to accommodate a cone, so I finally had to wing it.

This isn't a full-fledged tutorial with photos of every step, but those willing to take a gamble too, here's what I did, with all seams being 1/4":

   1. Measure in front from table to top of thread holder - the tallest point of your machine. [front height]
   2. Measure in back from table to top of thread holder - the tallest point of your machine. [back height]
   3. Measure widest portion of your machine. [width]
   4. Measure deepest portion of your machine. [depth]
   5. For the front panel, I added 1" to my front height and width measurements and framed my paper-pieced block to become that dimension. I placed it on top of a piece of cotton batting and quilted. (If you want to do dense quilting, or have more leeway, quilt your front panel before trimming to size.) Of course, any block or design as a focal would be fine or even a single fabric.
   6. For the back panel, I added 1" to my back height and width measurements, placed it on top of a piece of cotton batting and quilted. (If you want to do dense quilting, or have more leeway, quilt your back panel before trimming to size.)
   7. Sew front and back panels together along top edges and press open.


***Note that while I thought my front and back heights might make more of difference in how I assembled the final piece, it really didn't, so if I was to do this again, I'd probably make one long panel, as shown below.


8. For the end pieces, choose an ultra firm fusible stabilizer as a base. I used pellon Peltex 71F. See diagram below for measurements of end pieces. For the top curve, I used a roll of painter's tape with a 3" center. I drew right on the non-fusible side of the stabilizer, fused onto my fabric, then cut out. You'll need two, one for each end.


9. Now that you have your front/back panel and end pieces, use them as templates to cut out lining pieces.
10. For outside of cover, find center of panel piece on one side and mark with a pin (or marker). Fold one end piece in half lengthwise to find the center top, and mark it. I found it easiest to start sewing the pieces together at this point, down along one side of end piece. Then flip as needed and sew down the other side of the end piece. Repeat for opposite side. Now your outer cover is complete. If needed, trim any pieces necessary so the bottom edges are even all the way around. My trimming was minimal, but there was a bit.


11. Repeat step #10 with your lining pieces. Turn right-side out.
12. Slip lining into outer cover so right sides are together. Pin along edges, matching corners. Sew seam around this edge, leaving an opening of 10-12" long back edges, back-stitching at beginning and end of stitching.
13. Turn entire piece right sides out, and tuck lining into cover, pressing edges well. Press seam allowance in at opening and pin. Top stitch along entire edge, catching seam allowances of opening securely.


So, I made it up as I went and it turned out ok! It is tall, but it serves the purpose well, and besides....this project was on my 2015 Q4 Finish-A-Long list!

For previous studio updates, see hashtag #aqtstudio on Instagram, or individual posts below:

Linking up with Sew Modern Monday.

Tuesday, May 22, 2012

W.i.P. Wednesday

It's hard to believe it's W.i.P Wednesday already! It's been a crazy busy week, but I've managed to crank out some little projects and finish a quilt for the festival. So all's good on the sewing front.

Completed projects (click links for full posts)
Zakka Style Sew-Along project #7: Rain Cloud Mug Rug. This was a whole lot of fun in a small package.

Sewing Machine Cover and Lined Drawstring Bag for daughter dear's birthday - in her colors, of course.


Hopscotch - finished in the nick of time for the Bloggers' Quilt Festival! (620 entries last time I checked. Now THAT'S a festival!)

FAITH Circle Pouch - can't show it yet, but it should be with my partner soon!

Modern Blocks Bee May block and Ohio Star blocks for FAITH circle's May quilt

Ongoing projects
Japanese x and + blocks Round 2 - I'm cutting it kind of close, but I have five blocks cut out for the swap and one made up to keep. Sorry I didn't get to this sooner, but oh well.

Upcoming projects
* Let's Get Acquainted project
* more Zakka - unfortunately probably not getting to project #8 this week
* Always Bee Learning June blocks - Tokoyo subway NEW
* Quilt using my 4x5 blocks from rounds 1, 2, & 3
* Tutorial for pieced binding
* QWERTY variation
* Solstice Stars quilt
* a quilt to coordinate with my Christmas tree skirt - On a Whim ??
* scrappy Metrolink
* Plus quilt for my sister-in-law - waiting to see her palette

Linking up with W.i.P. Wednesday.

Sunday, May 20, 2012

Even More Littles

After finishing up my mom's mother's day gift, I had less than a week to stitch up a birthday gift for my daughter! I was pretty sure she could use a sewing machine cover, so I stitched up one of her favorite blocks times six, and basically made a mini quilt with side ties.
I did some simple wavy quilting in both directions, backed and then bound it in navy Lizzy House Jewels.
Then, of course, I needed a gift bag. So out came Jeni's drawstring bag pattern again - this time I made The Artist Bag, 16" tall, made with Kona Surf. I'd yet to use solids in making Jeni's drawstring bags, so I decided it was high time to give it a go. With an accent of black and white Riley Blake chevrons and black twill tape ties, it turned out quite striking.
I used one of my favorites, Half Moon Ovals, for the lining which I think suited the bag perfectly.
Definitely another fun couple of finishes.

Linking up with pieceful life: show off fridaySlash the Stash, and Summer Sewing Contest.