When I shared the quilted bookmarks I'd made for our Little Free Library, I didn't really expect the response! Especially in the LFL Facebook group, there were lots of requests for a tutorial.
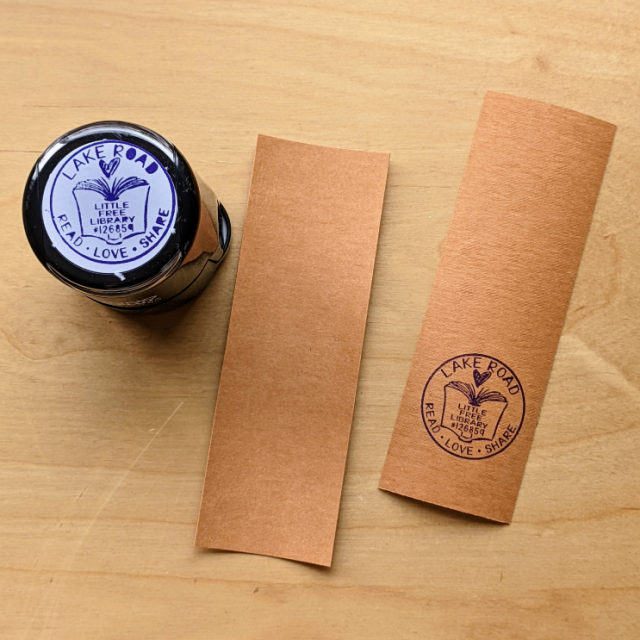
The idea started when my hubby and I got a personalized stamp for the books that pass through our Little Free Library, and we thought it might also be fun to offer bookmarks to our visitors along with the books. Soooo with a few scraps and a bit of kraft-tex, we came up with a prototype we thought might work.

Truth is, I'd had a roll of kraft-tex (a kraft paper fabric) in my stash that I had never tried, so when I was thinking of how to make the bookmarks, it seemed worth a try. For one, I could definitely stitch on it; and secondly, our personalized stamp would work nicely on it too. Here's how I made ours:
With a rotary cutter - the one reserved for cutting paper - I cut 2" strips along the edge coming off the roll. Then each strip was cut into 2" x 6" pieces - three cut from each strip. You'll need two pieces for each bookmark. If desired, decorate the 'back' of the bookmark as desired. If using a stamp, like we did, it's a good idea, though not absolutely necessary, to stamp a bunch and leave them for several hours to dry. I didn't on my first batch, and though the stamped back did not smear, it did leave some ink on my sewing machine, which easily washed off.
Note how, due to being rolled, the bookmark-sized pieces curve just a bit. That actually is an advantage, especially when it comes to the sewing. Otherwise the corners could get caught by the footplate and impede progress. Anyway, take strips of fabric - I used quilter's cotton - and cover the surface of the bookmark. Lay one strip down (the center piece in the photo below), then stitch another strip on either edge, right-sides together. Finger-press them both away from the initial piece.


What a lovely and fun idea! Love this!
ReplyDeleteVery colorful, useful and cheery!
ReplyDeleteThat is so cool...something simple but will give a lot of joy. And looks like some interesting books there, too.
ReplyDeleteThe quilted and free bookmarks are a great addition to your little library. They are so happily stitched, who could resist using one. Love your little library stamp.
ReplyDeleteCute bookmarks! Thanks for taking the time to write up the tutorial. xo
ReplyDeleteSuper idea!
ReplyDeleteIt's so nice when things like the slight curl of the Kraft-tex end up being beneficial. The bookmarks looks like really lovely additions to your library. I wonder if you'll see one return in a book or inspire other innovations in libraries around you? :)
ReplyDeletethose are so cute. I think I might make some for the children's shop at our church bazaar! hmm....
ReplyDeleteLove this idea for our church fair, grandchildren, etc.! I do wonder if the raw edges of the fabric will fray? Should they be zig zagged or decoratively stitched around the edge, use fray check or glue the edges down? Or did this not seem to be an issue? Thanks!
ReplyDeleteYes, over time, the edges will fray, so they are not a keepsake item. But I've been using mine for 18 months and it's still in good shape. I think it's all up to you - finishing the edges off definitely would add to its longevity.
DeleteThanks so much!
DeleteJust beautiful…I thought about the fraying of the fabric also - then I wondered if you could leave 1/4” of fabric when you trim, glue it to the back of the paper like you do with English Paper Piecing then glue the back on and do the 1/8” all the way around the book mark. That may help them to stay longer - be a keepsake!
DeleteThat's a great idea! That would certainly help the edges not fray.
DeleteI was thinking about using the picking shears around the edges.
DeleteDefinitely try it! I'm not sure mine would work well on this thickness but maybe?
DeleteThis really got me thinking about how to use up scraps of fabric. I can't wait to try the kraft-tex paper fabric. I was thinking since the back can be stamped on, etc. why not let the receiver of the bookmark write their name on the back or draw their own design. Also, the tassels could be made with yarn, twine, etc. I am so glad I found this pattern. Thank your. It something I could have my granddaughters sew or design.
ReplyDeleteVery cute idea and I love the fact you have a little free library❤️
ReplyDeleteThanks! We love having a LFL!
DeleteWhere can one purchase the kraft-tex paper?
ReplyDeleteI last found it on Amazon. If there's a JoAnns of Michael's in your area, they might have it too!
DeleteI found it on Amazon
ReplyDeleteThat's where I found it most recently too. Thanks!
DeleteWhat about the edges fraying?
ReplyDeleteThey will over time. I'm still using one of the bookmarks made in this batch, and it's serving me well and looking ok. They won't last forever, but will for quite a while.
DeleteGreat idea! So cute and I’m sure your visitors enjoyed the nice surprise. I read a lot and will probably make some for me and the other readers in my life. Thank you for sharing.
ReplyDeleteGlad you like them. I think they're fun. It's about time to make more!
DeleteIs this basic brown crafting paper? Or a specialty product?
ReplyDeleteIt's kraft-tex - heavier than crafting paper. Here's a link: https://www.ctpub.com/kraft-tex-basics-original-unwashed-rolls/. You can also get it on Amazon or at Joann's I bet.
DeleteSo your bookmarks are fabric in the front and kraft tex in the back? I realize that I could put fabric on both sides, is there a reason you didn't Would it be hard to do?
ReplyDeleteYes, the bookmarks are fabric on the front, and kraft tex in the back. That's because I wanted a way to stamp them with our personalized little free library stamp. I think it would be easy enough to do fabric on both sides. Maybe layer fabric - kraft tex - fabric in a bigger size, then cut them into bookmark shapes?? Just a thought.
Delete