Showing posts with label tutorial. Show all posts

Wednesday, October 28, 2026

Zigzag Grid

Back when I shared about quilting No Rest for the Weary, I mentioned being inspired by a design I got from the AQS blog a couple of years ago: 25 Nine Patch Quilting Designs. The link to the post wasn't available any more, but I did have a diagram of it.


Well luckily, one of my followers, Dot, used the Internet WayBack Machine to find the link! So enjoy! Meanwhile, for you and me both, I thought I'd document how I stitched my variation of this pattern. 


Excuse my imperfect diagram above, but hopefully you'll get the idea. I quilted a basic (3") grid first - the red and blue lines. I follow Erica's @kitchentablequilting Grid Quilting method: top to bottom from center to right hand edge; rotate 90-degrees to the left and repeat three times. It comes out great every time! Then I quilted the 45-degree angled lines (yellow). Lastly, I quilted the 60-degree lines (green). All lines were marked with my hera marker prior to stitching. And by looking at the diagram above, you see I could have continued on and stitched more 45-degree lines (black), but I didn't feel No Rest for the Weary needed quilting that dense. Maybe another quilt, another time.


It was a bit of a time commitment to quilt this design - basically four complete passes across the quilt. But I think it suited the quilt well, and it wasn't hard to do.

Monday, April 27, 2026

Making Scrappy Potholders

A while back, my friend Linda @flourishingpalms said she'd appreciate a tutorial for how I make potholders - specifically the layering sequence of fabric, batting, and Insulbrite. Knowing I could quite easily provide that, I put it on my 'to do' list for 2026. Finally, when I was in the mood for some scrappy free-sewing last week, I knew the time had come.


Not all potholders need to be scrappy, of course. Feel free to use orphan blocks, or make any pattern you wish for the front. For the purpose of this tutorial, I sewed scraps together with the goal of two 8" square-ish potholders. I stopped piecing when my slabs were 9"-10" square.


Of course, then I needed backings. I opted to use larger sized scraps this time, though sometimes I choose a stashed print so the pair has matching backs.

I like my potholders quilted, so here's where the layering comes in. I place the backing right-side down, then top it with a layer of Insulbrite.


Next comes a layer of cotton batting.


And finally, the pieced slab is placed on top, right-side up. I like to baste the layers with a shot of spray baste, but feel free to baste in whatever way you like. It won't take much, since the quilt sandwich is so small. 


Now quilt as desired. Here too, it won't take much. I often like straight lines or a grid, often following the lines of the piecing OR marked with a hera marker. Below are examples of the type of quilting I usually do, from a batch of scrappy potholders I made back in 2022.

And below is how I quilted this pair.


Though I've made potholders in a variety of shapes, these days I almost always trim them with the unique shape I saw Hannah Haberkern @verdigrissewing use several years ago. For my template, I drew an 8" square on copy paper, then rounded two opposite corners. The nice thing about making your slabs a little larger than needed is that you can choose the orientation later in the process - straight on or angled.


For this pair, I chose angled.

Once trimmed into a square, I use a marking pen to trace the rounded corners, and then cut along those lines with scissors. I just get a neater corner that way than with a rotary cutter.


Then it's time to bind! Though maybe not quite necessary, I like to use bias binding on these. About 42" of binding is plenty for each one. Though I often use 2" binding for hand-binding quilts, I like 2.25" wide for potholders, as I tend to sew it completely by machine. Machine sew onto the back, then fold over to the front. When machine-binding, I find frequent use of wonder clips to be a big help in keeping things in place.


So once they're bound, they're done! 


I hope you find this tutorial helpful! Let me know if there are any questions. And I sure hope you enjoy making some of your own. I find them a terrific way to use some scraps!


Friday, August 5, 2022

Improv eXtra Block

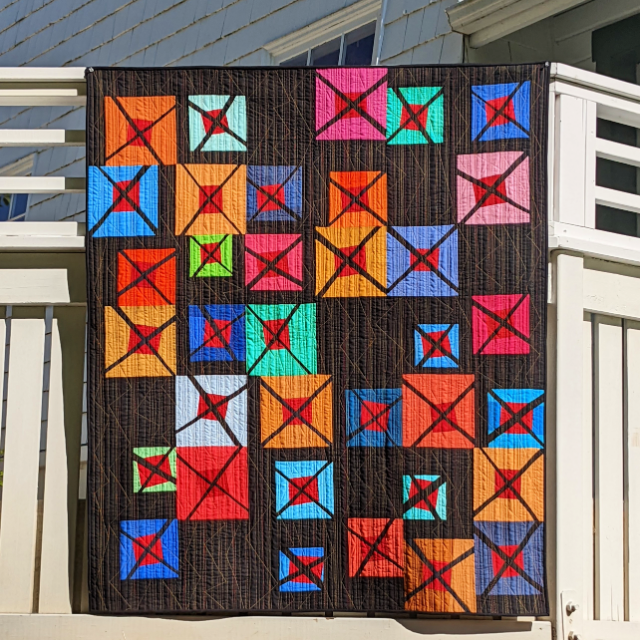
During (and after!) the making of my eXtra quilt, I had a lot of requests for a tutorial for the improv  blocks that make up the design. So here's a quick look at how the blocks came together. Remember, they're improvisational, so exact measurements won't be given. I made my blocks with mostly scraps, and most pieces were cut ruler-free.


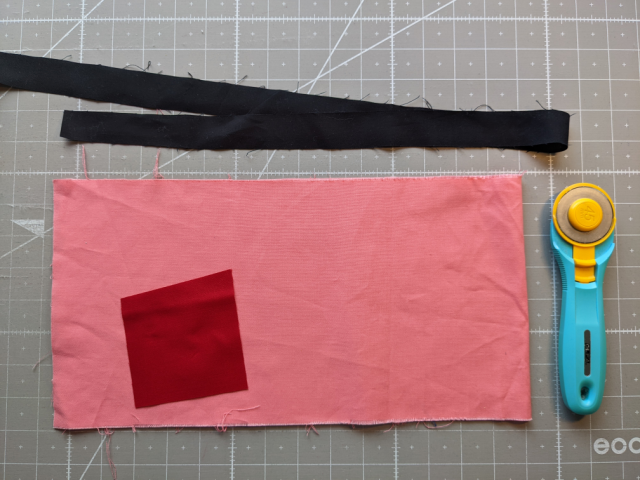
1. Begin with a center (mine were approximately 3-3.5" square), a main contrasting color, and a strip of black approximately 1" wide.


2. Cut an end off of your scrap about the width of your center block.


3. Cut end approximately in half, creating a piece for either side of the center block.


4. Sew side pieces onto the center block, press, and trim long edges if necessary to create straight edges. Cut two lengths from remaining scrap for top and bottom of the block.


5. Sew top and bottom portions onto center strip and press.


6. Use rotary cutter to slice block in half on the diagonal, cutting approximately through the center corners.


7. Sew the 1" black strip along one diagonal edge, trim off excess, and press.


8. Position other half of the block along the edge of the black strip, checking on alignment before sewing. Reposition and pin, if necessary. Sew block into a square and press.


9. Use rotary cutter to slice block in half on the opposite diagonal, cutting approximately through the center corners.


10. Repeat steps 7. and 8. for second diagonal.


11. Now your basic block is complete.


12. To make your block more wonky, place square ruler over your block, angling it slighly, checking to see how large of square you are able to cut. In this instance, I've decided on a 8.5" block. Cut first two sides of your block. Finished block size will depend on the size of the scraps used and the dimensions used up until this point. I chose to trim my blocks into three sizes for my eXtra quilt, but they can be whatever you choose.


13. Reposition your block and rearrange your ruler to cut the remaining two sides of your block.


14. Now you have your completed eXtra block!


Well that was fun, amIright? Be sure and let me know if you give the block a try!

Friday, November 1, 2019

Pieced Batting

The other day, as I was piecing batting scraps together for my latest quilt, I was so pleased how nicely they went together, I thought it worth sharing. I know lots of folks zig-zag their batting scraps together, but I've never had good luck with that method. I end up with bumps and the result is never as smooth as I'd like. So enter an alternative method.


To start, I almost always use Warm & White batting, which is pretty flat to begin with. It's important to have straight edges butting together, so if you need to cut fresh edges on your batting scraps, definitely do. Since I always have a bolt of fusible SF101 interfacing on hand, I cut several 1" strips to get me started. Then it's the simple process of laying your scraps on your ironing surface, straight edges together, and ironing a strip of interfacing over the 'seam'. Once you iron on one strip, add on another, slightly overlapping the ends. When you reach the edge of your batting, just trim the strip. Then I like to turn the whole piece over and do the flip side of the seam as well.


When it comes to quilting quilt sandwiches with this kind of pieced batting, I haven't found any issues. Instead, I celebrate the smoothness of the batt seams and the use of those batting bits. All in all, a very good thing.

Wednesday, September 18, 2019

10 Ways to Make a Quilt Back II

A couple of years ago I first shared 10 Ways to Make a Quilt Back, and it seems time to refresh it a bit. Part of the impetus is the #partyinthequiltback hosted by 3rd story workshop over on Instagram. "It's a festival with daily prizes, community, and fun," running from September 18-22. 

So here are some of the many ways I create quilt backs. It's rarely my favorite part of the quilting process, but a necessary one nonetheless. And it's definitely good to have options, right?


1. Whether it's purchasing a wide-back for a large quilt, or discovering an unexpected find in the ole stash that works perfectly with the smaller quilt top I've created, a whole-cloth is quick and satisfying. The time I used a panel from Jeni Baker's Nordika turned out really fun, showing off the quilting like it did.


And for this baby quilt, it was a chance to really show off a sweet print.


Baby Coin

2. Matched-seam backing is one of the newer techniques I've tried, and I'm still perfecting my skills. Of course, you need to have an extra long length of fabric, depending on the fabric's design, but it's totally worth it.


3. Two years later, it's still true. If I made a backing of stashed fat quarters for all my future quilts, I think I'd be set for life. Simple to sew together, and a great stash buster.


4. Using a design repeated from the quilt front is probably my favorite way to create a quilt back.


5. A close second is using just an element from the front design....


or repeated elements.


6. Something I've just done a couple of times, but with great effect is the use of border prints. I was so pleased how this turned out and I need to do it again!


7. Of course, the combination of simple geometric elements is always a win-win.


Both the solid version above and the gingham one below completely use leftover fabrics from the front, a matchy-matchy approach I really love.


8. It's also great fun to super-size just one block from those on the quilt front.


9. And surprise surprise, sometimes an improvisationally pieced back is just the ticket. Oh yeah.


10. And lastly, why not back a quilt top with another quilt top? Won't do a bona fide two-sided quilt every time, but I loved doing it here. And for those of you who have stacks of quilt tops ready to quilt.... well why not?


So tell us about your go-to quilt back, will you? And consider joining in with
#partyinthequiltback. Fun times and inspiration to boot.